Neither one nor Many
Software engineering blog about my projects, geometry, visualization and music.
If you are behind a firewall, chances are you can tunnel through it with Proxytunnel. This post does not describe anything new, but I think is still useful because it includes configuration of apache and ssh client examples.
The goal is being able to tunnel through a (corporate) firewall/proxy. And even more important, have your communication encrypted. This also has the advantage that even if you are not restricted, a corporate firewall/proxy can still not cache the websites you visit.
We do this by establishing an ssh session to some machine, and useing ssh portforwarding from there. This target machine may be your home computer or some server on the internet.
If you are able to run your SSH server on port 80 or 443, you might want to do that because then you can simply define the firewall as a proxy in PuTTY. The firewall should probably allow the communication, especially on 443 as this is normally for HTTPS and encrypted (as is SSH). I haven't tested this, but I believe you should be able to skip the proxytunnel stuff.
I assume you already have Apache running on port 80 and 443, so switching SSH to one of those ports won't be possible. We simply configure Apache so that it becomes itself another proxy that can make the connect to port 22, or 42 in the example I'm going to use. If you do not want to use apache, you can put your webserver of choice on a different port and use Apache's mod_proxy to redirect a virtual host to it.
In short how it works:
Your ssh client will NOT communicate directly to your ssh server. Instead it will communicate with proxytunnel, and proxytunnel establishes the actual connection. Proxytunnel will first connect to the "corporate" firewall/proxy and request a connection to your server on the HTTPS port, The firewall will then consider all communication HTTPS encrypted traffic and therefor allow it. But actually a mod_proxy is configured to respond to connection requests to specific destinations (using CONNECT dest:port HTTP/1.1). So we issue another CONNECT connection to the destination + SSH port. From that moment on proxytunnel simply redirects all read/write to the ssh client.
Once connected to your SSH server you can simply use the Port forwarding stuff that the SSH protocol supports.
Example config
I will be using this hosts throughout the post, you will have to replace these.
| Ip | Host | Description |
|---|---|---|
| 46.51.179.218 | ext.cppse.nl | My server machine, runs the apache @ port 80 and destination ssh @ 42 |
| NA | whatismyipaddress.com | Some website @ port 80 that displays remote host (optional for testing) |
| 172.18.12.11 | NA | The firewall @ port 8080, accepts only connections to ports 80,443. |
Configure proxy on some Apache server
You need mod_proxy, mod_proxy_http, mod_proxy_connect modules enabled in Apache. (Not 100% sure about mod_proxy_http.)
Create a VirtualHost like this:
<VirtualHost *:80>
    ServerAdmin no-reply@ext.cppse.nl
    ServerName ext.cppse.nl
    ErrorLog /var/log/apache2/error_log
    TransferLog /var/log/apache2/access_log

    # Allow proxy connect (forward-proxy) to servers only on port 80 (http) and 42 (at my box SSH)
    ProxyRequests On
    AllowConnect 80 42
    # Deny all proxying by default...
    <Proxy *>
        Order deny,allow
        Deny from all
    </Proxy>
    # This directive defines which servers can be connected to.
    # Access is controlled here via standard Apache user authentication.
    <ProxyMatch (46\.51\.179\.218|ext.cppse.nl|whatismyipaddress.com|www.whatismyipaddress.com)>
        Order deny,allow
        Allow from all

        #You should replace the above two rules with something like this:
        # Deny from all
        # Allow from <some_host>
        # Allow from <some_host>
    </ProxyMatch>
</VirtualHost>
This example will allow from any source to CONNECT to four locations: 46.51.179.218, ext.cppse.nl, whatismyipaddress.com and www.whatismyipaddress.com. Only destination ports 80 and 42 are allowed. We'll be using 46.51.179.218 on port 42 (SSH server), and {www.}whatismyipaddress.com on port 80 (plain HTTP) for testing.
- Add this VirtualHost as the first virtual host. Loading it /after/ other vhosts made the proxy deny all CONNECT's on my machine.
- Port 443 would be nicer, again, on my machine I couldn't do this because I have other HTTPS sites configured, and couldn't get it to use the proxy "as HTTP on port 443". My apache seems to expect SSL communication although I didn't enable SSL on the vhost.
- The vhost name "ext.cppse.nl" seems unimportant, the Proxy settings appear not to be specifically bound to this vhost. This might explain why using port 443 didn't work.
- I can imagine there would be some more complicated trick to make it possible to configure "unencrypted" traffic over port 443 for a specific vhost, butthis works well enough for me.
Test if this proxy works
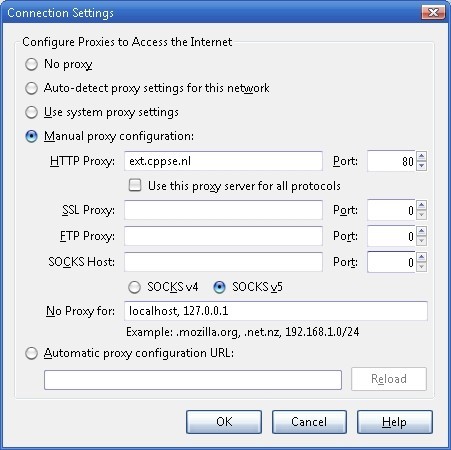
You might want to test this from some location where you are not behind the firewall. Configure it as a proxy in your browser:
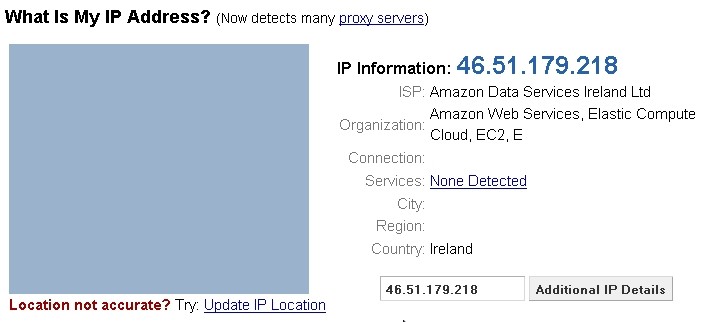
This is why I added [www.whatismyipaddress.com][] and port 80 in the Virtual Host, open it:
- You can also test the SSH connection if your client supports usage of an HTTP proxy.
- You also might want to replace the default allow by the default deny config in the vhost.
- You might want to remove port 80 from the AllowConnect parameter in the vhost, and the whatismyipaddress domain(s).
Configure proxytunnel for PuTTY
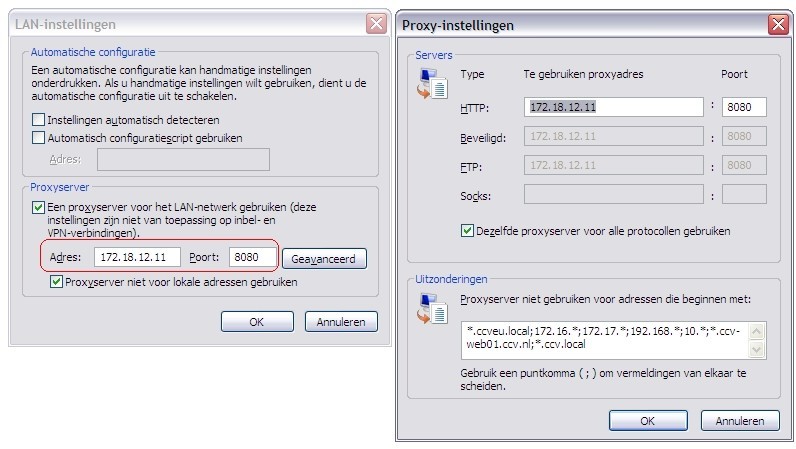
In our example we have the proxy "172.18.12.11:8080", with no-authentication required. If you have a proxy that requires a username and password use the -P "username:password" parameter on proxytunnel. Also see the help for more available options.)
Install proxytunnel on windows
I made a zip file with Putty "Development snapshot 2012-01-16:r9376" because it
supports "local proxy" feature we need to use for Proxytunnel, also included
version 1.9.0.
You can download PuTTY Tray a version of PuTTY that supports local proxy and some more very nice additional features!!
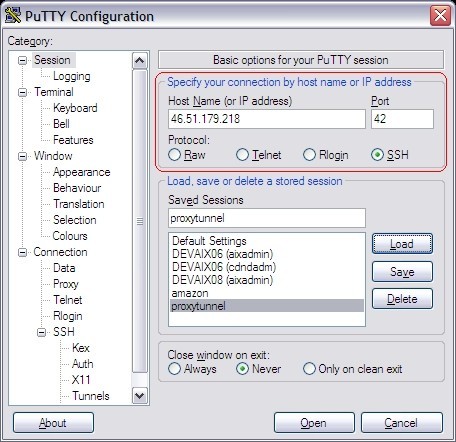
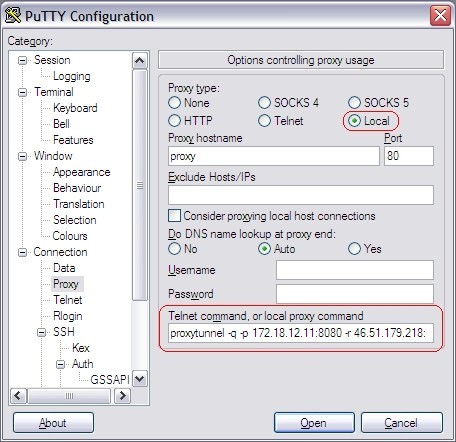
When PuTTY is configured to use Proxytunnel it delegates the connection to proxytunnel, which will first connect to our newly configured proxy "46.51.179.218:80" (the one we configured in apache) using the firewall/proxy 172.18.12.11:8080. Once connected to our proxy we connect to our intended destination "46.51.179.218:42". In PuTTY you use %host:%port (these values get replaced).
This is a command you can use for testing at commandline:
C:\proxytunnel>proxytunnel -v -p 172.18.12.11:8080 -r 46.51.179.218:80 ^
         -d 46.51.179.218:42 -H "User-Agent: Mozilla/4.0 (compatible; MSIE 6.0; Win32)\n"
Connected to 172.18.12.11:8080 (local proxy)

Tunneling to 46.51.179.218:80 (remote proxy)
Communication with local proxy:
 -> CONNECT 46.51.179.218:80 HTTP/1.0
 -> Proxy-Connection: Keep-Alive
 -> User-Agent: Mozilla/4.0 (compatible; MSIE 6.0; Win32)\n
 <- HTTP/1.1 200 Connection established

Tunneling to 46.51.179.218:42 (destination)
Communication with remote proxy:
 -> CONNECT 46.51.179.218:42 HTTP/1.0
 -> Proxy-Connection: Keep-Alive
 -> User-Agent: Mozilla/4.0 (compatible; MSIE 6.0; Win32)\n
 <- HTTP/1.0 200 Connection Established
 <- Proxy-agent: Apache/2.2.12 (Linux/SUSE)

Tunnel established.
SSH-2.0-OpenSSH_5.1
You give exactly the same command to PuTTY although, instead of the -v flag and hardcoded destination you use the -q (quiet mode) (and %host:%port). PuTTY then communicates by reading/writing to the started proxytunnel process, instead of a socket.
This is how you configure PuTTY
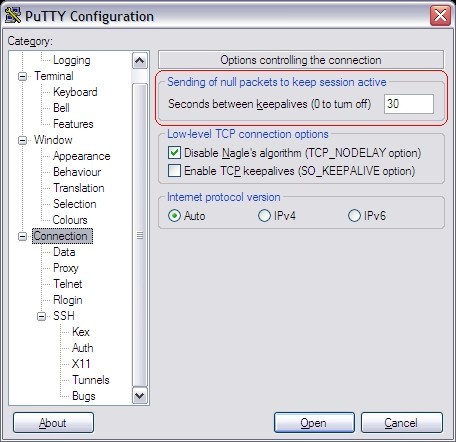
Note that the Keep-alive may be necessary if the firewall we're going to tunnel through actively closes connections if they are idle for longer than xx seconds.
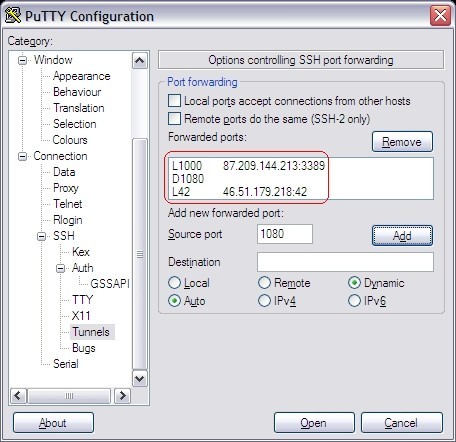
You can configure all kinds of portforwarding.
Install proxytunnel on linux
Download proxytunnel and "make" like any other tool. If you are missing development packages, I may have a precompiled 32 bit version available that might work on your box. Todo: Add download link.
linux-yvch:/usr/local/src # tar -zxvf proxytunnel-1.9.0.tgz
...
linux-yvch:/usr/local/src # cd proxytunnel-1.9.0
..
linux-yvch:/usr/local/src/proxytunnel-1.9.0 # make
..
linux-yvch:/usr/local/src/proxytunnel-1.9.0 # make install
..
linux-yvch:/usr/local/src/proxytunnel-1.9.0 # cd
Just as with PuTTY you need to configure your ssh config: In linux I prefer to keep it verbose (the -v setting, you can use -q for quiet mode). Note that openssh uses %h:%p for host / port replacement.
linux-yvch:~ # cat ~/.ssh/config
Host 46.51.179.218 ext.cppse.nl ext.cppse.nl
        DynamicForward 1080
        ProxyCommand proxytunnel -v -p 172.18.12.11:8080 -r 46.51.179.218:80 \
               -d %h:%p -H "User-Agent: Mozilla/4.0 (compatible; MSIE 6.0; Win32)\n"
        ServerAliveInterval 30
Connecting with openssh should yield something like:
linux-yvch:~ # ssh -l proxy -p 42 46.51.179.218
Connected to 172.18.12.11:8080 (local proxy)

Tunneling to 46.51.179.218:80 (remote proxy)
Communication with local proxy:
 -> CONNECT 46.51.179.218:80 HTTP/1.0
 -> Proxy-Connection: Keep-Alive
 -> User-Agent: Mozilla/4.0 (compatible; MSIE 6.0; Win32)\n
 <- HTTP/1.1 200 Connection established

Tunneling to 46.51.179.218:42 (destination)
Communication with remote proxy:
 -> CONNECT 46.51.179.218:42 HTTP/1.0
 -> Proxy-Connection: Keep-Alive
 -> User-Agent: Mozilla/4.0 (compatible; MSIE 6.0; Win32)\n
 <- HTTP/1.0 200 Connection Established
 <- Proxy-agent: Apache/2.2.12 (Linux/SUSE)

Tunnel established.
Password: *****
Last login: Thu Jan 26 15:55:40 2012 from 46.51.179.218

  __|  __|_  )  SUSE Linux Enterprise
  _|  (     /       Server 11 SP1
 ___|\___|___|       x86 (32-bit)

For more information about using SUSE Linux Enterprise Server please see
http://www.novell.com/documentation/sles11/

Have a lot of fun...
YOU ARE IN A RESTRICTED SHELL BECAUSE THIS ACCOUNT IS ONLY FOR TUNNELING
proxy@ip-10-235-45-12:/home/proxy>
After the "Tunnel established" you continue as with any other SSH connection.
Using SSH port forwarding
It would have been more elegant if the first connect would have been to port
443. Because then the communication, although when sniffing you see the CONNECT statement and the SSH banner in plain text.
From the firewall perspective it is all encrypted data. It just coincidentally
happens to be readable ") .
But after the initial stuff everything is encrypted as we're tunneling SSH.
I'm not sure if it is possible to communicate in SSL to the second proxy,
because then it won't be detectable at all.. the SSL communication would be
encrypted twice!
.
But after the initial stuff everything is encrypted as we're tunneling SSH.
I'm not sure if it is possible to communicate in SSL to the second proxy,
because then it won't be detectable at all.. the SSL communication would be
encrypted twice!
I already included in the PuTTY screenshots and OpenSSH example a Dynamic Forward (socks) proxy on 1080. This means that SSH will start a listener socket on port 1080 accepting connections and tunneling it through the established connection. The SSH protocol supports this, and this feature is (I think) enabled by default, it is configurable on the server in your sshd config.
You can then configure your browser to use the socks proxy, localhost:1080 and all communications will go through the established tunnel. Remote desktop, at the time of writing, doesn't support the use of a proxy, but you can create a "normal" port-forward as for this to a specific destination & port.
If your firewall does not support CONNECT you might want to try cURLproxy, a proxy program I wrote that works simply by downloading and POSTing HTML. Available here: curlprox[cURLproxy].

DISCLAIMER: Okay, probably still almost any firewall. There are a few posts on the internet about how SSH tunnels bypass "almost any firewall", I believe this proxy will probably bypass a whole lot more firewalls.
So I had to do come up with something better than "almost any" .
When is this useful?
ProxyTunnel is awesome as it allows you to tunnel to SSH through--for example--port 443. And due to SSH supporting port forwards you can go from there to wherever you want. If I am correct, it requires that the proxy in question supports the CONNECT syntax.
Sometimes however, proxies are more restricted than that: CONNECT may not be supported; connections are not allowed to stream (i.e., file downloads are first downloaded by the proxy server, scanned for viruses, executables and other filetypes may be blocked); base64 may actually be decoded to see if it contains anything that isn't allowed, it may go as far as to inspect content of zip files and may have restrictions on the maximum file size for downloads (XX MB limit). In that case ProxyTunnel won't suffice.
If you're unfortunate enough to be behind such a firewall, no worries because now there is a way to tunnel through it!
The only requirement for it to work is that you can receive plain text from a webpage, and post data to it. One that you own or have access to. Well If you can't do that, I suggest you look for another Job, because this is REALLY important!!!!1 (Not really but then this proxy solution won't work).
Do not expect it to be very performant with broadband type of stuff by the way.
How it works in short
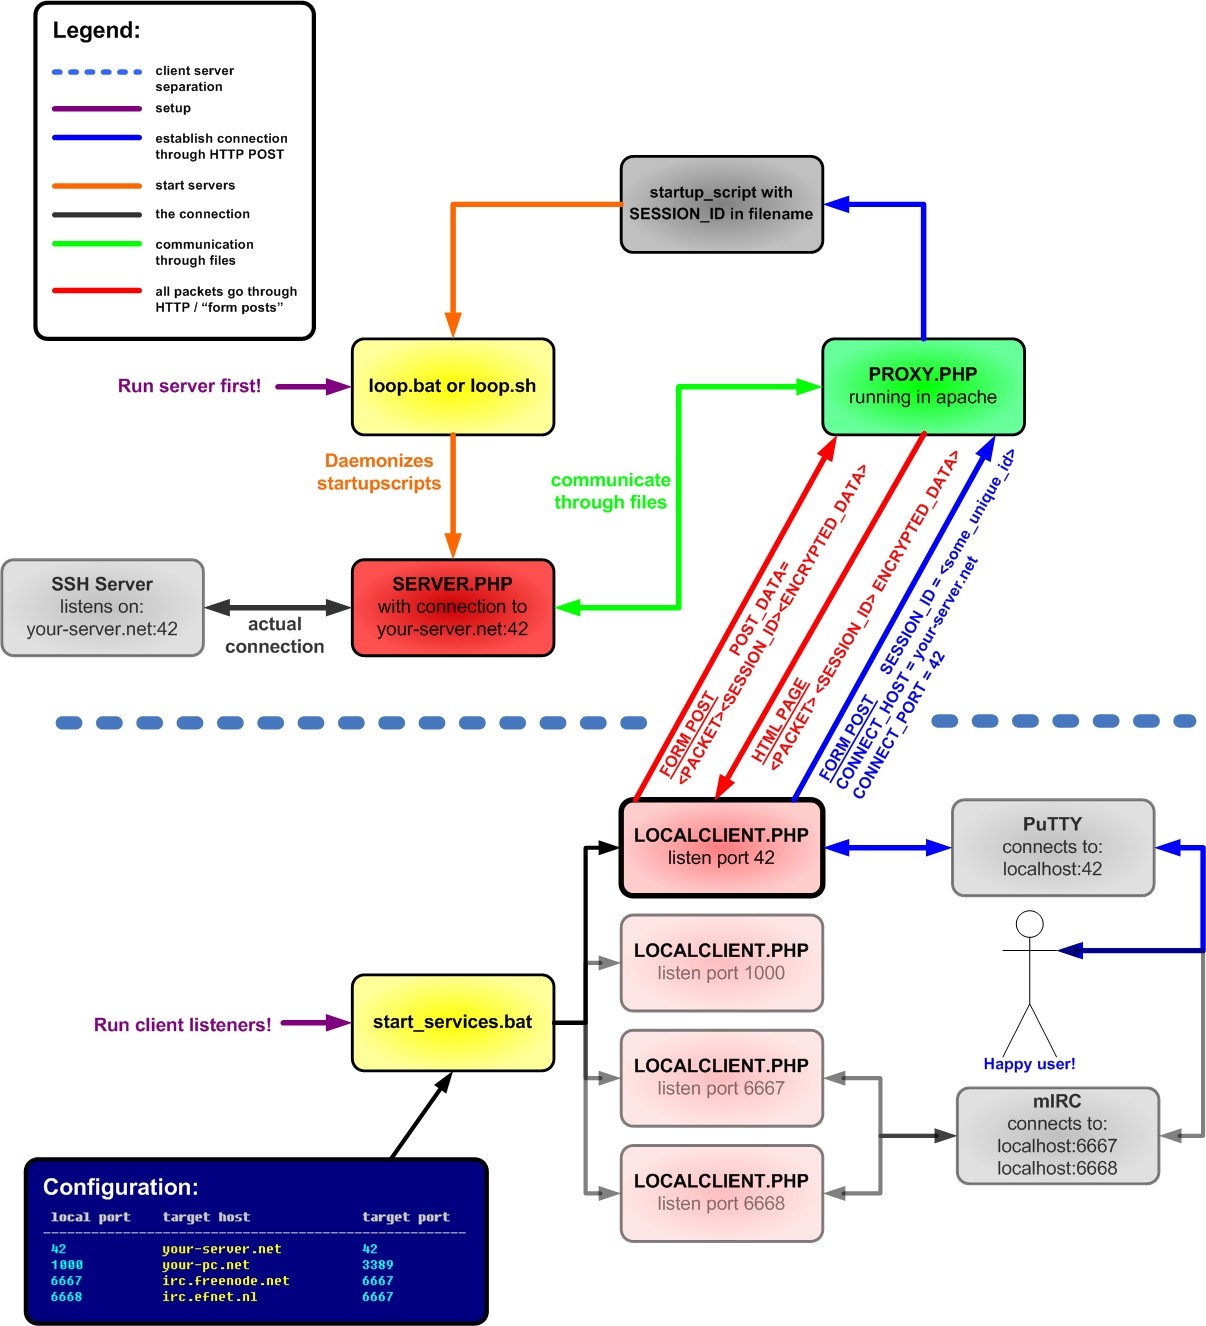
It works with three PHP scripts. And just like with Proxytunnel you need to run one of them on your local computer: localclient.php. This script binds to a local port, you connect with your program to this local port. Each local client is configured to establish a connection with some destination host + port. But the cool part is, it does so by simply reading plain old HTML from an url, and posting some formdata back to it. Well actually it appears to be plain old HTML, because it's the data prefixed with an HTML tag, followed by the connection identifier and the DES encrypted data (converted into base64).
The curl proxy (as I call it, because I use the cURL extension in PHP) retrieves HTML pages like this:
Example of packet with data "PONG :leguin.freenode.net", is sent as the following HTML:

<PACKET>a5bc97ba2f6574612MNIoHM6FyG0VuU6BTF/Pv/UcVkSXM5AbiUrF4BDBB4Q=
|______||_______________||__________________________________________|
       |                |                                           `=BASE64 OF ENCRYPTED DATA
       |                `=Session id / socket id
       `=Fake HTML tag

POSTing back sends a string with the same syntax back, basically only prefixed with "POST_DATA=".
In order for this to work, a second script has to be callable on the web, you must be able to access it, and the same machine has to be able to make the connections you want. For example: http://your-server/proxy.php (you could rename it to something less suspicious; there are some smart things you can do here, but I'll leave that to your imagination ). All proxy.php does is write and read files from a directory, nothing more.
Then a shellscript has to be started to run in background, with access to the same directory. This script scans that directory for instructions, specifically starting server.php processes for new connections. The actual connection is made in the server.php script. And all this script does is read from the same directory for packets received, which it will send to it's socket, any data read from the proxy is written back to the directory, which proxy.php will eventually sent back to the client.
Graphical explanation
You should follow the arrows in the same order as presented in the Legend. Click to enlarge the image.
Design decisions
When I had the idea to make it, I didn't feel like spending alot of time on it, so I hacked it together in a few hours. Then I tested it, it worked and it got me exited enough to refactor it and make a blog post out of it.
- After the encryption of the packets I use base64 encoding, which increases the size of the messages, but it looks more HTML-like. If I wanted to send the encrypted data raw I'd have to do some more exotic stuff, maybe disguise it as a file upload, because AFAIK a plain old POST does not support binary data.
- I use BASE64 and not urlencode on the encrypted data, because when I tested it urlencode produced even more overhead. Of course the BASE64 string is still "urlencoded" before POST, but only a few chars are affected.
- I don't use a socket for communicating between proxy.php and server.php, but files and some lock-files because I preferred them somehow. A database would be nicer, but implies more configuration hassle.
Encryption used
define('CRYPT_KEY', pack('H*', substr(md5($crypt_key),0,16)));

function encrypt_fn($str)
{
    $block = mcrypt_get_block_size('des', 'ecb');
    $pad = $block - (strlen($str) % $block);
    $str .= str_repeat(chr($pad), $pad);

    return base64_encode(mcrypt_encrypt(MCRYPT_DES, CRYPT_KEY, $str, MCRYPT_MODE_ECB));
}

function decrypt_fn($str)
{
    $str = mcrypt_decrypt(MCRYPT_DES, CRYPT_KEY, base64_decode($str), MCRYPT_MODE_ECB);

    $block = mcrypt_get_block_size('des', 'ecb');
    $pad = ord($str[($len = strlen($str)) - 1]);

    return substr($str, 0, strlen($str) - $pad);
}
If you prefer something else, simply re-implement the functions, you'll have to copy them to all three scripts (sorry, I wanted all three scripts to be fully self-contained).
I found my "ASCII key → md5 → 16 hexadecimal display chars → actual binary" a pretty cool find by the way. Did you notice it?
Demonstration
Note that first I demo it where the server is running on an Amazon AMI image. Appended to the video is a short demo where I run the server on my local windows pc (just to show how it it'd work on windows). This second part starts when I open my browser with the google page.
Remote desktop actually works pretty good through the curl proxy by the way. Establishing the connection is a little slow like with WinSCP, but once connected it performs pretty good. I could't demo it because I don't have a machine to connect to from home.
Sourcecode & downloads
Put it here on bitbucket: https://bitbucket.org/rayburgemeestre/curlproxy Placed it under MPL 2.0 license, which seamed appropriate. Basically this means that when you distribute it with your own software in some way, you'll have to release your code changes/improvements/bugfixes (applicable to curlproxy) to the initial developer. This way the original repository will also benefit and you're pretty much unrestricted.
Work in progress...
It will be a lot easier to compile. No longer dependant on the json lib. A single .cpp file (as the code is quite small).
No makefile, just a g++ goto.cpp -o goto -lncurses
Get the source code here
P.S. I added colours:

Updates
24-feb-2013: Now listens for ncurses KEY_RESIZE event so changing window size will redraw.
Bash wrapper script
With Apache (2.2) you could get an generic "Internal Server Error" error message in case the cgi sends the wrong headers. There is probably a setting for this in Apache as well, but I always create a bash wrapper script. For example someapp.cgi:
#!/bin/bash
printf "Content-type: text/html\n\n"
/path/to/actual_appl
This immediately makes the output visible and you can comment the printf statement once fixed. This trick only makes sense if you don't have quick access to a debugger or a core dump.
Running application in chroot
There are plugins for apache AFAIK for running cgi applications in a chroot. I didn't experiment with these, as I simply use my (probably lame) bash wrapper here as well:
#!/bin/bash
sudo -E /usr/bin/chroot /usr/local/src/some_jail /usr/bin/some_appl 2>&1
The -E flag means "preserve environment". To allow this you have to configure sudoers properly (visudo). Something like this:
wwwrun ALL=(ALL) SETENV: ALL, NOPASSWD : /usr/bin/chrootThis is no rocket science but I thought this was a really cool solution to the problem.
First I created a helper function Xprintf to interface with an existing C API that works with (non const) char arrays. Hence its char * return value.
char *Xprintf(const char *format, ...);

// This function works in the following situations

foo1(Xprintf("Hello world: %d", 1001)); // void foo1(char *);
foo2(Xprintf("Hello world: %d", 1001)); // void foo2(const char *);
foo3(Xprintf("Hello world: %d", 1001)); // void foo3(const string);
foo4(Xprintf("Hello world: %d", 1001)); // void foo4(const string &);
foo5(Xprintf("Hello world: %d", 1001),
     Xprintf("...", ...));              // void foo5(char *, char *);
Xprintf cannot use just one buffer because the case of 'foo5' would fail (it would get the same pointer twice).
I needed a different return value, like std::string, so that copies could be returned which would clean themselves up as soon as they went out of scope.
But std::string does not provide implicit casting to const char *, only explicit casting through .c_str().
The call to foo1 would become: foo1(const_cast
The following fixes it, creating a tmp_str class that extends std::string and simply provides the implicit cast:
class tmp_str : public std::string
{
public:
    tmp_str(const char *str)
        : std::string(str) {}

    // g++ is fine with adding this one, xlC isn't
    //operator const char *() const { return c_str(); }

    operator char *() const { return const_cast<char *>(c_str()); }
};

tmp_str cHelperCharArray::Xprintf(const char *format, ...)
{
    char buffer[512] = {0x00};

    va_list args;
    va_start(args, format);
    vsprintf(buffer, format, args);
    va_end(args);

    return tmp_str(buffer);
}
A note why tmp_str is-a std::string and not an is-implemented-in-terms-of: the call to foo4 would fail as it would not accept tmp_str as a reference to string (A parameter of type "const std::basic_string,std::allocator > &" cannot be initialized with an rvalue of type "tmp_str".). )
g++ accepts all these foo* functions, but IIRC xlC doesn't like foo2. In that case I had to cast to const. Adding the const char * operator overload would make some casts for that compiler ambiguous.
mplayer can easily be instructed to render on a custom window with the -wid (window handle) parameter.
// On windows
long targetWindowId = reinterpret_cast<long>(canvas->GetHWND());

// On Linux
long targetWindowId = GDK_WINDOW_XWINDOW(canvas->GetHandle()->window);
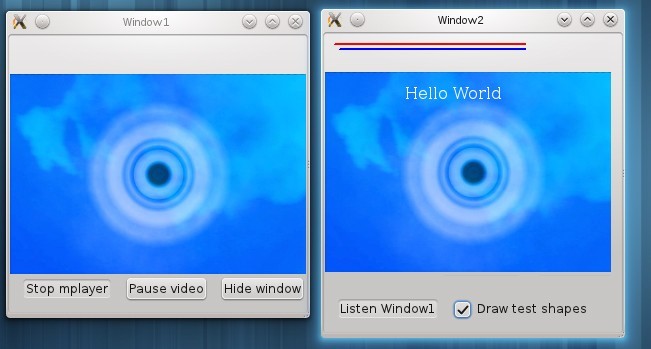
Now that I got it to render on my canvas, I cannot render on top of it without flickering, because I cannot do double buffering. (I cannot control when mplayer renders frames on the window). That's why I add a second window that reads the first window to a bitmap, I can do whatever I want to that bitmap, and display it . This meant that I could no longer use my preferred video renderer on windows -vo direct3d because somehow that setting doesn't actually draw on the window, just in the same region. When reading the first window I'd get an empty bitmap and not the video. I ended up using -vo directx:noaccel in order to properly read it.
Fix overlap problem
This posed another problem, when hovering the second window on top of the first, it interferes with the video as it renders itself in window1 first. I only encountered this on my windows pc:

I decided to ignore this problem and try to find a way to hide the first window so that it wouldn't interfere. I tried minimizing it, Hide(), move it outside the screen, etc. But mplayer would not render the video in these cases. I then tried making the window 100% transparent and this worked. It also fixed my overlap-problem as I could now overlap the windows without problems. Somehow making the windows transparent forces the no-hardware-acceleration-directx renderer to behave differently. Making the window 1% transparent also fixes the overlap-problem.
Fix linux support
On Linux I use the -vo X11 video output, and overlap wasn't a problem. The only annoying thing is that in order to get the GTK window handle you have to include a GTK header in C++, which requires adding a lot of include directories to your include path. Because you need to cast the window handle to a GTKWidget instance, and ask it for the xid.
Result
The code is available on bitbucket and works on Windows (tested Windows vista with aero theme) and Linux (openSUSE 11.4). Makefile and Visual studio project files included.
Where I used this for..
All texts and images are rendered on top of the background video.
Putting source files in separate directory
View youtube video
(don't forget to enable 720p and fullscreen)
- How to put source and image files in subdirectories in DialogBlocks..
- NOTE for git users: If you're going to do this with an existing git repository. My advice is to do a move through git as well: "git mv source dest". So that git knows it was a file move, not a delete/create.
Seperate implementation files on a few panels
View youtube video
(don't forget to enable 720p and fullscreen)
- We put two panels (with their contents) into separate implementation files.
- Show some examples you can do with it (or more easily than before).
- Events and other functions can be nicely grouped into that implementation.
Compiling with MinGW
View youtube video
(don't forget to enable 720p and fullscreen)
- How to add configuration for MinGW
Compiling with Visual C++ compiler with project files
View youtube video
(don't forget to enable 720p and fullscreen)
- Shows how to set the platform SDK.
- Some specific errors you can get w/ DialogBlocks.
- How to use generated project file(s) for visual studio.
- How they handle file changes
- Why to use: autocomplete, debugger, etc.
Settings for Tide graph Casio G-Shock GLX 150
Deploying owncloud via Helm on Kubernetes
How to print an endlessly folding card
i3 floating point window resize percentage wise and centered
My visit to Meeting C++ 2016!
Kerberizing Cloudera Manager
How to screen capture in Windows 10 with HiDPI support
Profiling and visualizing with GNU strace
How to "inspect element" XUL applications
How to debug XUL applications
Circlix Clock
Improve performance Jetbrains IDE when working on remote machine
Enable fsnotifier for Jetbrains IDE's like PyCharm over NFS/SSHFS network share
Nagios 4 + Nagvis + Nagiosgraph + Nagios plugins Dockerfile / Docker image
Qt Applications in Browser
Tweak Battle....
Example rendered video
Zend server And the Return of the Oracle Instant Client
Visualize Issue Ranks in Atlassian Jira Agile board
PhpStorm or IntelliJ suddenly hangs / freezes / keyboard not responsive/ unresponsive while editing in Linux / Ubuntu
Deflate and Gzip compress and decompress functions
Optimizing your website for performance
Lame PHP Parser, visualization and how cool hhvm is!
PHP Benelux 2014
Use cache in http proxy for debugging in webdevelopment
Install NVIDIA proprietary drivers in Ubuntu 13.10 or Linux mint 15/16
Free HTTP proxy for debugging purposes with GUI
Away- nicknames coloring in nicklist mIRC
Visual studio shortcut keys / settings
Raspberry pi camera streaming with crtmpserver test
Video streaming from code with SFML and ffmpeg
![nl][] Dutch PHP Conference 2013
![nl][] Tweakers fotoalbum images uploader
sanitizer - a shortcut key app with explorer integration
benchmarklib: a small benchmarking library
![nl][] watermarker tool
Fixing slow phpmyadmin by rewriting queries using mysql-proxy
ksh "pushd .", "popd" and "dirs" commands
Generating gradients
spf13 vim distribution
phpfolding.vim : Automatic folding of PHP functions, classes,.. (also folds related PhpDoc)
Visualizing (inverse) square root optimizations
Configure highlight weechat in screen and putty
Meta log monitor (or scriptable tail with GUI)
Firefox select behaviour and H264 support
Cool way to provide multiple iterators for your class (C++)
X, Y to Latitude + Longitude functions for (google) maps
PhpStorm and Ideavim {Escape,C-c,C-[} responsiveness
Tweakers logo test
Firebird IBPP use in non-unicode project
Automatic nickname in channel and nicklist colouring in mIRC
Allegro 5 separate process for rendering
Allegro 5 and wxWidgets example
Proxy securely through ANY corporate proxy/firewall
GNU Screen Navigator V2
Some CGI "tips"
Inline printf compatible with char *
Render on top of mplayer using custom window
Starcry rendered videos
Behaviours engine
DialogBlocks Howto
Compiling with DialogBlocks
Git, github, Mercurial, bitbucket
SuperMouser - mouseless navigation
Collection of wallpapers
BASE64 COMMANDLINE
Singleton notepad.exe
Starcry rendered frame images
GNU Screen Navigator
PHP debugging in practice!
Photoshop blenders for allegro
Launch of yet another blog ii
Common Lisp wallpaper
Improving the outline for the Adornment of the Middle Way
Using allegro with wxWidgets
Launch of yet another blog
Motion blur
Functional programming
Enable wake-on-lan on Linux Debian (4.0)

Topics:
Other interests:
EBPF Flamegraphs C++ Ubuntu 20.04
Site generated using ![]() ArticleManager © 2010-2013
ArticleManager © 2010-2013