Neither one nor Many
Software engineering blog about my projects, geometry, visualization and music.
If you are behind a firewall, chances are you can tunnel through it with Proxytunnel. This post does not describe anything new, but I think is still useful because it includes configuration of apache and ssh client examples.
The goal is being able to tunnel through a (corporate) firewall/proxy. And even more important, have your communication encrypted. This also has the advantage that even if you are not restricted, a corporate firewall/proxy can still not cache the websites you visit.
We do this by establishing an ssh session to some machine, and useing ssh portforwarding from there. This target machine may be your home computer or some server on the internet.
If you are able to run your SSH server on port 80 or 443, you might want to do that because then you can simply define the firewall as a proxy in PuTTY. The firewall should probably allow the communication, especially on 443 as this is normally for HTTPS and encrypted (as is SSH). I haven't tested this, but I believe you should be able to skip the proxytunnel stuff.
I assume you already have Apache running on port 80 and 443, so switching SSH to one of those ports won't be possible. We simply configure Apache so that it becomes itself another proxy that can make the connect to port 22, or 42 in the example I'm going to use. If you do not want to use apache, you can put your webserver of choice on a different port and use Apache's mod_proxy to redirect a virtual host to it.
In short how it works:
Your ssh client will NOT communicate directly to your ssh server. Instead it will communicate with proxytunnel, and proxytunnel establishes the actual connection. Proxytunnel will first connect to the "corporate" firewall/proxy and request a connection to your server on the HTTPS port, The firewall will then consider all communication HTTPS encrypted traffic and therefor allow it. But actually a mod_proxy is configured to respond to connection requests to specific destinations (using CONNECT dest:port HTTP/1.1). So we issue another CONNECT connection to the destination + SSH port. From that moment on proxytunnel simply redirects all read/write to the ssh client.
Once connected to your SSH server you can simply use the Port forwarding stuff that the SSH protocol supports.
Example config
I will be using this hosts throughout the post, you will have to replace these.
| Ip | Host | Description |
|---|---|---|
| 46.51.179.218 | ext.cppse.nl | My server machine, runs the apache @ port 80 and destination ssh @ 42 |
| NA | whatismyipaddress.com | Some website @ port 80 that displays remote host (optional for testing) |
| 172.18.12.11 | NA | The firewall @ port 8080, accepts only connections to ports 80,443. |
Configure proxy on some Apache server
You need mod_proxy, mod_proxy_http, mod_proxy_connect modules enabled in Apache. (Not 100% sure about mod_proxy_http.)
Create a VirtualHost like this:
<VirtualHost *:80>
    ServerAdmin no-reply@ext.cppse.nl
    ServerName ext.cppse.nl
    ErrorLog /var/log/apache2/error_log
    TransferLog /var/log/apache2/access_log

    # Allow proxy connect (forward-proxy) to servers only on port 80 (http) and 42 (at my box SSH)
    ProxyRequests On
    AllowConnect 80 42
    # Deny all proxying by default...
    <Proxy *>
        Order deny,allow
        Deny from all
    </Proxy>
    # This directive defines which servers can be connected to.
    # Access is controlled here via standard Apache user authentication.
    <ProxyMatch (46\.51\.179\.218|ext.cppse.nl|whatismyipaddress.com|www.whatismyipaddress.com)>
        Order deny,allow
        Allow from all

        #You should replace the above two rules with something like this:
        # Deny from all
        # Allow from <some_host>
        # Allow from <some_host>
    </ProxyMatch>
</VirtualHost>
This example will allow from any source to CONNECT to four locations: 46.51.179.218, ext.cppse.nl, whatismyipaddress.com and www.whatismyipaddress.com. Only destination ports 80 and 42 are allowed. We'll be using 46.51.179.218 on port 42 (SSH server), and {www.}whatismyipaddress.com on port 80 (plain HTTP) for testing.
- Add this VirtualHost as the first virtual host. Loading it /after/ other vhosts made the proxy deny all CONNECT's on my machine.
- Port 443 would be nicer, again, on my machine I couldn't do this because I have other HTTPS sites configured, and couldn't get it to use the proxy "as HTTP on port 443". My apache seems to expect SSL communication although I didn't enable SSL on the vhost.
- The vhost name "ext.cppse.nl" seems unimportant, the Proxy settings appear not to be specifically bound to this vhost. This might explain why using port 443 didn't work.
- I can imagine there would be some more complicated trick to make it possible to configure "unencrypted" traffic over port 443 for a specific vhost, butthis works well enough for me.
Test if this proxy works
You might want to test this from some location where you are not behind the firewall. Configure it as a proxy in your browser:
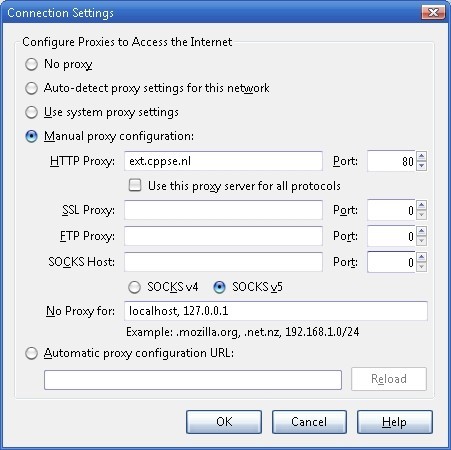
This is why I added [www.whatismyipaddress.com][] and port 80 in the Virtual Host, open it:
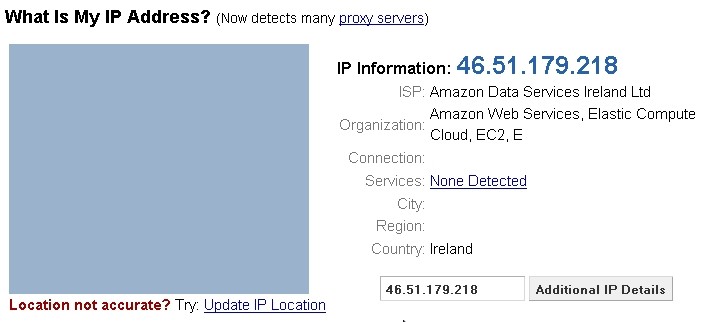
- You can also test the SSH connection if your client supports usage of an HTTP proxy.
- You also might want to replace the default allow by the default deny config in the vhost.
- You might want to remove port 80 from the AllowConnect parameter in the vhost, and the whatismyipaddress domain(s).
Configure proxytunnel for PuTTY
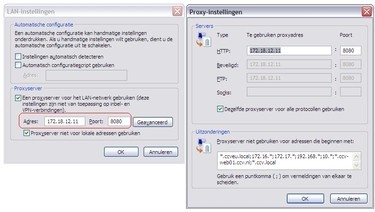
In our example we have the proxy "172.18.12.11:8080", with no-authentication required. If you have a proxy that requires a username and password use the -P "username:password" parameter on proxytunnel. Also see the help for more available options.)
Install proxytunnel on windows
I made a zip file with Putty "Development snapshot 2012-01-16:r9376" because it
supports "local proxy" feature we need to use for Proxytunnel, also included
version 1.9.0.
You can download PuTTY Tray a version of PuTTY that supports local proxy and some more very nice additional features!!
When PuTTY is configured to use Proxytunnel it delegates the connection to proxytunnel, which will first connect to our newly configured proxy "46.51.179.218:80" (the one we configured in apache) using the firewall/proxy 172.18.12.11:8080. Once connected to our proxy we connect to our intended destination "46.51.179.218:42". In PuTTY you use %host:%port (these values get replaced).
This is a command you can use for testing at commandline:
C:\proxytunnel>proxytunnel -v -p 172.18.12.11:8080 -r 46.51.179.218:80 ^
         -d 46.51.179.218:42 -H "User-Agent: Mozilla/4.0 (compatible; MSIE 6.0; Win32)\n"
Connected to 172.18.12.11:8080 (local proxy)

Tunneling to 46.51.179.218:80 (remote proxy)
Communication with local proxy:
 -> CONNECT 46.51.179.218:80 HTTP/1.0
 -> Proxy-Connection: Keep-Alive
 -> User-Agent: Mozilla/4.0 (compatible; MSIE 6.0; Win32)\n
 <- HTTP/1.1 200 Connection established

Tunneling to 46.51.179.218:42 (destination)
Communication with remote proxy:
 -> CONNECT 46.51.179.218:42 HTTP/1.0
 -> Proxy-Connection: Keep-Alive
 -> User-Agent: Mozilla/4.0 (compatible; MSIE 6.0; Win32)\n
 <- HTTP/1.0 200 Connection Established
 <- Proxy-agent: Apache/2.2.12 (Linux/SUSE)

Tunnel established.
SSH-2.0-OpenSSH_5.1
You give exactly the same command to PuTTY although, instead of the -v flag and hardcoded destination you use the -q (quiet mode) (and %host:%port). PuTTY then communicates by reading/writing to the started proxytunnel process, instead of a socket.
This is how you configure PuTTY
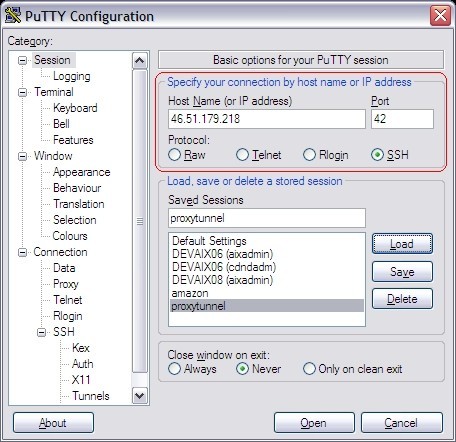
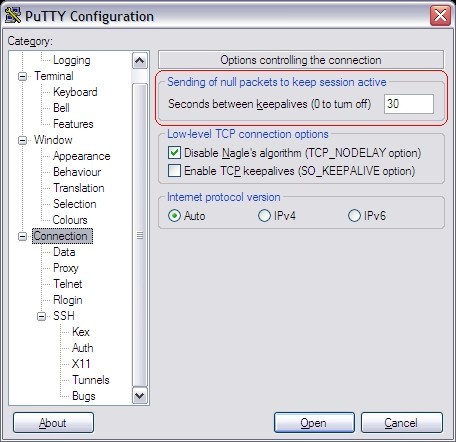
Note that the Keep-alive may be necessary if the firewall we're going to tunnel through actively closes connections if they are idle for longer than xx seconds.
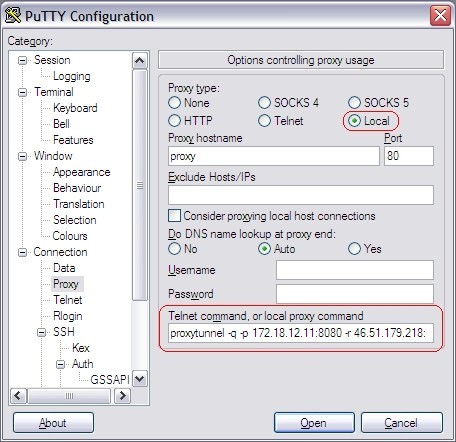
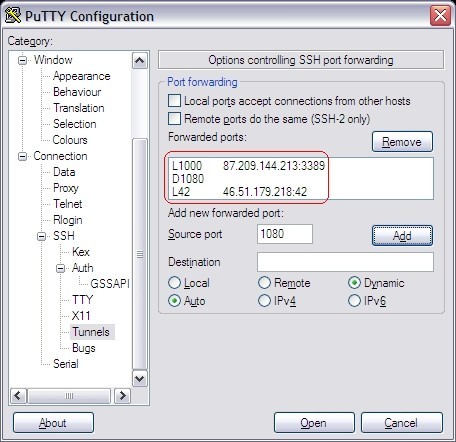
You can configure all kinds of portforwarding.
Install proxytunnel on linux
Download proxytunnel and "make" like any other tool. If you are missing development packages, I may have a precompiled 32 bit version available that might work on your box. Todo: Add download link.
linux-yvch:/usr/local/src # tar -zxvf proxytunnel-1.9.0.tgz
...
linux-yvch:/usr/local/src # cd proxytunnel-1.9.0
..
linux-yvch:/usr/local/src/proxytunnel-1.9.0 # make
..
linux-yvch:/usr/local/src/proxytunnel-1.9.0 # make install
..
linux-yvch:/usr/local/src/proxytunnel-1.9.0 # cd
Just as with PuTTY you need to configure your ssh config: In linux I prefer to keep it verbose (the -v setting, you can use -q for quiet mode). Note that openssh uses %h:%p for host / port replacement.
linux-yvch:~ # cat ~/.ssh/config
Host 46.51.179.218 ext.cppse.nl ext.cppse.nl
        DynamicForward 1080
        ProxyCommand proxytunnel -v -p 172.18.12.11:8080 -r 46.51.179.218:80 \
               -d %h:%p -H "User-Agent: Mozilla/4.0 (compatible; MSIE 6.0; Win32)\n"
        ServerAliveInterval 30
Connecting with openssh should yield something like:
linux-yvch:~ # ssh -l proxy -p 42 46.51.179.218
Connected to 172.18.12.11:8080 (local proxy)

Tunneling to 46.51.179.218:80 (remote proxy)
Communication with local proxy:
 -> CONNECT 46.51.179.218:80 HTTP/1.0
 -> Proxy-Connection: Keep-Alive
 -> User-Agent: Mozilla/4.0 (compatible; MSIE 6.0; Win32)\n
 <- HTTP/1.1 200 Connection established

Tunneling to 46.51.179.218:42 (destination)
Communication with remote proxy:
 -> CONNECT 46.51.179.218:42 HTTP/1.0
 -> Proxy-Connection: Keep-Alive
 -> User-Agent: Mozilla/4.0 (compatible; MSIE 6.0; Win32)\n
 <- HTTP/1.0 200 Connection Established
 <- Proxy-agent: Apache/2.2.12 (Linux/SUSE)

Tunnel established.
Password: *****
Last login: Thu Jan 26 15:55:40 2012 from 46.51.179.218

  __|  __|_  )  SUSE Linux Enterprise
  _|  (     /       Server 11 SP1
 ___|\___|___|       x86 (32-bit)

For more information about using SUSE Linux Enterprise Server please see
http://www.novell.com/documentation/sles11/

Have a lot of fun...
YOU ARE IN A RESTRICTED SHELL BECAUSE THIS ACCOUNT IS ONLY FOR TUNNELING
proxy@ip-10-235-45-12:/home/proxy>
After the "Tunnel established" you continue as with any other SSH connection.
Using SSH port forwarding
It would have been more elegant if the first connect would have been to port
443. Because then the communication, although when sniffing you see the CONNECT statement and the SSH banner in plain text.
From the firewall perspective it is all encrypted data. It just coincidentally
happens to be readable  .
But after the initial stuff everything is encrypted as we're tunneling SSH.
I'm not sure if it is possible to communicate in SSL to the second proxy,
because then it won't be detectable at all.. the SSL communication would be
encrypted twice!
I already included in the PuTTY screenshots and OpenSSH example a Dynamic Forward (socks) proxy on 1080. This means that SSH will start a listener socket on port 1080 accepting connections and tunneling it through the established connection. The SSH protocol supports this, and this feature is (I think) enabled by default, it is configurable on the server in your sshd config.
You can then configure your browser to use the socks proxy, localhost:1080 and all communications will go through the established tunnel. Remote desktop, at the time of writing, doesn't support the use of a proxy, but you can create a "normal" port-forward as for this to a specific destination & port.
If your firewall does not support CONNECT you might want to try cURLproxy, a proxy program I wrote that works simply by downloading and POSTing HTML. Available here: curlprox[cURLproxy].

We try to set proxy tunnel for HTTPS but find Apache want start with out having certificate information. WE tried it with the root CA certificate then it starts but does not forward the traffic to the backend server. Any ideas. Below the config we tried.
<VirtualHost 172.19.1.136:443>
DocumentRoot "/usr/local/apache2221/htdocs/test/"
ServerName ibcm.southampton.gov.uk
ErrorLog logs/ibcm
ServerAdmin webmaster@test.com
ProxyRequests On
AllowConnect 443
SSLEngine on
SSLHonorCipherOrder On
SSLProtocol -ALL +SSLv3 +TLSv1
SSLCipherSuite ALL:!aNULL:!ADH:!eNULL:!LOW:!EXP:RC4+RSA:+HIGH:+MEDIUM
SSLCertificateFile "/etc/ssl/crt/ibcm.crt"
SSLCertificateKeyFile "/etc/ssl/crt/test.key"
SSLCertificateChainFile "/etc/ssl/crt/CA-DOM.crt"
<proxy *>
Order deny,allow
Deny from all
</proxy>
<ProxyMatch (webssl.test.com|192.168.50.100)>
Order deny,allow
Allow from all
</ProxyMatch>
</VirtualHost>
###################################################
Microsoft Windows [Version 6.1.7601]
Copyright (c) 2009 Microsoft Corporation. All rights reserved.
## Over corporate ethernet##
C:\SS>proxytunnel -v -E -p myserver.example.org:443 -d localhost:22 -H "User-Agen
t: Mozilla/5.0 (compatible; MSIE 6.3; Win32)"
SSL client to proxy enabled
Local proxy myserver.example.org resolves to xx.x.xxx.114
error: connect() failed: [116] Connection timed out
## Over my mobile internet connection##
C:\SS>proxytunnel -v -E -p myserver.example.org:443 -d localhost:22 -H "User-Agen
t: Mozilla/5.0 (compatible; MSIE 6.3; Win32)"
SSL client to proxy enabled
Local proxy myserver.example.org resolves to xx.x.xxx.114
Connected to myserver.example.org:443 (local proxy)
Tunneling to localhost:22 (destination)
Communication with local proxy:
-> CONNECT localhost:22 HTTP/1.0
-> Proxy-Connection: Keep-Alive
-> User-Agent: Mozilla/5.0 (compatible; MSIE 6.3; Win32)
<- HTTP/1.0 200 Connection Established
<- Proxy-agent: Apache/2.4.16 (Win64) OpenSSL/1.0.2d
Tunnel established.
SSH-2.0-5.34 FlowSsh: Bitvise SSH Server (WinSSHD) 6.31: free only for personal
non-commercial use
@HTTPS forward proxy: No idea really, maybe try a newer apache. I guess you're using 2.2.21 from your directory.
@Mr Perfect: Does your company perhaps already use a proxy that should be used in the -p flag? In that case you would need to corporate-proxy -> myserver.example.org:443 -> destination.
@rayburgemeestre
I'm not a computer technical person so doing my best to understand.
Do you mean I should replace the proxytunnel command above to this:
C:\SS>proxytunnel -v -E -p myworkproxy.com -r myserver.example.org:443 -d localhost:22 -H "User-Agent: Mozilla/5.0 (compatible; MSIE 6.3; Win32)"
https://github.com/yrutschle/sslh
The official website was less clear to me: http://www.rutschle.net/tech/sslh.shtml

EBPF Flamegraphs C++ Ubuntu 20.04


Johann
2013-09-17 09:38:43
Running HTTPS on your webserver is far better than HTTP as, as you correctly say, it makes the traffic indistinguishable from 'real' SSL traffic and will work in virtually any environment.