Neither one nor Many
Software engineering blog about my projects, geometry, visualization and music.
Some of the stuff I'm posting on my 'blog' might be better categorized as a knowledge base articles, or more simply 'notes'..
In any case, this might be one more such posts ![]() , just some caveats I ran into setting stuff up on my Ubuntu Server 20.04 LTS.
, just some caveats I ran into setting stuff up on my Ubuntu Server 20.04 LTS.
Flame Graphs
Invented by Brendan Gregg, who is someone that I honestly greatly admire. He is behind a lot of amazing presentations/talks, online content and tools w/r/t performance. Recently, when I got very interested in EBPF, stumbled upon his work again.
I've used Flame Graphs in the past with perf, and so I was curious to try it with ebpf this time. Flame Graphs can give very useful insights into potential bottlenecks.
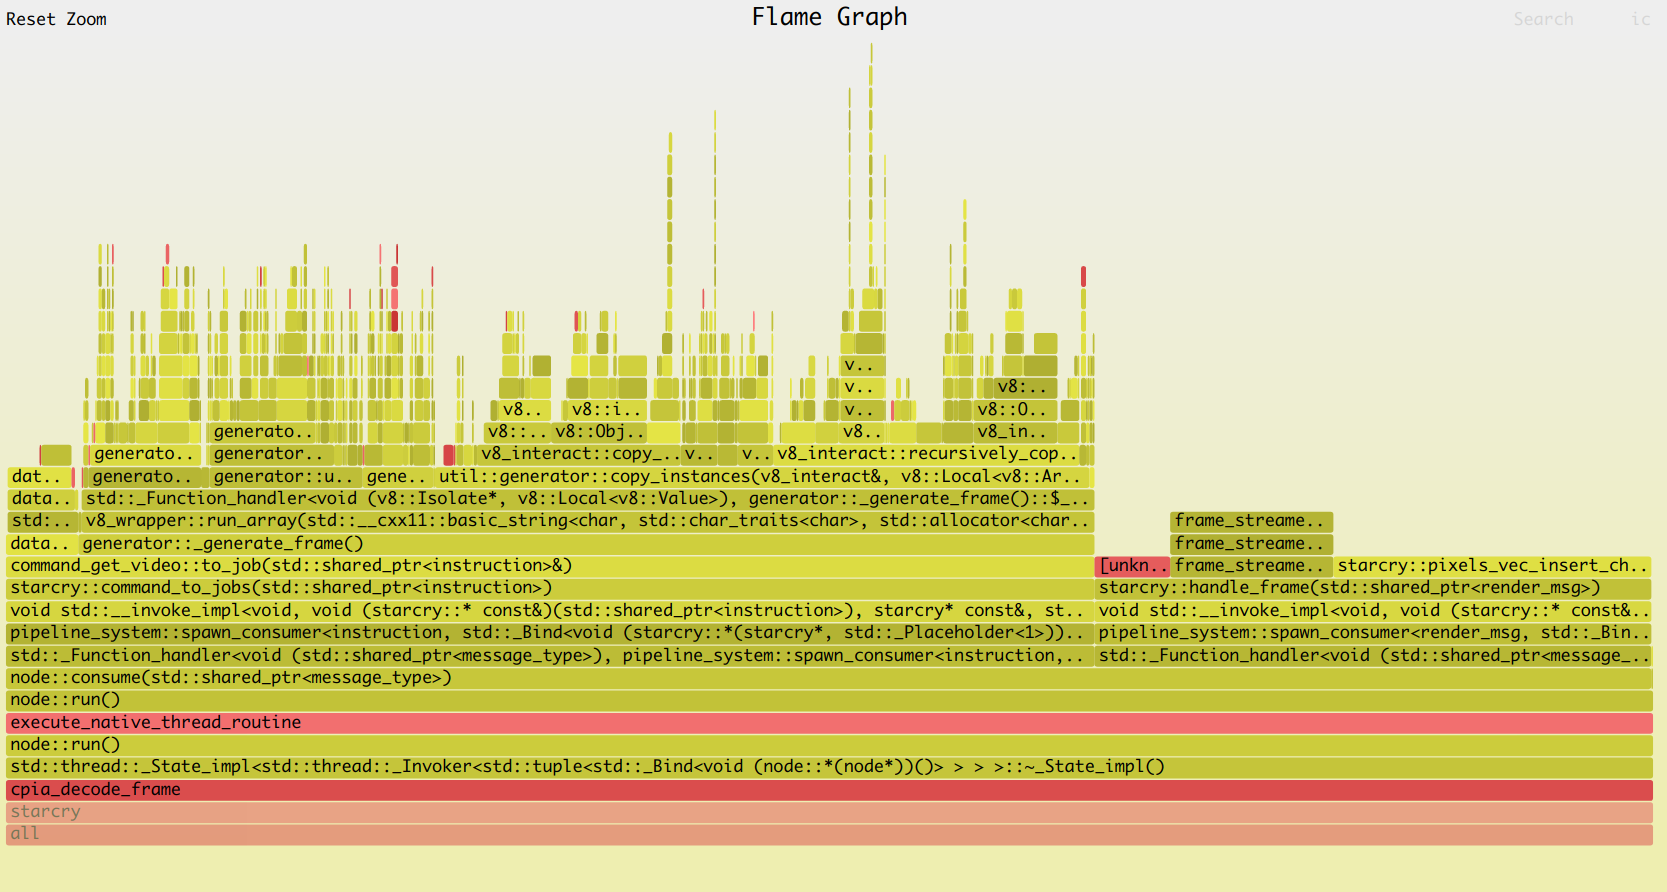
Below is one that I've created as an example, but will refer to Brendan's website if you want to dive into them more, and see more interesting examples.
As I tried to make all the tools work, I discovered the Ubuntu packages are a bit old, and I ran into a few issues. The steps that worked for me are based on this link, section 4.2.:
1) Install prerequisites
sudo apt install -y bison build-essential cmake flex git libedit-dev \
  libllvm7 llvm-7-dev libclang-7-dev python zlib1g-dev libelf-dev libfl-dev python3-distutils
Remove the old bpfcc-tools package, if you've installed them before (gave me nothing but issues, such as python scripts raising errors, that have already been fixed upstream). We will fetch the latest version from github instead.
apt remove -y bpfcc-tools2) Install bcc tools (bpfcc-tools)
git clone https://github.com/iovisor/bcc
cd bcc
Then execute the following:
mkdir -p build; cd build
export LLVM_ROOT=/usr/lib/llvm-7
cmake ..
make
sudo make install
cmake -DPYTHON_CMD=python3 .. # build python3 binding
pushd src/python/
make
sudo make install
popd
Note the export LLVM_ROOT=/usr/lib/llvm-7, this was critical in my case, since I had newer versions:
trigen@ideapad:~> find /usr/lib -name 'llvm-*' -type d
/usr/lib/llvm-7
/usr/lib/llvm-10
/usr/lib/llvm-12
CMake would pick up the latest llvm-12, and that would cause compilation errors. See: https://github.com/iovisor/bcc/issues/3601
3) Do the profiling with EBPF
- Step 1: I would start my executable program
starcryin a terminal, have it render a bunch of stuff. - Step 2: Then sample for 60 seconds on the specific pid as
root, see below.
export PYTHONPATH=$(dirname `find /usr/lib -name bcc | grep dist-packages`):$PYTHONPATH
/usr/share/bcc/tools/profile  # see if it produces meaningful output
The PYTHONPATH had to be exported correctly first (on my system in any case) or the profile tool would raise a Python error.
THen do the actual sampling with:
sudo python3 /usr/share/bcc/tools/profile -F 99 -adf 10 -p $(pidof starcry) > /path/to/out.profile-folded4) Generate the Flame Graph
git clone https://github.com/brendangregg/FlameGraph
cd FlameGraph
./flamegraph.pl --colors=java /path/to/out.profile-folded > profile.svg
That should be it!
Example
From the example PNG included in this blog post:
trigen@ideapad:~/projects/FlameGraph[master]> export PYTHONPATH=$(dirname `find /usr/lib -name bcc | grep dist-packages`):$PYTHONPATH
trigen@ideapad:~/projects/FlameGraph[master]> sudo python3 /usr/share/bcc/tools/profile -U -F 99 -adf 10 -p $(pidof starcry) > out.profile-folded
WARNING: 17 stack traces could not be displayed. Consider increasing --stack-storage-size.
trigen@ideapad:~/projects/FlameGraph[master]> ./flamegraph.pl --colors=java ./out.profile-folded > profile.svg
lunitidal interval
In ADJUST Settings set the right Longitude. I.e., if Lat/Lon for my city is: 52.601234, 4.700493
The only relevant part is the longitude, +4 or +5 in this case. I configured 4 for longitude, and E for EAST, negative numbers should be WEST.
Then lookup whatever beach you are interested in, the closest to me is Egmond Aan Zee. The manual contains a bunch of them, but this list is not very complete, or useful at all IMO. And I learned in The Netherlands these times differ greatly per beach.
So, better find the High and Low tide times yourself, in my case for Egmond Aan Zee:
https://egmondaanzee.org/nl/getijden-eb-vloed.php
This lunitidal interval (HH:MM) is called a "havengetal" or "haventijd" in my language. And it's dutch definition is:
"De haventijd is het tijdsverschil tussen de hoogste waterstand en de doorgang van zon of maan door de meridiaan, voor een gegeven plaats."
Translated: the difference between the highest tide and the passing of the sun or moon through the meridian, for a given place.
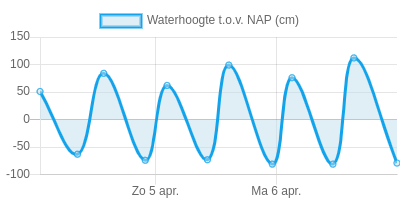
Today is the 4th of april 2020 with the highest tide at 13:44 (84 cm).

According to this site the moon passes the meridian at exactly 23:00 for my location today.
https://www.timeanddate.com/moon/@2754516

We need the difference:
From 23:00 to 13:44 is: 14:44.
This results in settings for my casio: 4 LONG E + INT 14:44.
testing
Then test in the tide mode for different dates, and it should work! Personally I noticed that low tide is not completely synchronized, it's one "bar" later with the wave on the watch. I suspect that is because the actual graph is not a perfect sine wave, but looks a little skewed. I guess this may vary per beach.
For this tutorial I'm assuming Kubernetes with Helm + Ingress is already deployed. If not, I still included the commands I used near the end of this article.

OwnCloud
My NAS is running at home with Rockstor, and I'm using RAID10 with btrfs. Rockstor has (docker) apps support with the feature called Rock-on's, they also include OwnCloud, but after updating and some other issues with Rockstor at some point my deployment broke. This frustrated me so I've decided to switch to Kubernetes instead.
I use my own cloud (no pun intended) as an alternative over using services owned by Google/Amazon/Apple. When you plan to do the same, just make sure to also make proper backups.
Deploy OwnCloud with Helm
Following the instructions; copy their default values.yaml (from here). Tweak all the values. It seems important to define a hostname! (If you try accessing the service later via IP address, the webinterface will not accept this.)
helm install --name my-owncloud -f owncloud.yaml stable/owncloud --set rbac.create=true
Notes: owncloud.yaml is my values.yaml, and I expect the rbac.create=true not to be needed but I used it anyway it was left over when copy & pasting another command.. For convenience you can download my owncloud.yaml.
Owncloud will require some storage.
In my case I made a btrfs share named /mnt2/NAS/kubeowncloudstorage.
Then created three folders inside it:
mkdir -p /mnt2/NAS/kubeowncloudstorage/data
mkdir -p /mnt2/NAS/kubeowncloudstorage/mariadb
mkdir -p /mnt2/NAS/kubeowncloudstorage/apache
Set the right permissions for these folders, owncloud will write as user id(1).
chown 1:1 /mnt2/NAS/kubeowncloudstorage -RThen apply the following yaml (kubectl apply -f kube_owncloud_storage.yaml):
nas:/root # cat kube_owncloud_storage.yaml
kind: PersistentVolume
apiVersion: v1
metadata:
  name: kube-owncloud-storage-data
  labels:
    type: local
spec:
  capacity:
    storage: 3072Gi
  storageClassName: owncloud-storage-data
  accessModes:
    - ReadWriteOnce
  hostPath:
    path: /mnt2/NAS/kubeowncloudstorage/data
---
kind: PersistentVolume
apiVersion: v1
metadata:
  name: kube-owncloud-storage-mariadb
  labels:
    type: local
spec:
  capacity:
    storage: 8Gi
  storageClassName: owncloud-storage-mariadb
  accessModes:
    - ReadWriteOnce
  hostPath:
    path: /mnt2/NAS/kubeowncloudstorage/mariadb
---
kind: PersistentVolume
apiVersion: v1
metadata:
  name: kube-owncloud-storage-apache
  labels:
    type: local
spec:
  capacity:
    storage: 1Gi
  storageClassName: owncloud-storage-apache
  accessModes:
    - ReadWriteOnce
  hostPath:
    path: /mnt2/NAS/kubeowncloudstorage/apache
If you redeploy Kubernetes and/or the system in general, I forgot when exactly but a PersistentVolume may end up in a state that prevents PersistentVolumeClaim's to not bind to the Volumes.
There was a trick to force it to bind, IIRC kubectl edit pv kube-owncloud-storage-data and you can remove the reference it has to an existing PVC. But it was a few weeks ago I experimented with this so sorry I don't remember the details.
Only now I stumbled upon my notes and decided to wrap it up in a blog post.
Setup ingress (beware of caveat!)
nas:/root # cat owncloud_ingress.yaml
apiVersion: extensions/v1beta1
kind: Ingress
metadata:
  annotations:
    kubernetes.io/ingress.class: nginx
    ingress.kubernetes.io/proxy-body-size: 500m
    nginx.ingress.kubernetes.io/proxy-body-size: 500m
  name: owncloud
  namespace: default
spec:
  rules:
    - host: ******DOMAIN NAME*******
      http:
    paths:
      - backend:
          serviceName: my-owncloud-owncloud
          servicePort: 80
        path: /
Take a careful look at these two options in the annotations:
ingress.kubernetes.io/proxy-body-size: 500m
nginx.ingress.kubernetes.io/proxy-body-size: 500m
They took me two hours of debugging, owncloud was throwing errors 413 Request Entity Too Large when syncing some larger video files from my phone to owncloud. Thinking this must be an issue inside owncloud I experimented with lots of parameters, fixes for php, apache, etc. Then realized it could be the Ingress in Kubernetes. The above example makes sure it doesn't block uploads up to half a gigabyte.
DONE!
The end result should look something like this in Kubernetes:
nas:/root # kubectl get all
NAME                                                          READY   STATUS    RESTARTS   AGE
pod/my-nginx-nginx-ingress-controller-664f4547d8-vjgkt        1/1     Running   0          16d
pod/my-nginx-nginx-ingress-default-backend-5bcb65f5f4-qrwcd   1/1     Running   0          16d
pod/my-owncloud-mariadb-0                                     1/1     Running   0          16d
pod/my-owncloud-owncloud-6cddfdc8f4-hmrh5                     1/1     Running   2          16d

NAME                                             TYPE           CLUSTER-IP      EXTERNAL-IP     PORT(S)                      AGE
service/kubernetes                               ClusterIP      10.96.0.1       <none>          443/TCP                      16d
service/my-nginx-nginx-ingress-controller        LoadBalancer   10.103.57.37    192.168.2.122   80:32030/TCP,443:30453/TCP   16d
service/my-nginx-nginx-ingress-default-backend   ClusterIP      10.101.16.224   <none>          80/TCP                       16d
service/my-owncloud-mariadb                      ClusterIP      10.104.48.71    <none>          3306/TCP                     16d
service/my-owncloud-owncloud                     LoadBalancer   10.102.95.4     <pending>       80:32287/TCP                 16d

NAME                                                     DESIRED   CURRENT   UP-TO-DATE   AVAILABLE   AGE
deployment.apps/my-nginx-nginx-ingress-controller        1         1         1            1           16d
deployment.apps/my-nginx-nginx-ingress-default-backend   1         1         1            1           16d
deployment.apps/my-owncloud-owncloud                     1         1         1            1           16d

NAME                                                                DESIRED   CURRENT   READY   AGE
replicaset.apps/my-nginx-nginx-ingress-controller-664f4547d8        1         1         1       16d
replicaset.apps/my-nginx-nginx-ingress-default-backend-5bcb65f5f4   1         1         1       16d
replicaset.apps/my-owncloud-owncloud-6cddfdc8f4                     1         1         1       16d

NAME                                   DESIRED   CURRENT   AGE
statefulset.apps/my-owncloud-mariadb   1         1         16d
nas:/root # kubectl get ingress
NAME       HOSTS               ADDRESS   PORTS   AGE
owncloud   *****************             80      16d
nas:/root # kubectl get pv
NAME                            CAPACITY   ACCESS MODES   RECLAIM POLICY   STATUS   CLAIM                                   STORAGECLASS               REASON   AGE
kube-owncloud-storage-apache    1Gi        RWO            Retain           Bound    default/my-owncloud-owncloud-apache     owncloud-storage-apache             16d
kube-owncloud-storage-data      3Ti        RWO            Retain           Bound    default/my-owncloud-owncloud-owncloud   owncloud-storage-data               16d
kube-owncloud-storage-mariadb   8Gi        RWO            Retain           Bound    default/data-my-owncloud-mariadb-0      owncloud-storage-mariadb            16d
nas:/root # kubectl get pvc
NAME                            STATUS   VOLUME                          CAPACITY   ACCESS MODES   STORAGECLASS               AGE
data-my-owncloud-mariadb-0      Bound    kube-owncloud-storage-mariadb   8Gi        RWO            owncloud-storage-mariadb   16d
my-owncloud-owncloud-apache     Bound    kube-owncloud-storage-apache    1Gi        RWO            owncloud-storage-apache    16d
my-owncloud-owncloud-owncloud   Bound    kube-owncloud-storage-data      3Ti        RWO            owncloud-storage-data      16d
Deploying Kube on a single node machine notes
Just in case you are also attempting to install Kubernetes for the first time, a reference of the commands used in my setup. First I followed the official docs to deploy kubeadm,kubelet etc. See here.
My init looked like this:
kubeadm init --pod-network-cidr=192.168.0.0/16At this point you may get some errors, and you have to fix the errors, maybe even kubeadm reset and then retry.
Until I was okay with the remaining errors, I proceeded with:
kubeadm init --pod-network-cidr=192.168.0.0/16 --ignore-preflight-errors=all

# these steps will be recommended from above command:
mkdir -p $HOME/.kube
sudo cp -f /etc/kubernetes/admin.conf $HOME/.kube/config
sudo chown $(id -u):$(id -g) $HOME/.kube/config

# I chose calico for networking
kubectl apply -f https://docs.projectcalico.org/v3.1/getting-started/kubernetes/installation/hosted/rbac-kdd.yaml
kubectl apply -f https://docs.projectcalico.org/v3.1/getting-started/kubernetes/installation/hosted/kubernetes-datastore/calico-networking/1.7/calico.yaml

# Then after a while (maybe check if kubelet etc. come up correctly, try "kubectl get no")
# Make sure the master node is not excluded for running pods.
kubectl taint nodes --all node-role.kubernetes.io/master-

# I also executed this patch, but I think it's not needed anymore, it was still in my helper script
kubectl -n kube-system get deployment coredns -o yaml |   sed 's/allowPrivilegeEscalation: false/allowPrivilegeEscalation: true/g' |   kubectl apply -f -

# Then I looked up the kubelet service file with `systemctl cat kubelet` and edited:
vim /etc/systemd/system/kubelet.service.d/10-kubeadm.conf
# added this to above file, the --resolv-conf:
#
#ExecStart=/usr/bin/kubelet $KUBELET_KUBECONFIG_ARGS $KUBELET_CONFIG_ARGS $KUBELET_KUBEADM_ARGS $KUBELET_EXTRA_ARGS --resolv-conf=/etc/resolv.conf
#
#ALSO: I edited /etc/resolv.conf, I removed the ipv6 nameserver entry, and added 8.8.8.8 as per https://hk.saowen.com/a/e6cffc1e02c2b4643bdd525ff9e8e4cfb49a4790062508dca478c0c8a0361b5a
systemctl daemon-reload
systemctl restart kubelet

kubectl get pod -n kube-system
kubectl delete pod coredns-68fb79bcf6-9zdtz -n kube-system
kubectl delete pod coredns-68fb79bcf6-t7vsm -n kube-system
kubectl get pod -n kube-system -o wide
Solution for the last bit I got from here. However this may have been a random issue that I just ran into, because on different servers I don't recall I had to the steps regarding coredns.
Possible commands
helm reset --force
helm init --upgrade --service-account tiller

# don't remember if these two commands were still necessary
kubectl create serviceaccount --namespace kube-system tiller
kubectl create clusterrolebinding tiller-cluster-rule --clusterrole=cluster-admin --serviceaccount=kube-system:tiller
Unrelated notes about Owncloud itself
Links for solutions for problems that I ran into at some point in time:
- https://central.owncloud.org/t/file-is-locked-how-to-unlock/985
Links that eventually pointed me in the right direction for the 413 Request Entity Too Large error.
- https://forum.owncloud.org/viewtopic.php?t=23199
- https://www.keycdn.com/support/413-request-entity-too-large
- https://stackoverflow.com/questions/18740419/how-to-set-allowoverride-all
- https://github.com/nginxinc/kubernetes-ingress/issues/21
I remember having something like this as a child: http://www.endlessfoldingcard.com/endless-folding-card-p-768-918.html. It was not that one but something similar, a flyer for some stupid product. I was fascinated by it and could keep folding it for hours. It was nice made out of some very strong paper/cardboard, unfortunately I probably got rid of it at some point.
It took me a long time to find it again, every now and then I would try to look it up on Google (with years in between), unable to find it. Until I had a moment of clarity and tried the additional keyword "Endless", and finally found something that I remembered.
Figuring out how it works
All the YouTube videos I found would basically fold the thing together, and then decorate the card afterward, however I wanted to print it beforehand in such a way that it would turn out nicely when folded. To be honest this one does attempt to explain some of the layouting, but it wasn't clear enough for me. This is another video that shows how to fold it clearly.
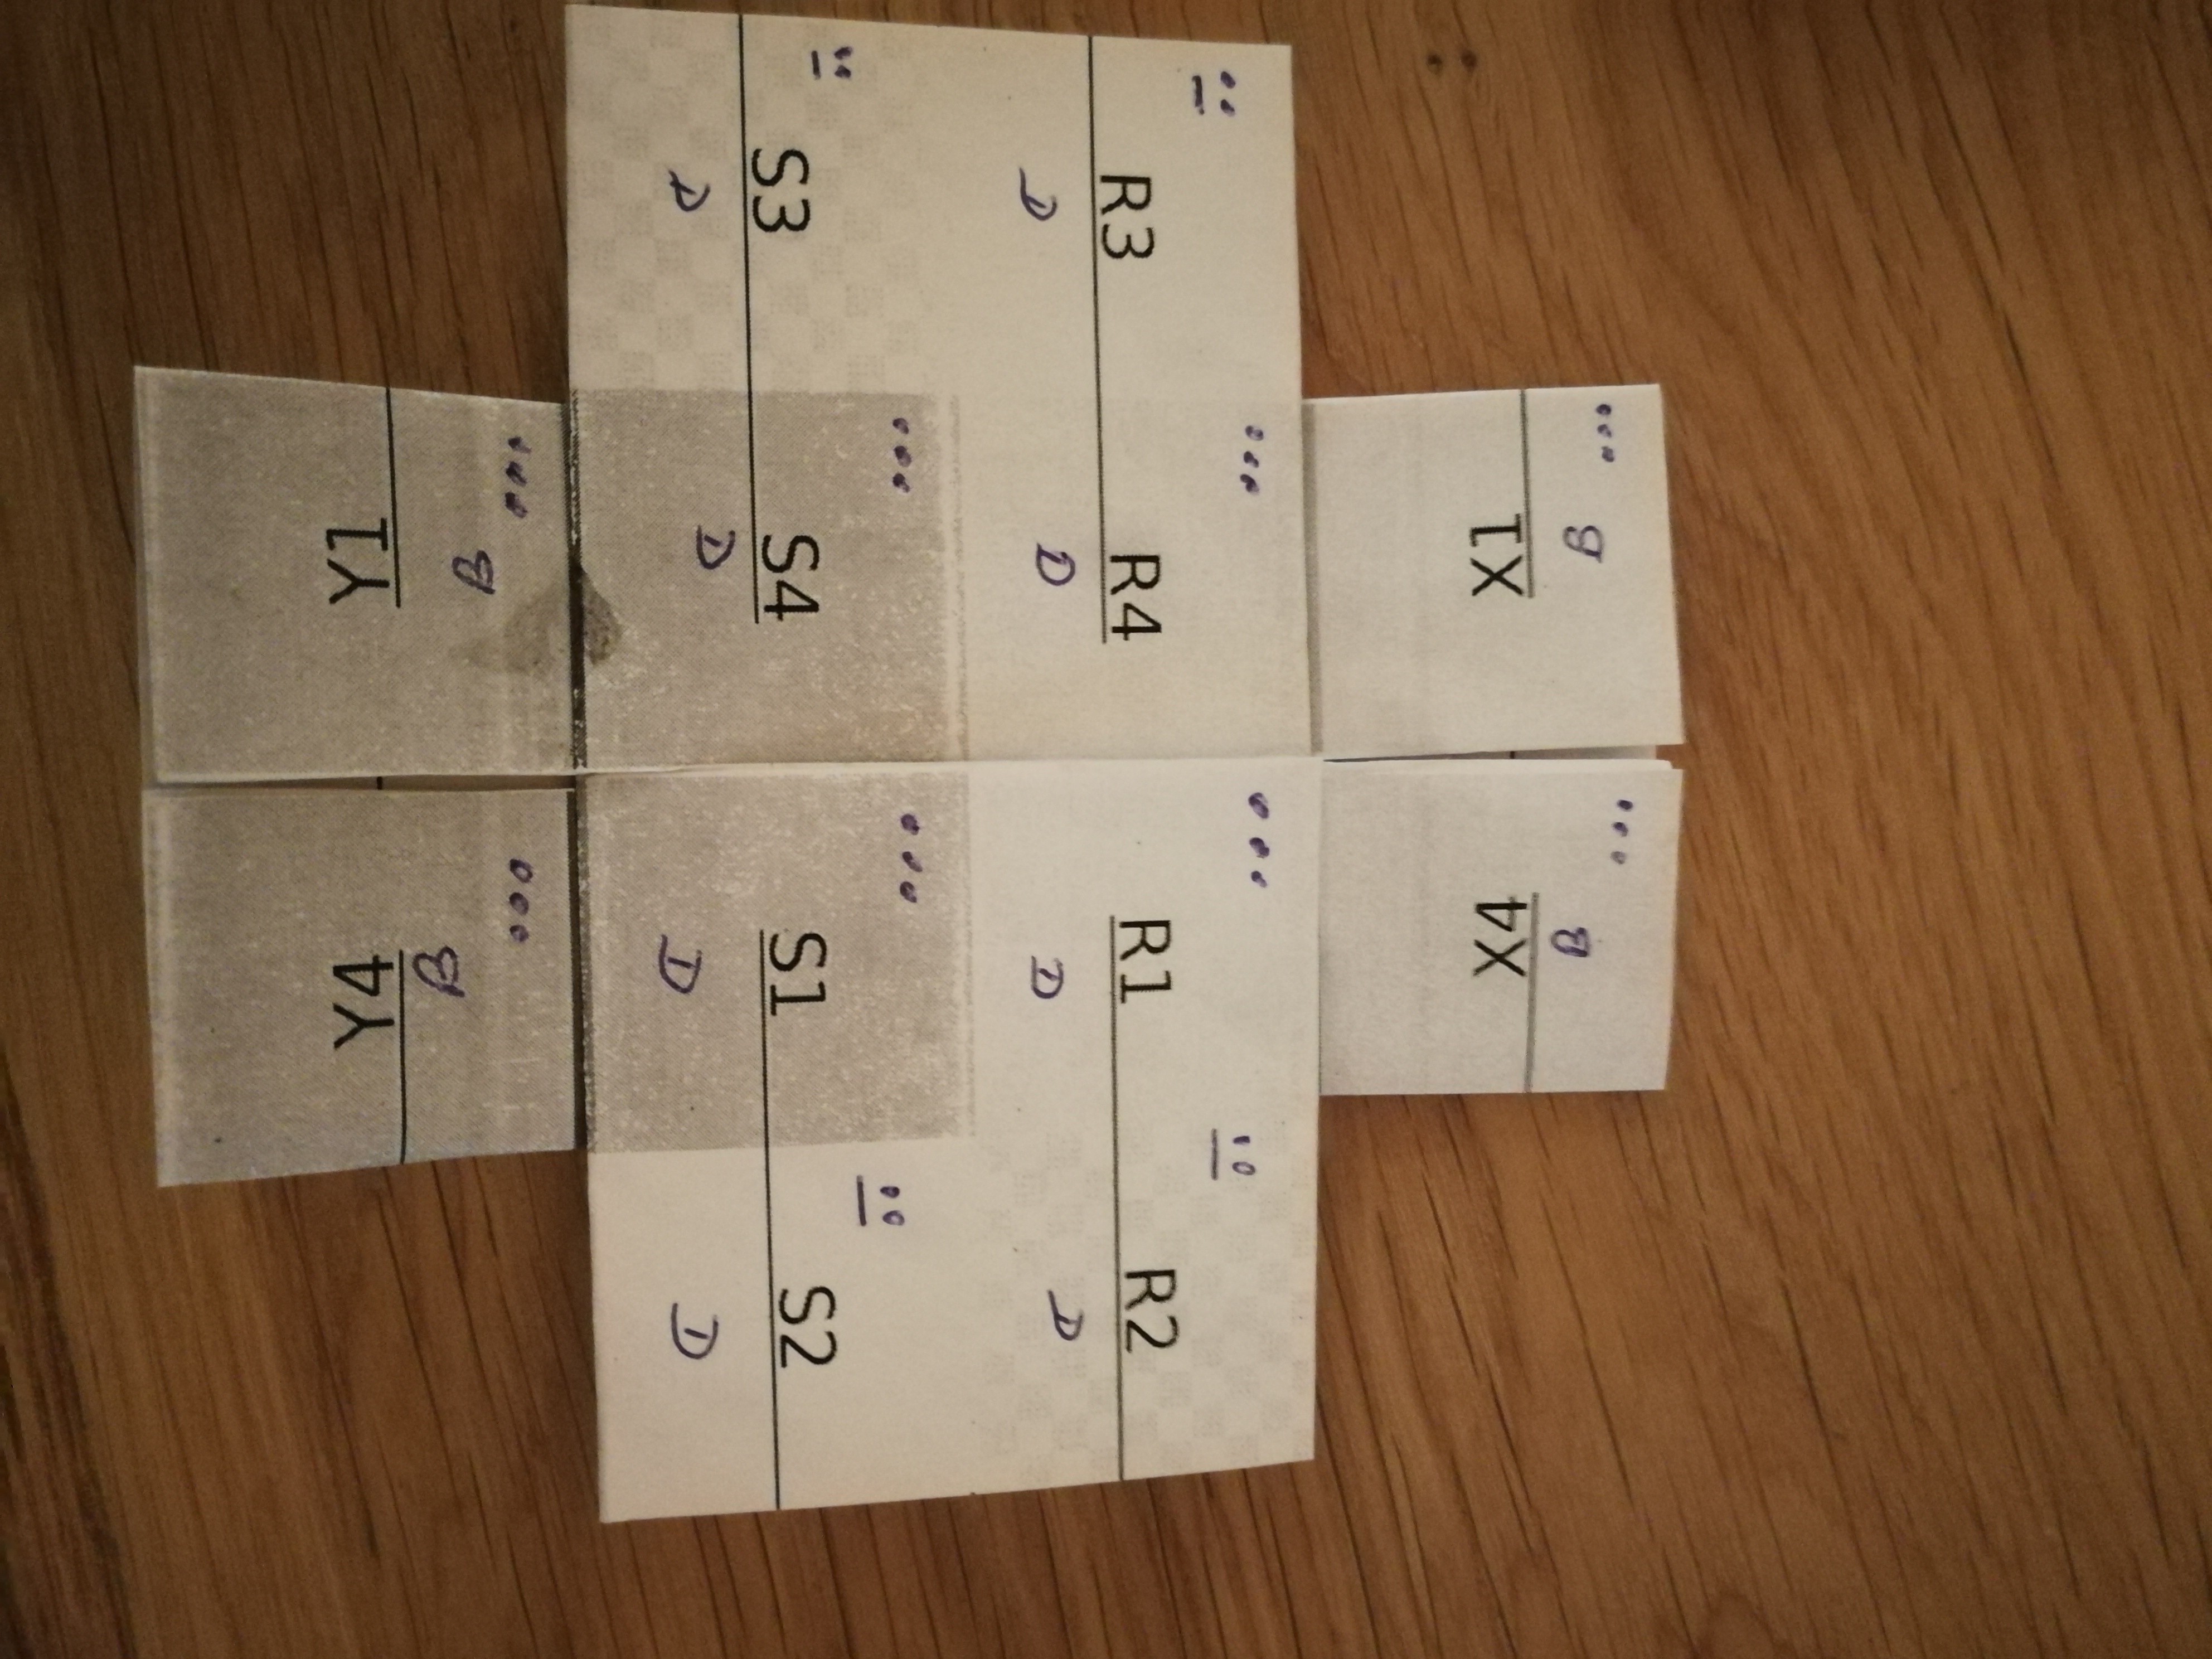
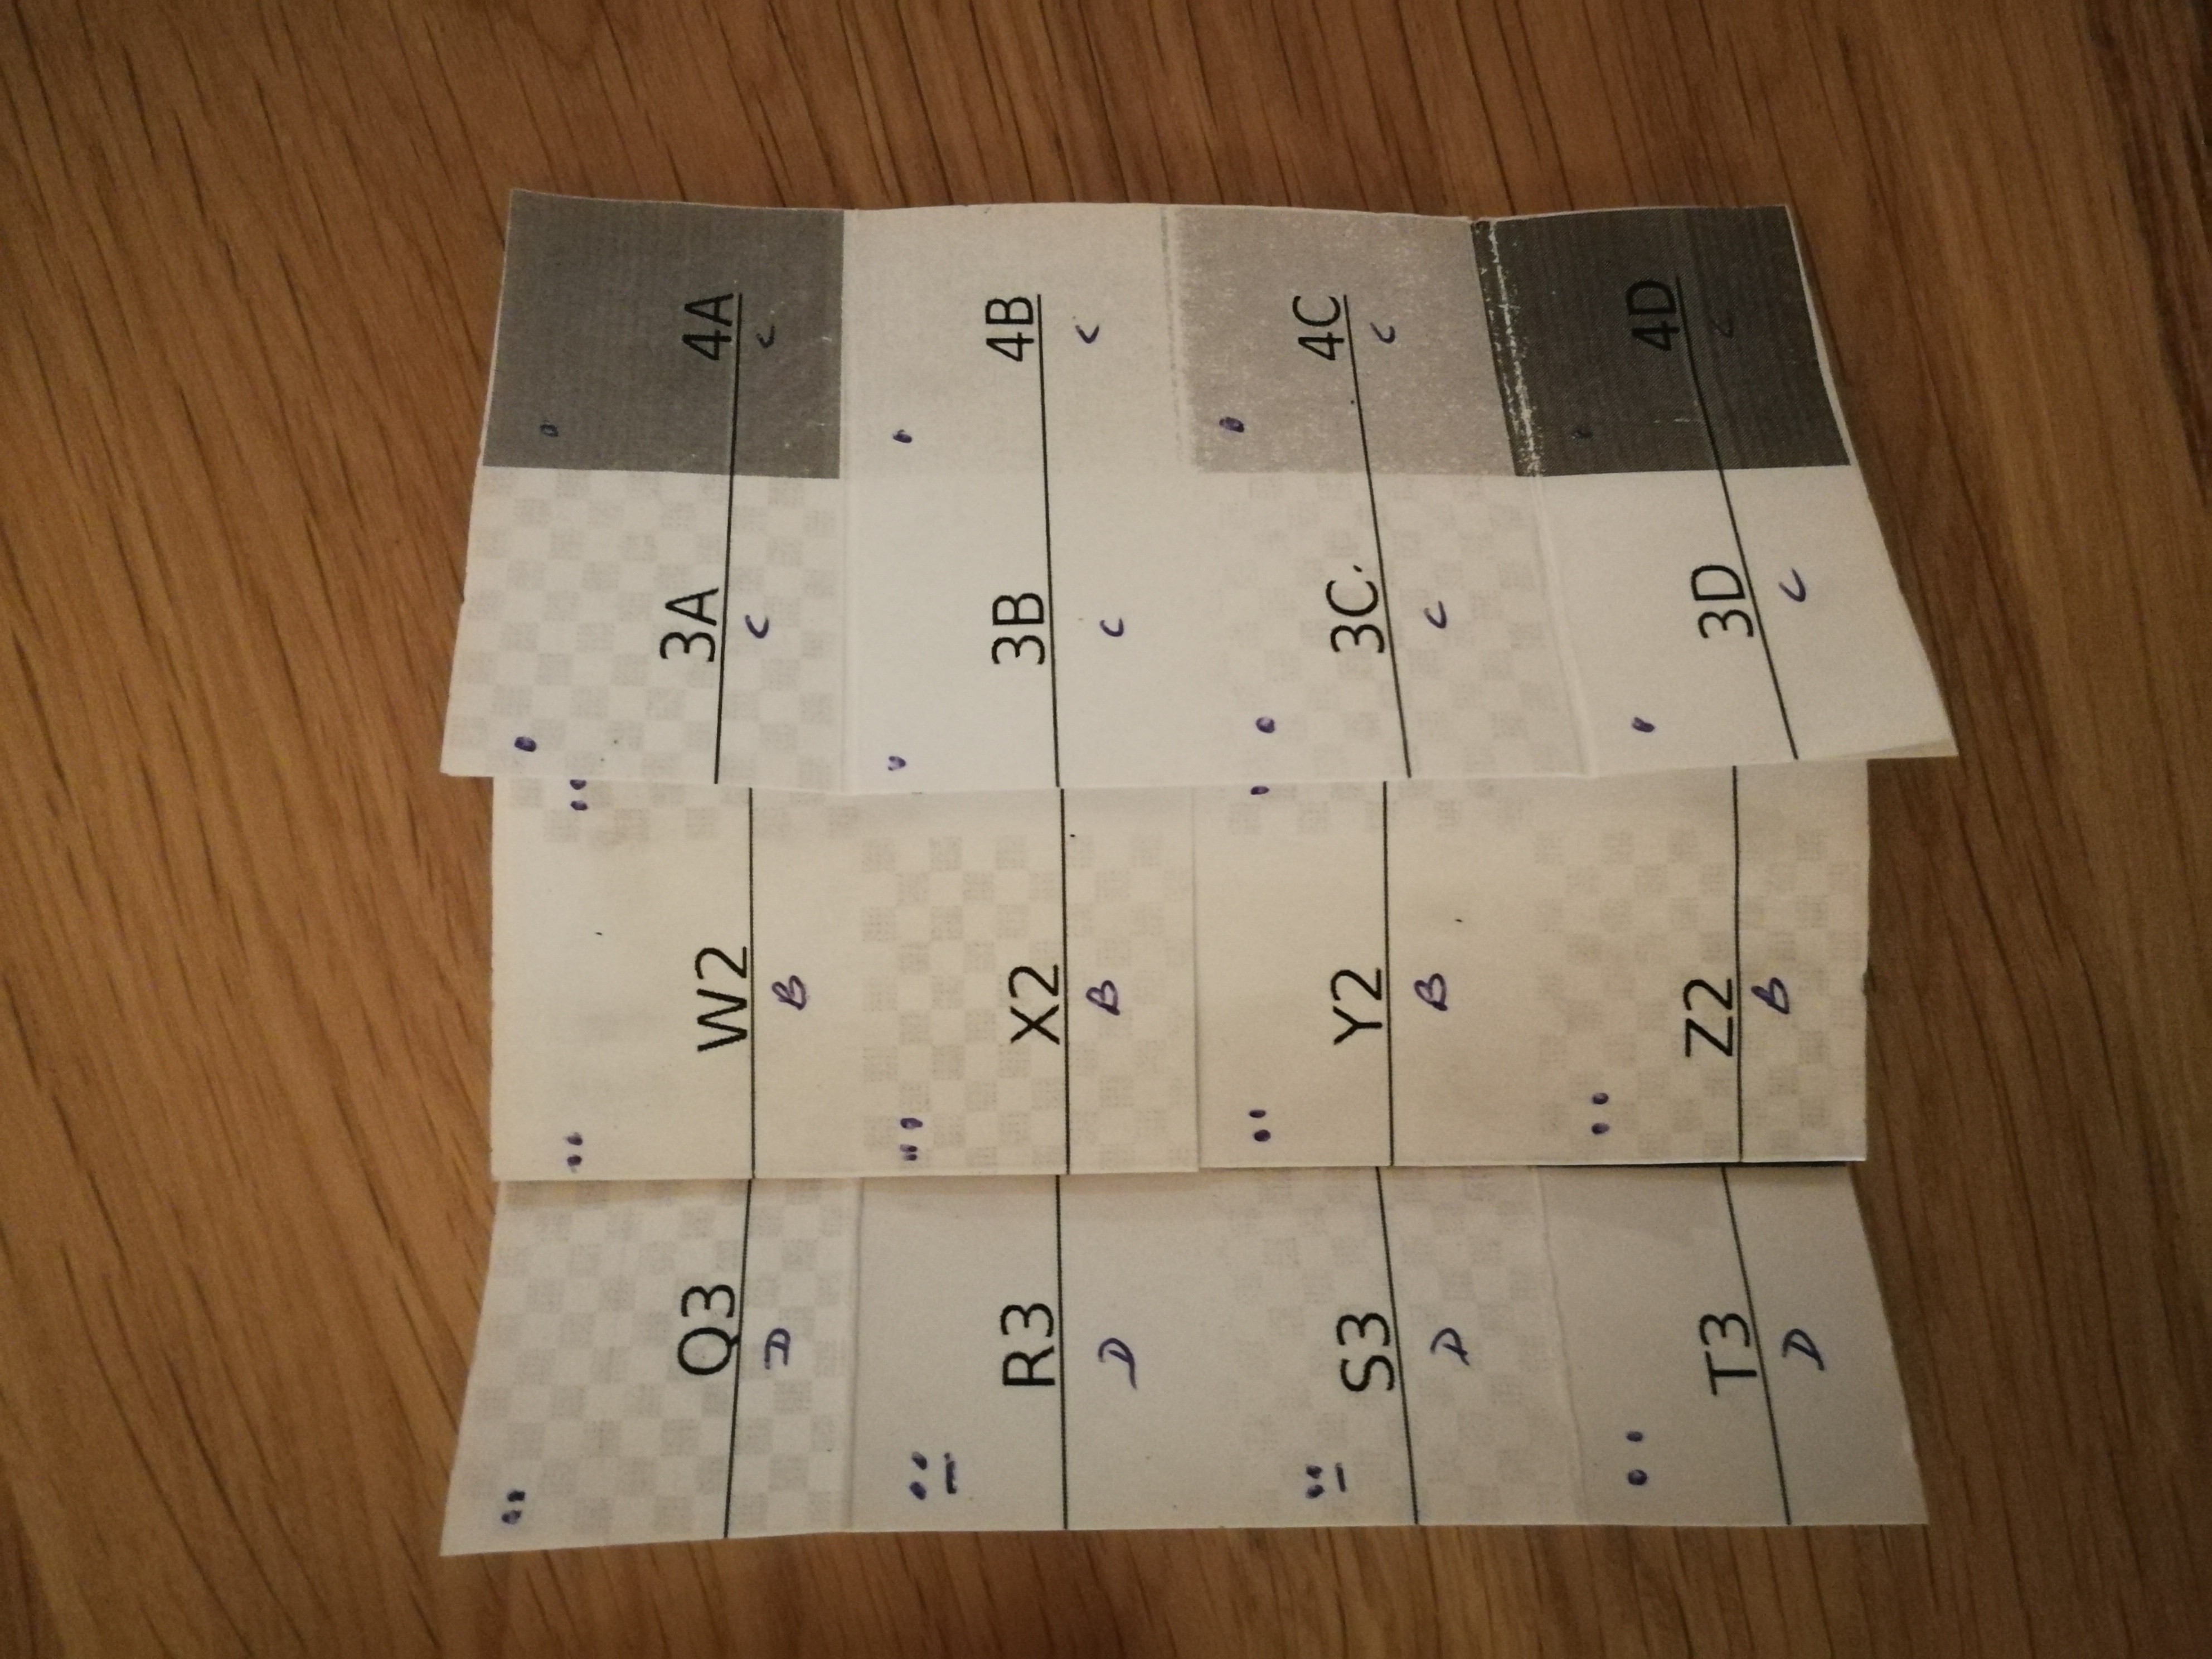
There are a few things that you will notice when you fold one, some parts of the card stay constant for example, and not all views have corners. Anyway I decided to treat it as a grid of tiles. I just printed 2 two-sided pieces of paper with unique numbers for each tile. Then I deciphered which tiles end up where after folding, and which ones are rotated 180 degrees. See madness below.
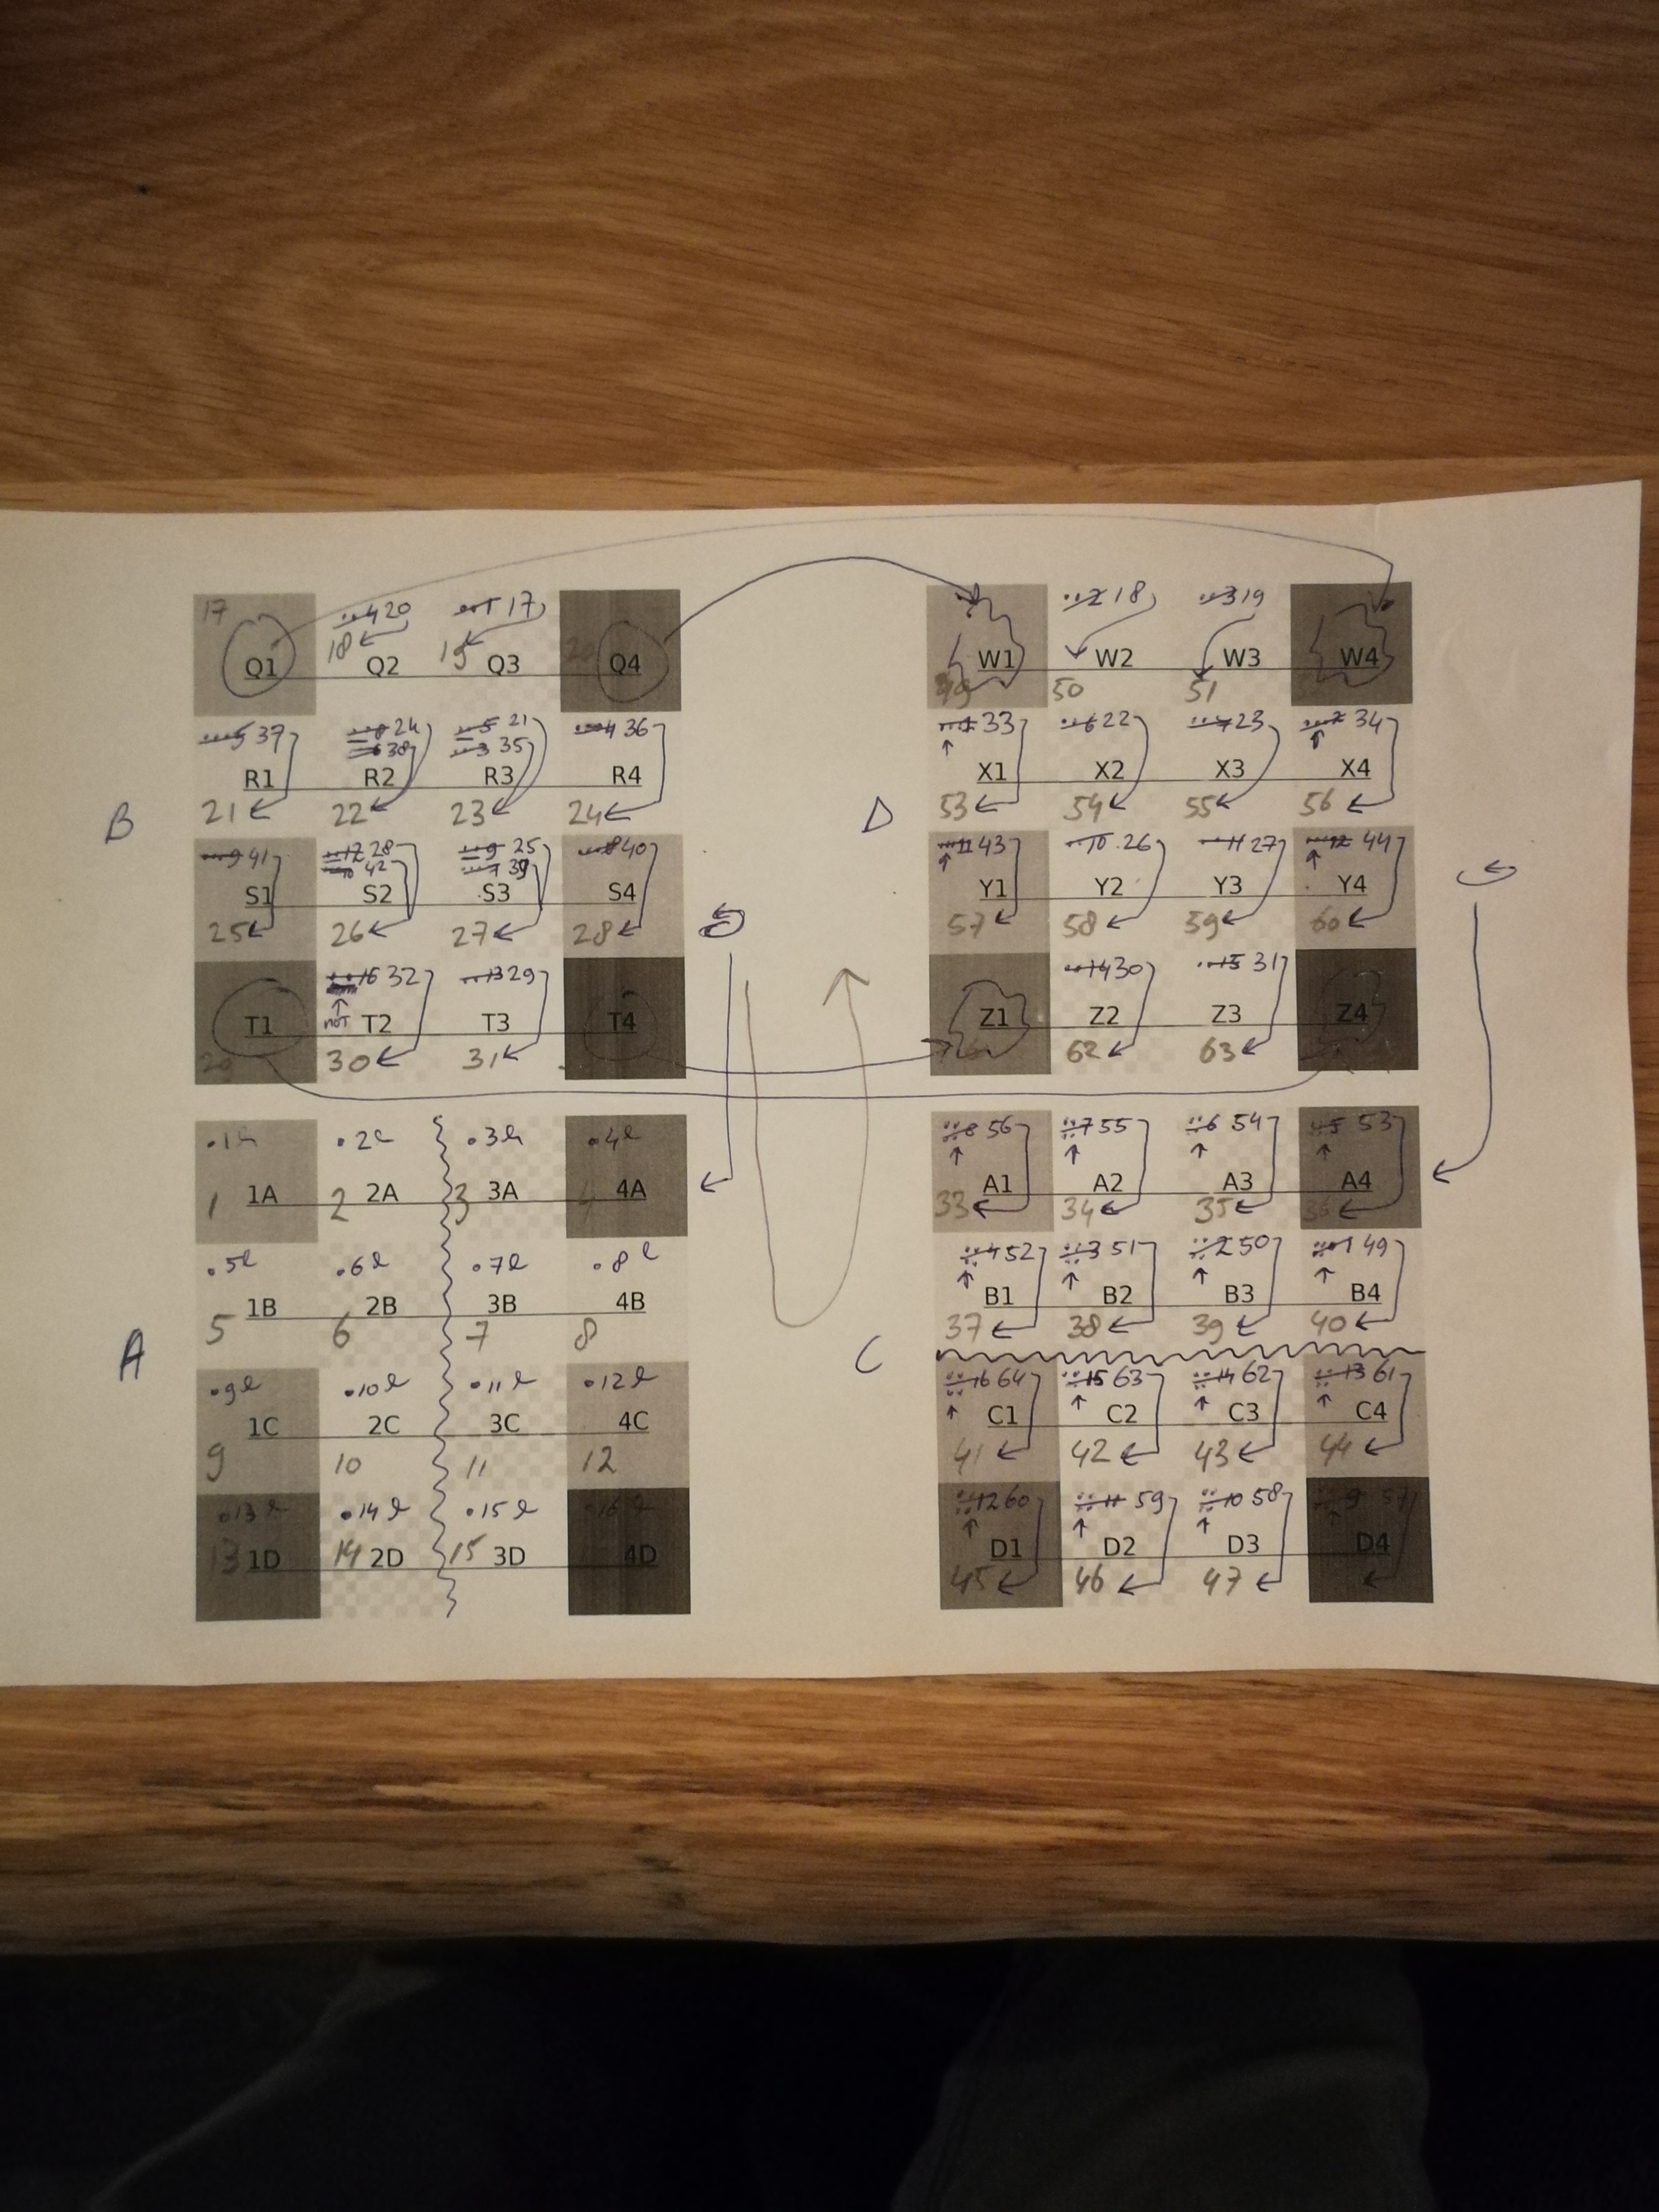
See the cardboard in action here: VID_20180531_011204.mp4
Design and print the card!
Designing the card in something like gimp is a lot of work of course, and it would be hell if you need to prepare it manually for printing.
Luckily I wrote a C++ program that uses the very cool Selene Image library, which I learned about via the Dutch C++ User Group ![]() ,
Michael (the author) gave an awesome lightning talk about it. It was good timing because a few days after that I needed to write this program.
,
Michael (the author) gave an awesome lightning talk about it. It was good timing because a few days after that I needed to write this program.
I didn't put this code on github, but here is the source code:
// This file is using the `Selene` library.
// Copyright 2017-2018 Michael Hofmann (https://github.com/kmhofmann).
// Distributed under MIT license. See accompanying LICENSE file in the top-level directory.

#include <selene/img/ImageAccess.hpp>
#include <selene/img/ImageDataToImage.hpp>
#include <selene/img/ImageToImageData.hpp>
#include <selene/img_io/IO.hpp>
#include <selene/img_ops/Algorithms.hpp>
#include <selene/img_ops/Transformations.hpp>
#include <selene/io/FileReader.hpp>
#include <selene/io/FileWriter.hpp>

#include <cassert>
#include <iostream>
#include <string>

#include <boost/filesystem.hpp>

using namespace sln::literals;

struct tile
{
  size_t index;
  size_t folded_index;
  bool flipped;
};

struct tile_index
{
  sln::PixelIndex x;
  sln::PixelIndex y;
};

// clang-format off
std::array<tile, 64> tiles {{
  /**
   * There are basically four sides (a,b,c,d), which I've divided into 16 tiles per side.
   * Side a & b will be printed on one piece of paper, double sided, as will sides c & d.
   * In total there are 64 tiles, and this table basically combines two states for each tile.
   *
   * When designing you create four "views" for each side, which is the desired outcome,
   * or the first state of each tile. Like:
   * {1, 2, 3, ..., 17, 18, 19, ..., 62, 53, 64.} (nothing will be rotated)
   *
   * But once you print them and glue them together, and you fold your way through the card,
   * the tiles appear in different order, and sometimes even rotated 180 degrees.
   * This is the second state of the tiles. Something like:
   * {1, 2, 3, ..., 19, 50, 51, ..., 43+rotate, 42+rotate, 43+rotate}
   *
   * Both states are combined in this table, for each tile the following fields:
   * - index: the tile number (for the first state)
   * - folded index: the tile number (for the second state)
   * - flipped: whether the tile is rotated 180 degrees in the 2nd state.
   *
   * So basically what needs to happen is move each tile from index -> folded_index, rotate
   * if needed, and you can just print the resulting images and when you assemble the card
   * all your designs appear the way you intended them to. Doing this in something like
   * Photoshop or Gimp would be a huge pain, so that's why I made this program.
   */
  // a
  {1, 1, false},   {2, 2, false},   {3, 3, false},   {4, 4, false},
  {5, 5, false},   {6, 6, false},   {7, 7, false},   {8, 8, false},
  {9, 9, false},   {10, 10, false}, {11, 11, false}, {12, 12, false},
  {13, 13, false}, {14, 14, false}, {15, 15, false}, {16, 16, false},

  // b (corner tiles are glued)
  {17, 19, false}, {18, 50, false}, {19, 51, false}, {20, 18, false},
  {21, 23, false}, {22, 54, false}, {23, 55, false}, {24, 22, false},
  {25, 27, false}, {26, 58, false}, {27, 59, false}, {28, 26, false},
  {29, 31, false}, {30, 62, false}, {31, 63, false}, {32, 30, false},

  // c (corner tiles are unset, tiles on left and right are similar as previous (side b))
  {33, 0, false},  {34, 53, true},  {35, 56, true},  {36, 0, false},
  {37, 0, false},  {38, 24, false}, {39, 21, false}, {40, 0, false},
  {41, 0, false},  {42, 28, false}, {43, 25, false}, {44, 0, false},
  {45, 0, false},  {46, 57, true},  {47, 60, true},  {48, 0, false},

  // d (corner tiles are glued)
  {49, 40, true},  {50, 39, true},  {51, 38, true},  {52, 37, true},
  {53, 36, true},  {54, 35, true},  {55, 34, true},  {56, 33, true},
  {57, 48, true},  {58, 47, true},  {59, 46, true},  {60, 45, true},
  {61, 44, true},  {62, 43, true},  {63, 42, true},  {64, 41, true},
}};
// clang-format on

template <typename PixelType>
sln::Image<PixelType> load_image(const char* filename)
{
  auto img_data = sln::read_image(sln::FileReader(filename));
  if (!img_data.is_valid())
  {
    std::cerr << "Image data could not be decoded." << std::endl;
  }
  const auto img = sln::to_image<PixelType>(std::move(img_data));
  assert(img.is_valid());
  return img;
}

template <typename T>
void copy(T src, T dst)
{
  for (auto y = 0_idx; y < src.height(); ++y)
  {
    for (auto ptr = src.data(y), end = src.data_row_end(y), ptr2 = dst.data(y); ptr != end; ++ptr, ++ptr2)
    {
      *ptr2 = *ptr;
    }
  }
}

int main()
{
  // load the four all-equal in size views for the endless card
  auto img1 = load_image<sln::Pixel_8u4>("card_a.png");
  auto img2 = load_image<sln::Pixel_8u4>("card_b.png");
  auto img3 = load_image<sln::Pixel_8u4>("card_c.png");
  auto img4 = load_image<sln::Pixel_8u4>("card_d.png");

  assert(img1.width() == img2.width() && img1.height() == img2.height());
  assert(img2.width() == img3.width() && img2.height() == img3.height());
  assert(img3.width() == img4.width() && img3.height() == img4.height());

  // concat all images into one long image, making it easier to calculate coordinates for each tile
  sln::Image<sln::Pixel_8u4> input(img1.width(), sln::to_pixel_length(img1.height() * 4));
  sln::Image<sln::Pixel_8u4> output = clone(input);

  copy(img1, sln::view(input, 0_idx, 0_idx, img1.width(), img1.height()));
  copy(img2, sln::view(input, 0_idx, sln::to_pixel_index(img1.height() * 1), img1.width(), img1.height()));
  copy(img3, sln::view(input, 0_idx, sln::to_pixel_index(img1.height() * 2), img1.width(), img1.height()));
  copy(img4, sln::view(input, 0_idx, sln::to_pixel_index(img1.height() * 3), img1.width(), img1.height()));

  // helper lambda to get coordinate for a given tile number
  const auto tile_width = sln::to_pixel_length(img1.width() / 4);
  const auto tile_height = sln::to_pixel_length(img1.height() / 4);
  auto index_to_x_and_y = [=](size_t index) -> tile_index {
    const size_t x = ((index - 1) % 4) * static_cast<sln::PixelLength::value_type>(tile_width);
    const size_t y = ((index - 1) / 4) * static_cast<sln::PixelLength::value_type>(tile_height);
    return {sln::to_pixel_index(x), sln::to_pixel_index(y)};
  };

  // copy each tile to the correct location for printing the endless card
  for (const auto& tile : tiles)
  {
    auto src_index = index_to_x_and_y(tile.index);
    auto dst_index = index_to_x_and_y(tile.folded_index);
    if (tile.folded_index == 0)
    {
      continue;
    }
    auto src = sln::view(input, src_index.x, src_index.y, tile_width, tile_height);
    auto dst = sln::view(output, dst_index.x, dst_index.y, tile_width, tile_height);
    if (tile.flipped)
    {
      copy(sln::rotate<sln::RotationDirection::Clockwise180>(src), dst);
    }
    else
    {
      copy(src, dst);
    }
  }

  // debug
  sln::write_image(to_image_data_view(input, sln::PixelFormat::RGBA), sln::ImageFormat::PNG,
                   sln::FileWriter("result.png"));
  sln::write_image(to_image_data_view(output, sln::PixelFormat::RGBA), sln::ImageFormat::PNG,
                   sln::FileWriter("result2.png"));

  // write the resulting cards ready to print, result a + b double sided, and c + d double sided.
  sln::write_image(
      to_image_data_view(sln::view(output, 0_idx, 0_idx, img1.width(), img1.height()), sln::PixelFormat::RGBA),
      sln::ImageFormat::PNG, sln::FileWriter("result_a.png"));
  sln::write_image(
      to_image_data_view(sln::view(output, 0_idx, sln::to_pixel_index(img1.height() * 1), img1.width(), img1.height()),
                         sln::PixelFormat::RGBA),
      sln::ImageFormat::PNG, sln::FileWriter("result_b.png"));
  sln::write_image(
      to_image_data_view(sln::view(output, 0_idx, sln::to_pixel_index(img1.height() * 2), img1.width(), img1.height()),
                         sln::PixelFormat::RGBA),
      sln::ImageFormat::PNG, sln::FileWriter("result_c.png"));
  sln::write_image(
      to_image_data_view(sln::view(output, 0_idx, sln::to_pixel_index(img1.height() * 3), img1.width(), img1.height()),
                         sln::PixelFormat::RGBA),
      sln::ImageFormat::PNG, sln::FileWriter("result_d.png"));

  return 0;
}
Input & Output
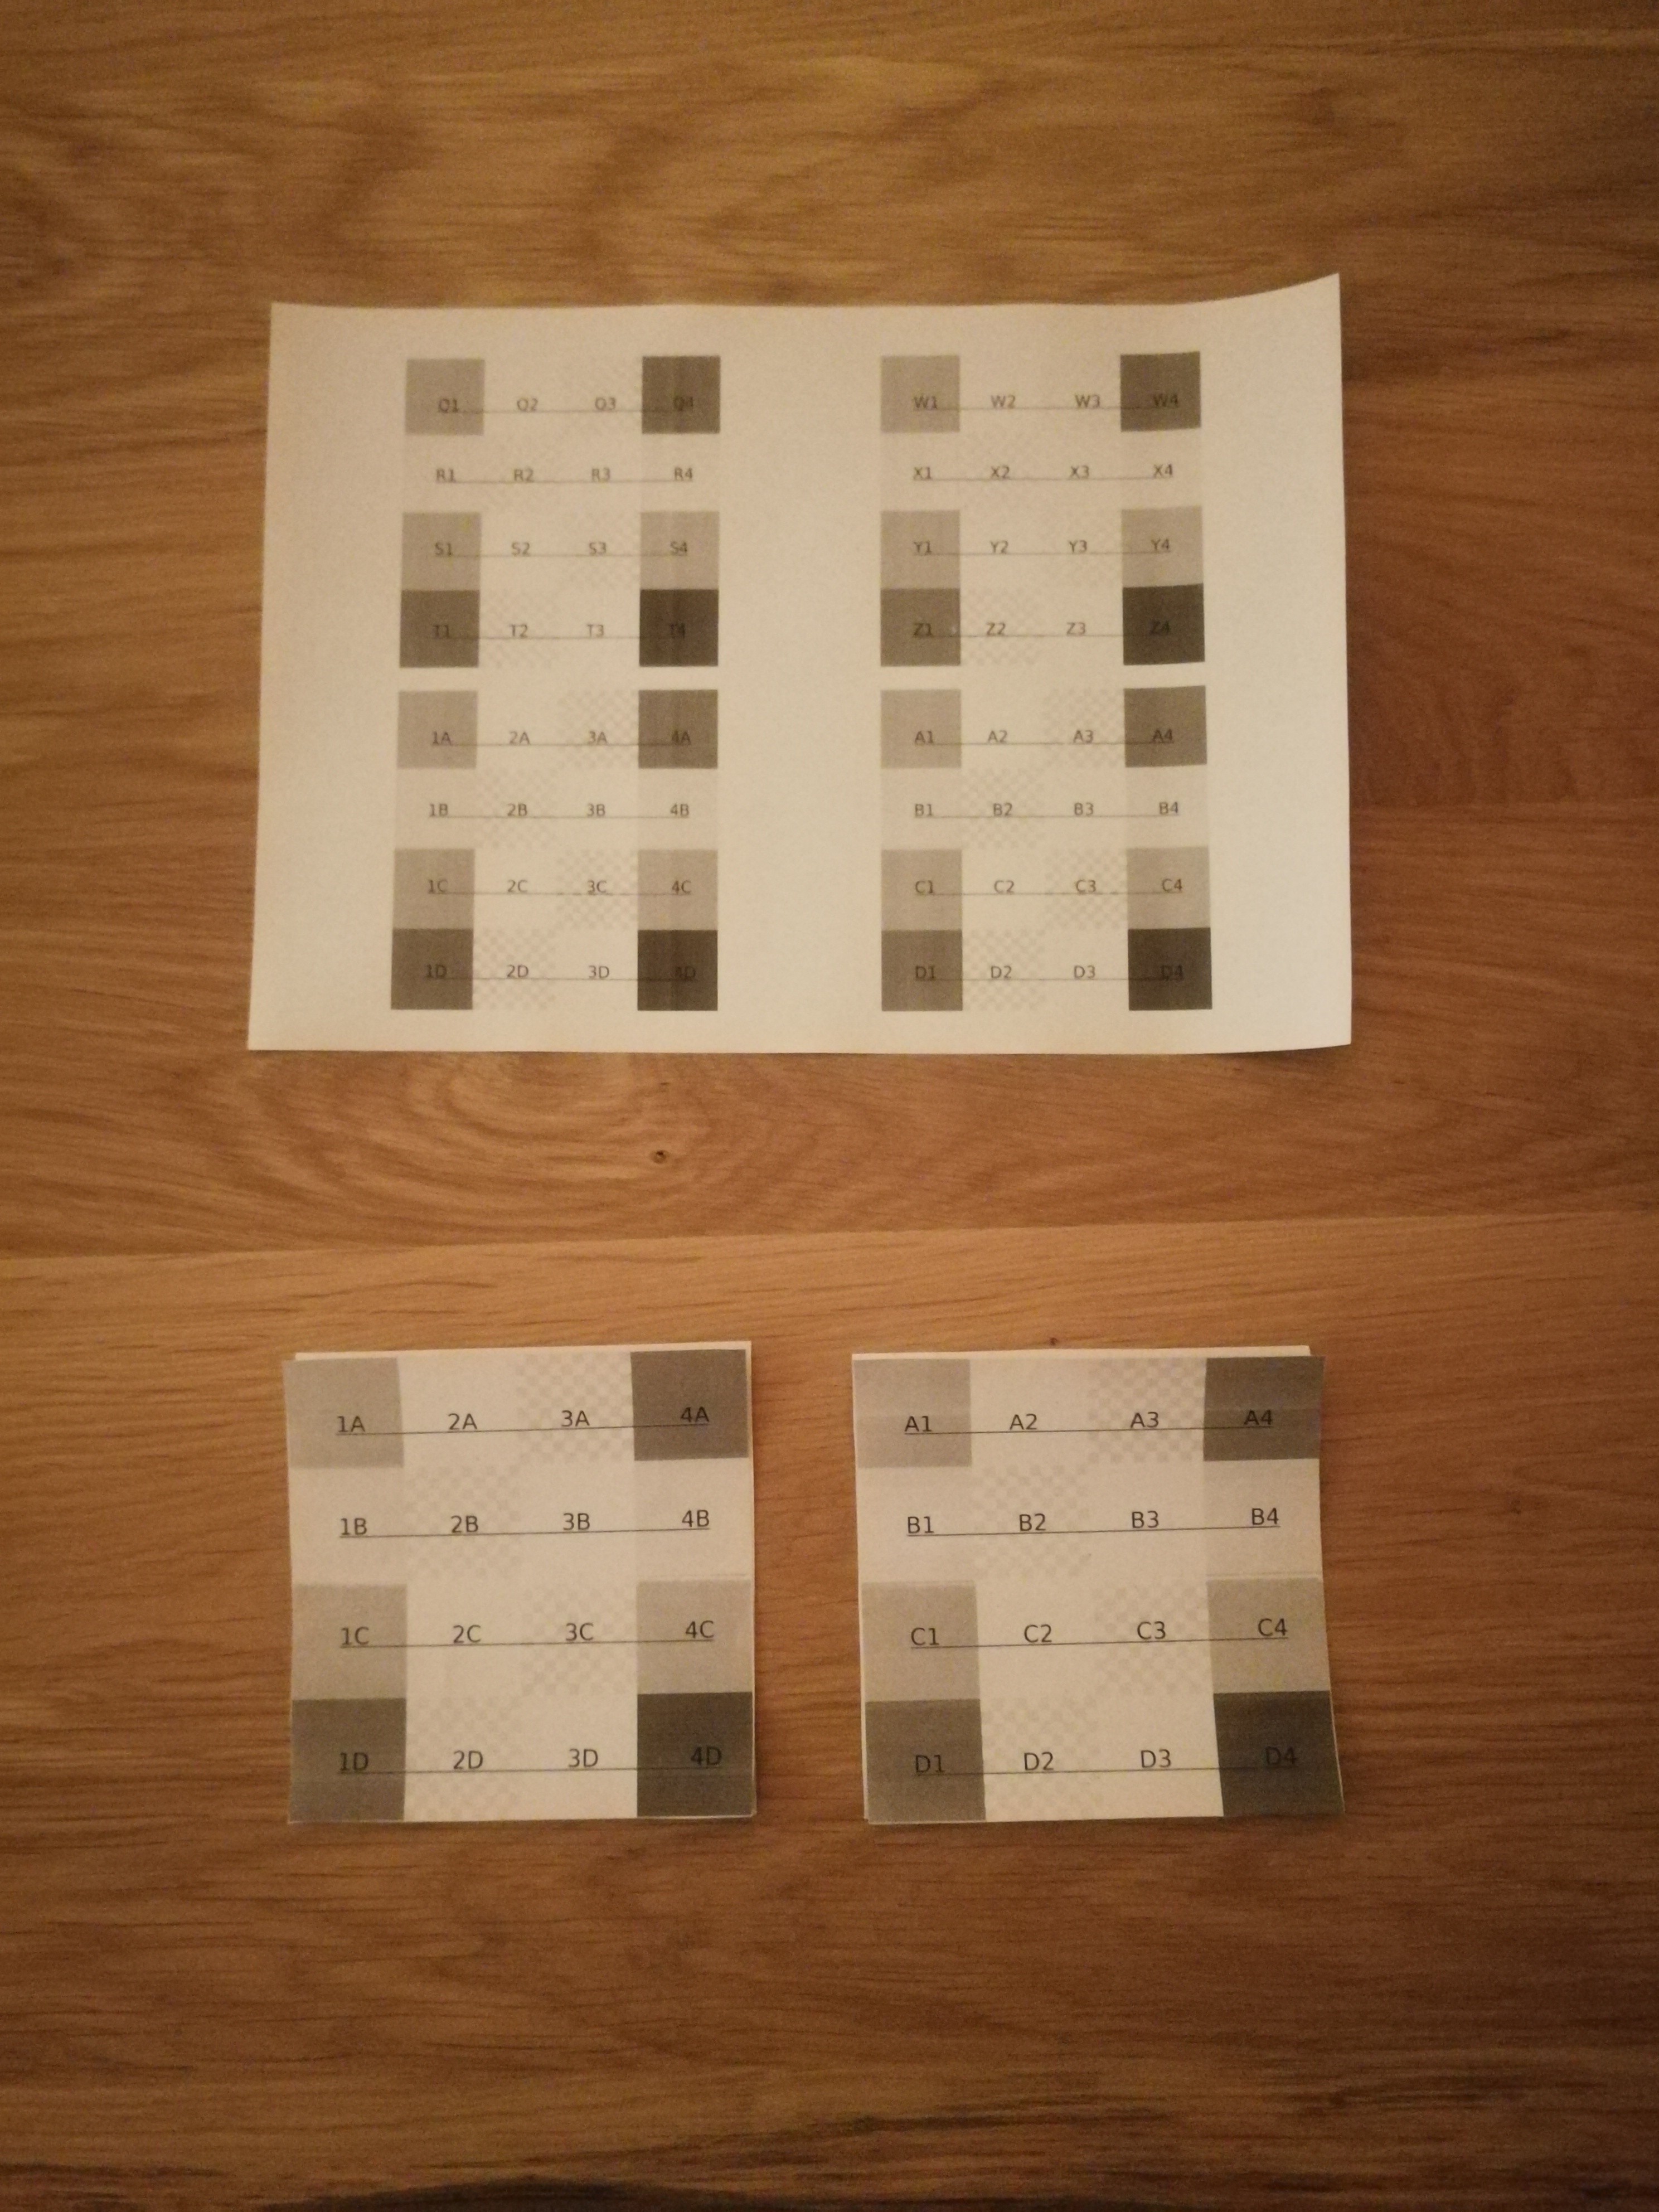
The program reads card_a.png, card_b.png, card_c.png, card_d.png.
Does it's magic and procudes: result_a.png, result_b.png, result_c.png, result_d.png.
 <-- the *input* images
  <-- the *output* images
As you can see the resulting images look a bit weird, but when printed double sidedly, card A and B on one side, and card C and D on the other side of the paper, you can cut them out and fold them.
How to fold?
This is how I did it, I didn't plan to make a blog post so I didn't completely document every step. But at least on this picture should give you an idea:
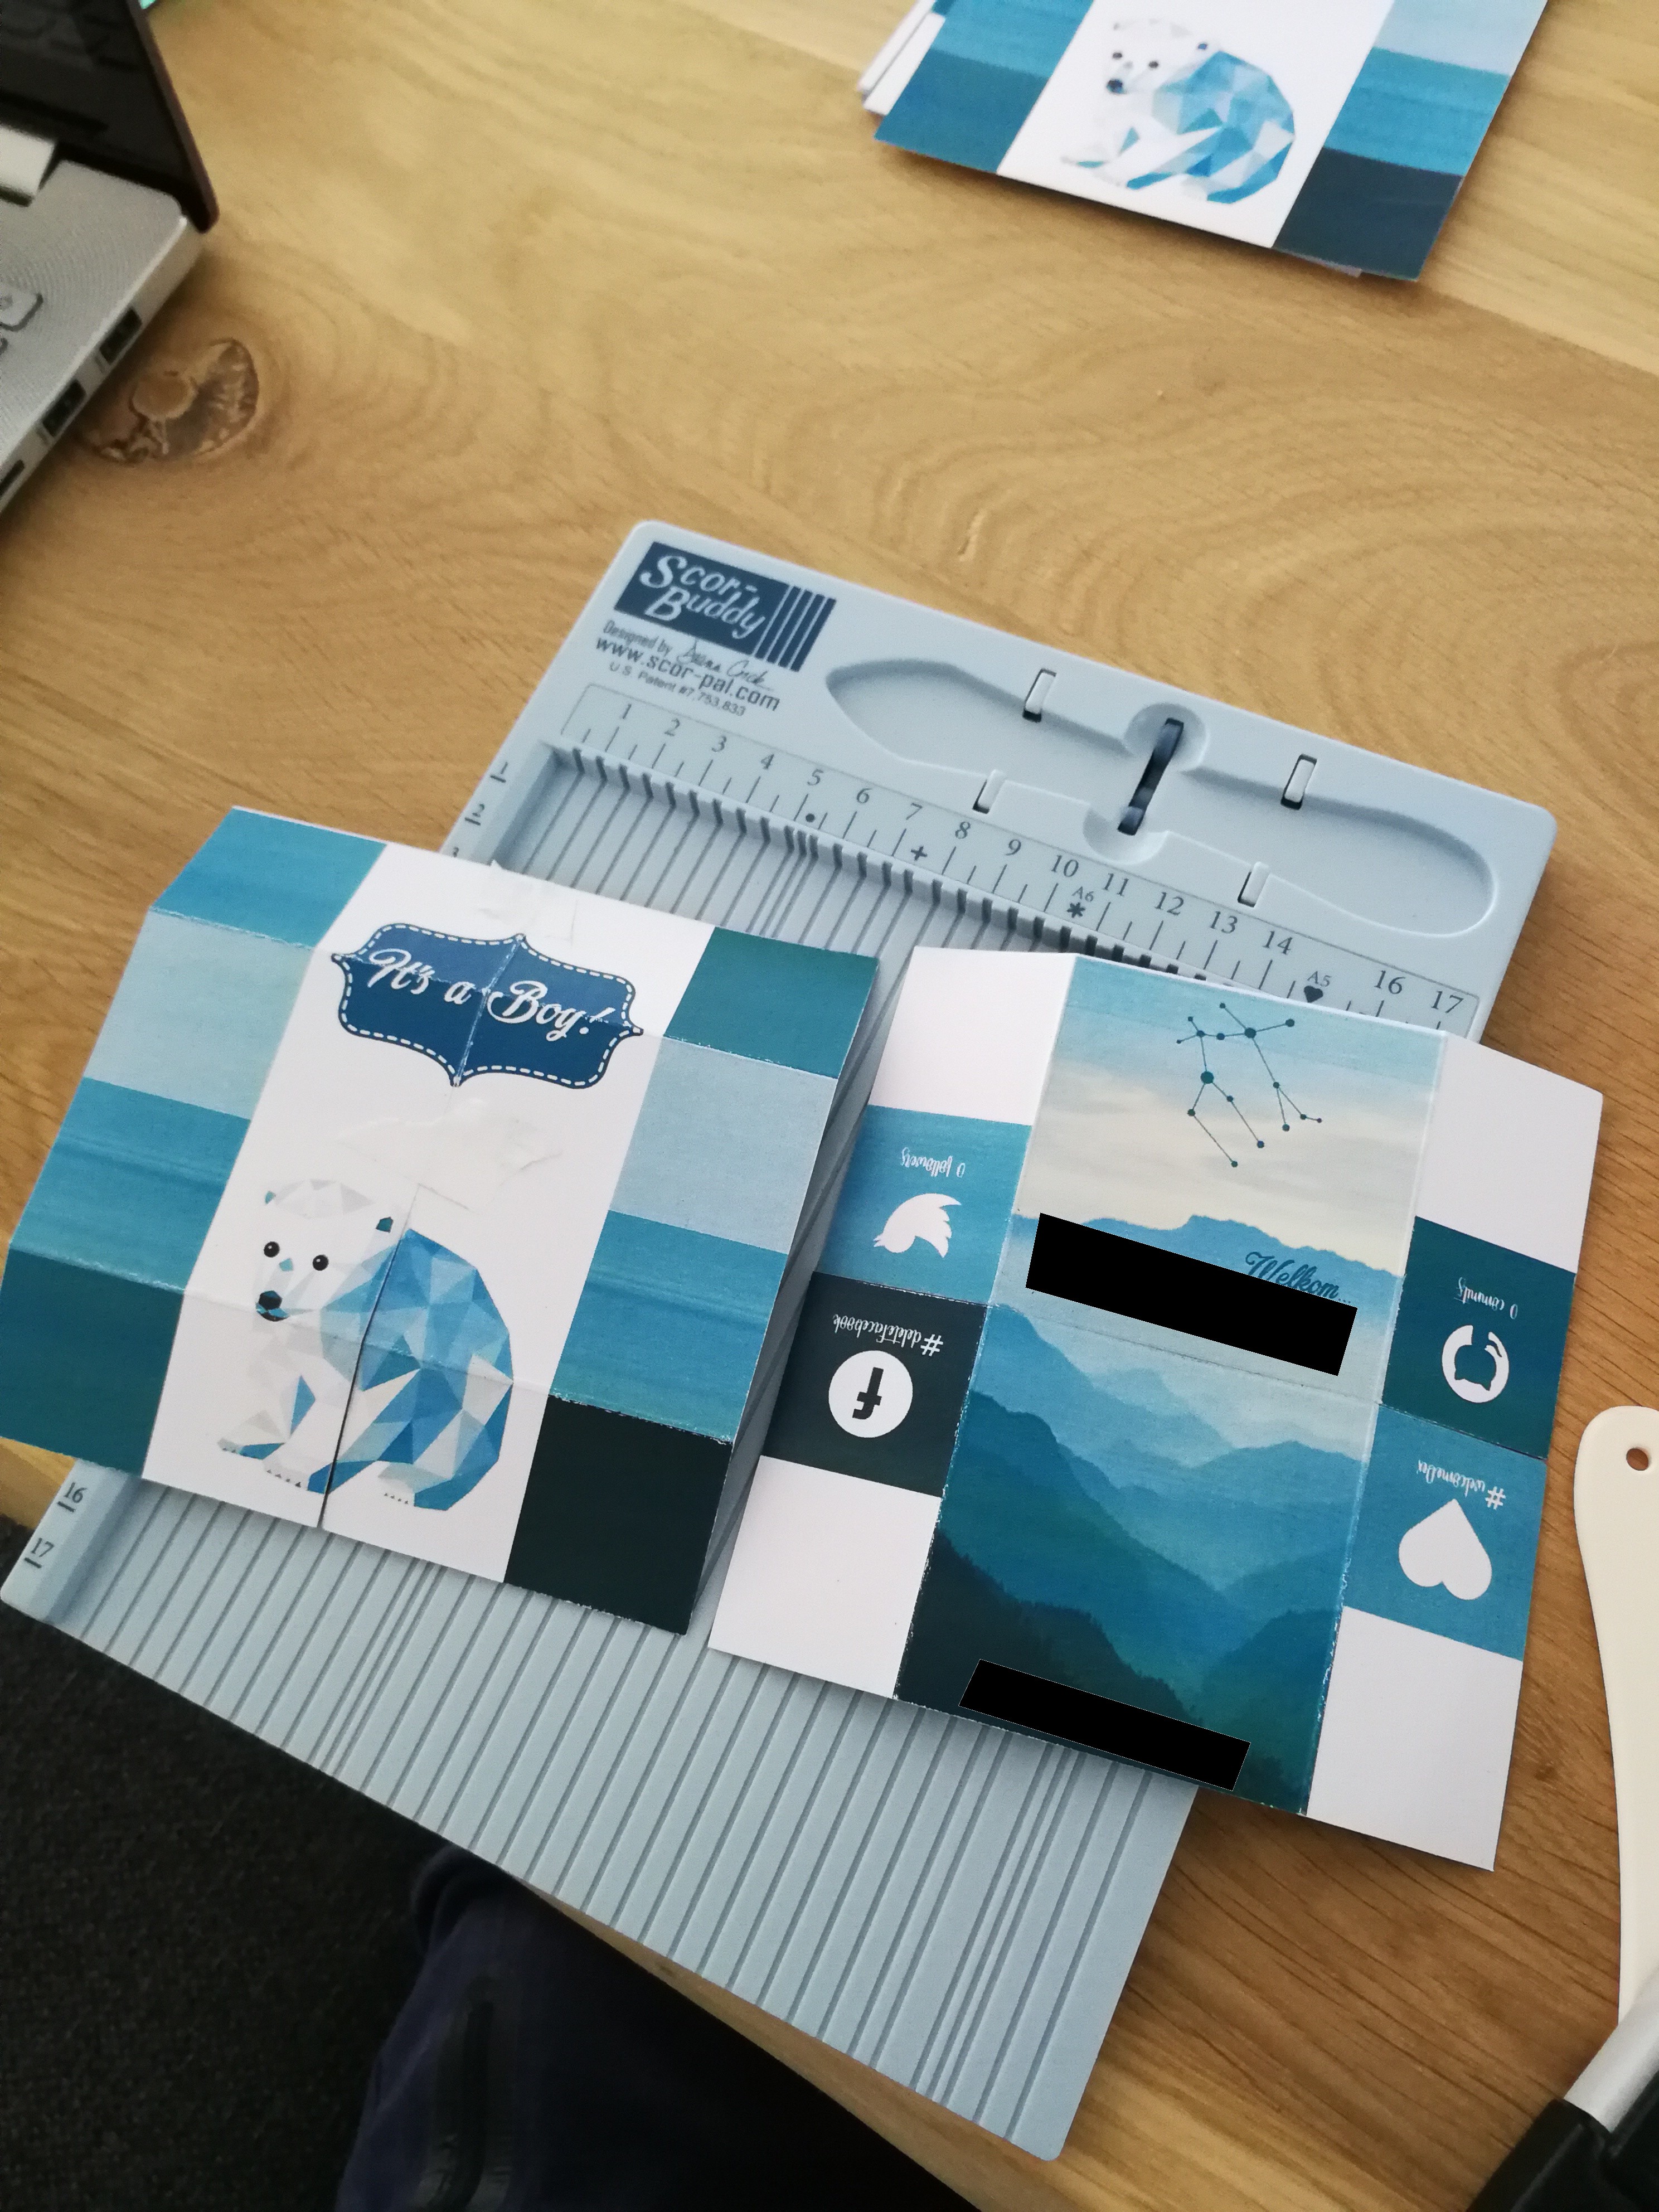
For folding I bought a "Scor-Pal", I can recommend this tool it makes nice folds, doing without would give crappy results on thick paper IMO.
The polar bear piece of paper is side A & C, and cut in the middle already, and two horizontal pre-folds are made (sloppy ones though ![]() ).
The other two sides
).
The other two sides C & D are pre-folded as well, but I didn't cut it horizontally yet.
After cutting, glue the white edges on sides B & C together, and have it dry, the card should be done.
Conclusion
After having folded about 60 of these I finally got the hang of it and I could produce pretty slick cards. One thing I did was print myself with a color laser printer on very thick paper, this gave "meh" results, the toner had trouble sticking to the paper especially after folding. I recommend doing the printing at a specialized shop, maybe to avoid the toner letting loose, but also because aligning both sides is important. Not all printers are great at this I've discovered, especially if you have to use the manual feed for the thick paper.
What worked best is this order:
- Printing both sides
- Cut out the two sides with something like

- Do the (in total four) pre-folds on both pieces of paper (do them in the right direction)
- Cut the first one vertically, perfectly in the middle.
- Cut the second one horizontally, perfectly in the middle.
- Put glue on the corners for the second one now (the one cut horizontally)
- Then align those two pieces perfectly so it appears whole again.
- One by one add the other (the one cut vertically) two pieces, you'll find with the glue still wet it's easy to adjust.
- When done, let it dry, and later on pre-fold some more for the definitive card.

I'm a heavy user of scratch pads with i3, I often don't like the dimensions of a window after you make them floating. As do other people, see here and here2.
I've used a customized version of the solution proposed in one of the comments by the creator of i3-gaps (Airblader) here3. This has served me well, but one thing bugged me when using multiple monitors it wouldn't center the window correctly, so I made a Python script that first uses Qt to get all screen dimensions and determine the correct offset based on the Mouse position. It's a bit overkill probably, but it works, so I'm happy with it.
Step 1: download, make, and make install wmutils.
Note that if you update your system in the meantime, it may have to be recompiled at some point, I've experienced this with the lsw command which is using some X calls that changed after I updated from Ubuntu 17.04 -> 17.10.
Step 2: put this python script somewhere
#!/usr/bin/env python3
import os
import os.path
import psutil
import subprocess
import sys
from PyQt5.QtCore import *
from PyQt5.QtGui import *
from PyQt5.QtWidgets import *
from pymouse import PyMouse
from sys import platform


def clamp(n, smallest, largest):
    return max(smallest, min(n, largest))


def current_screen_size(mouse_position):
    for screen in app.screens():
        (x, y) = mouse_position
        screen_geom = screen.availableGeometry();
        if (x >= screen_geom.left() and y >= screen_geom.top() and
            x <= screen_geom.left() + screen_geom.width() and
            y <= screen_geom.top() + screen_geom.height()):
            return screen_geom
    return app.desktop().availableGeometry(-1)


# read ratio from config file
ratio_file = "/tmp/resize_ratio.txt"
ratio = 70

if os.path.isfile(ratio_file):
    file = open(ratio_file, "r")
    ratio = int(file.read())
    file.close()

if len(sys.argv) > 1:
    if sys.argv[1] == 'inc':
        ratio += 10
    elif sys.argv[1] == 'dec':
        ratio -= 10

ratio = clamp(ratio, 10, 100)

# get mouse and screen specs
app = QApplication(sys.argv)
mouse = PyMouse()
screen = current_screen_size(mouse.position())

# call wmutils::core utilities
currentWindow = subprocess.check_output(["pfw"])

# resize the window
new_width = (screen.width() / 100) * ratio
new_height = (screen.height() / 100) * ratio
# subprocess.call([
#     "wrs",
#     "-a",
#     str(new_width),
#     str(new_height),
#     currentWindow
# ])

# position the window centered (+ resize)
new_x = screen.left() + ((screen.width() - new_width) / 2)
new_y = screen.top() + ((screen.height() - new_height) / 2)
subprocess.call([
    "wtp",
    str(new_x),
    str(new_y),
    str(new_width),
    str(new_height),
    currentWindow
])

# persist current ratio
file = open("/tmp/resize_ratio.txt", "w")
file.write(str(ratio))
file.close()
Don't forget chmod +x /path/to/resize.py
You may need to install some python3 -m pip install ... when you try to run it you'll probably discover what exactly, I forgot to keep a requirements.txt.
From what I remember you need at least: python -m pip install pyuserinput pyqt5 python-xlib
Step 3: modify resize mode in i3
Probably you already have a "resize" mode, just add something like SHIFT+J and SHIFT+K to that mode to call the python script:
mode "resize" {
    bindsym Shift+k exec $HOME/.bin/resize.py inc
    bindsym Shift+j exec $HOME/.bin/resize.py dec
    ...
}
bindsym $mod+r mode "resize" Finally, I was able to attend this conference, missing out two years in a row, and it was great.
So far it has been the largest yet with 600 attendees, and AFAIK Bjarne Stroustrup was present for the first time this year.
Finally, I was able to attend this conference, missing out two years in a row, and it was great.
So far it has been the largest yet with 600 attendees, and AFAIK Bjarne Stroustrup was present for the first time this year.
I went to Berlin with my girlfriend two days before the event so we had a chance to see Berlin. Even though the weather was very much what you would expect around this time of year, cloudy, rainy, etc. we had a great time. Especially renting bikes and sightseeing.
[Image caption] Brief moment of no-rain..
Talks I attended... DAY 1
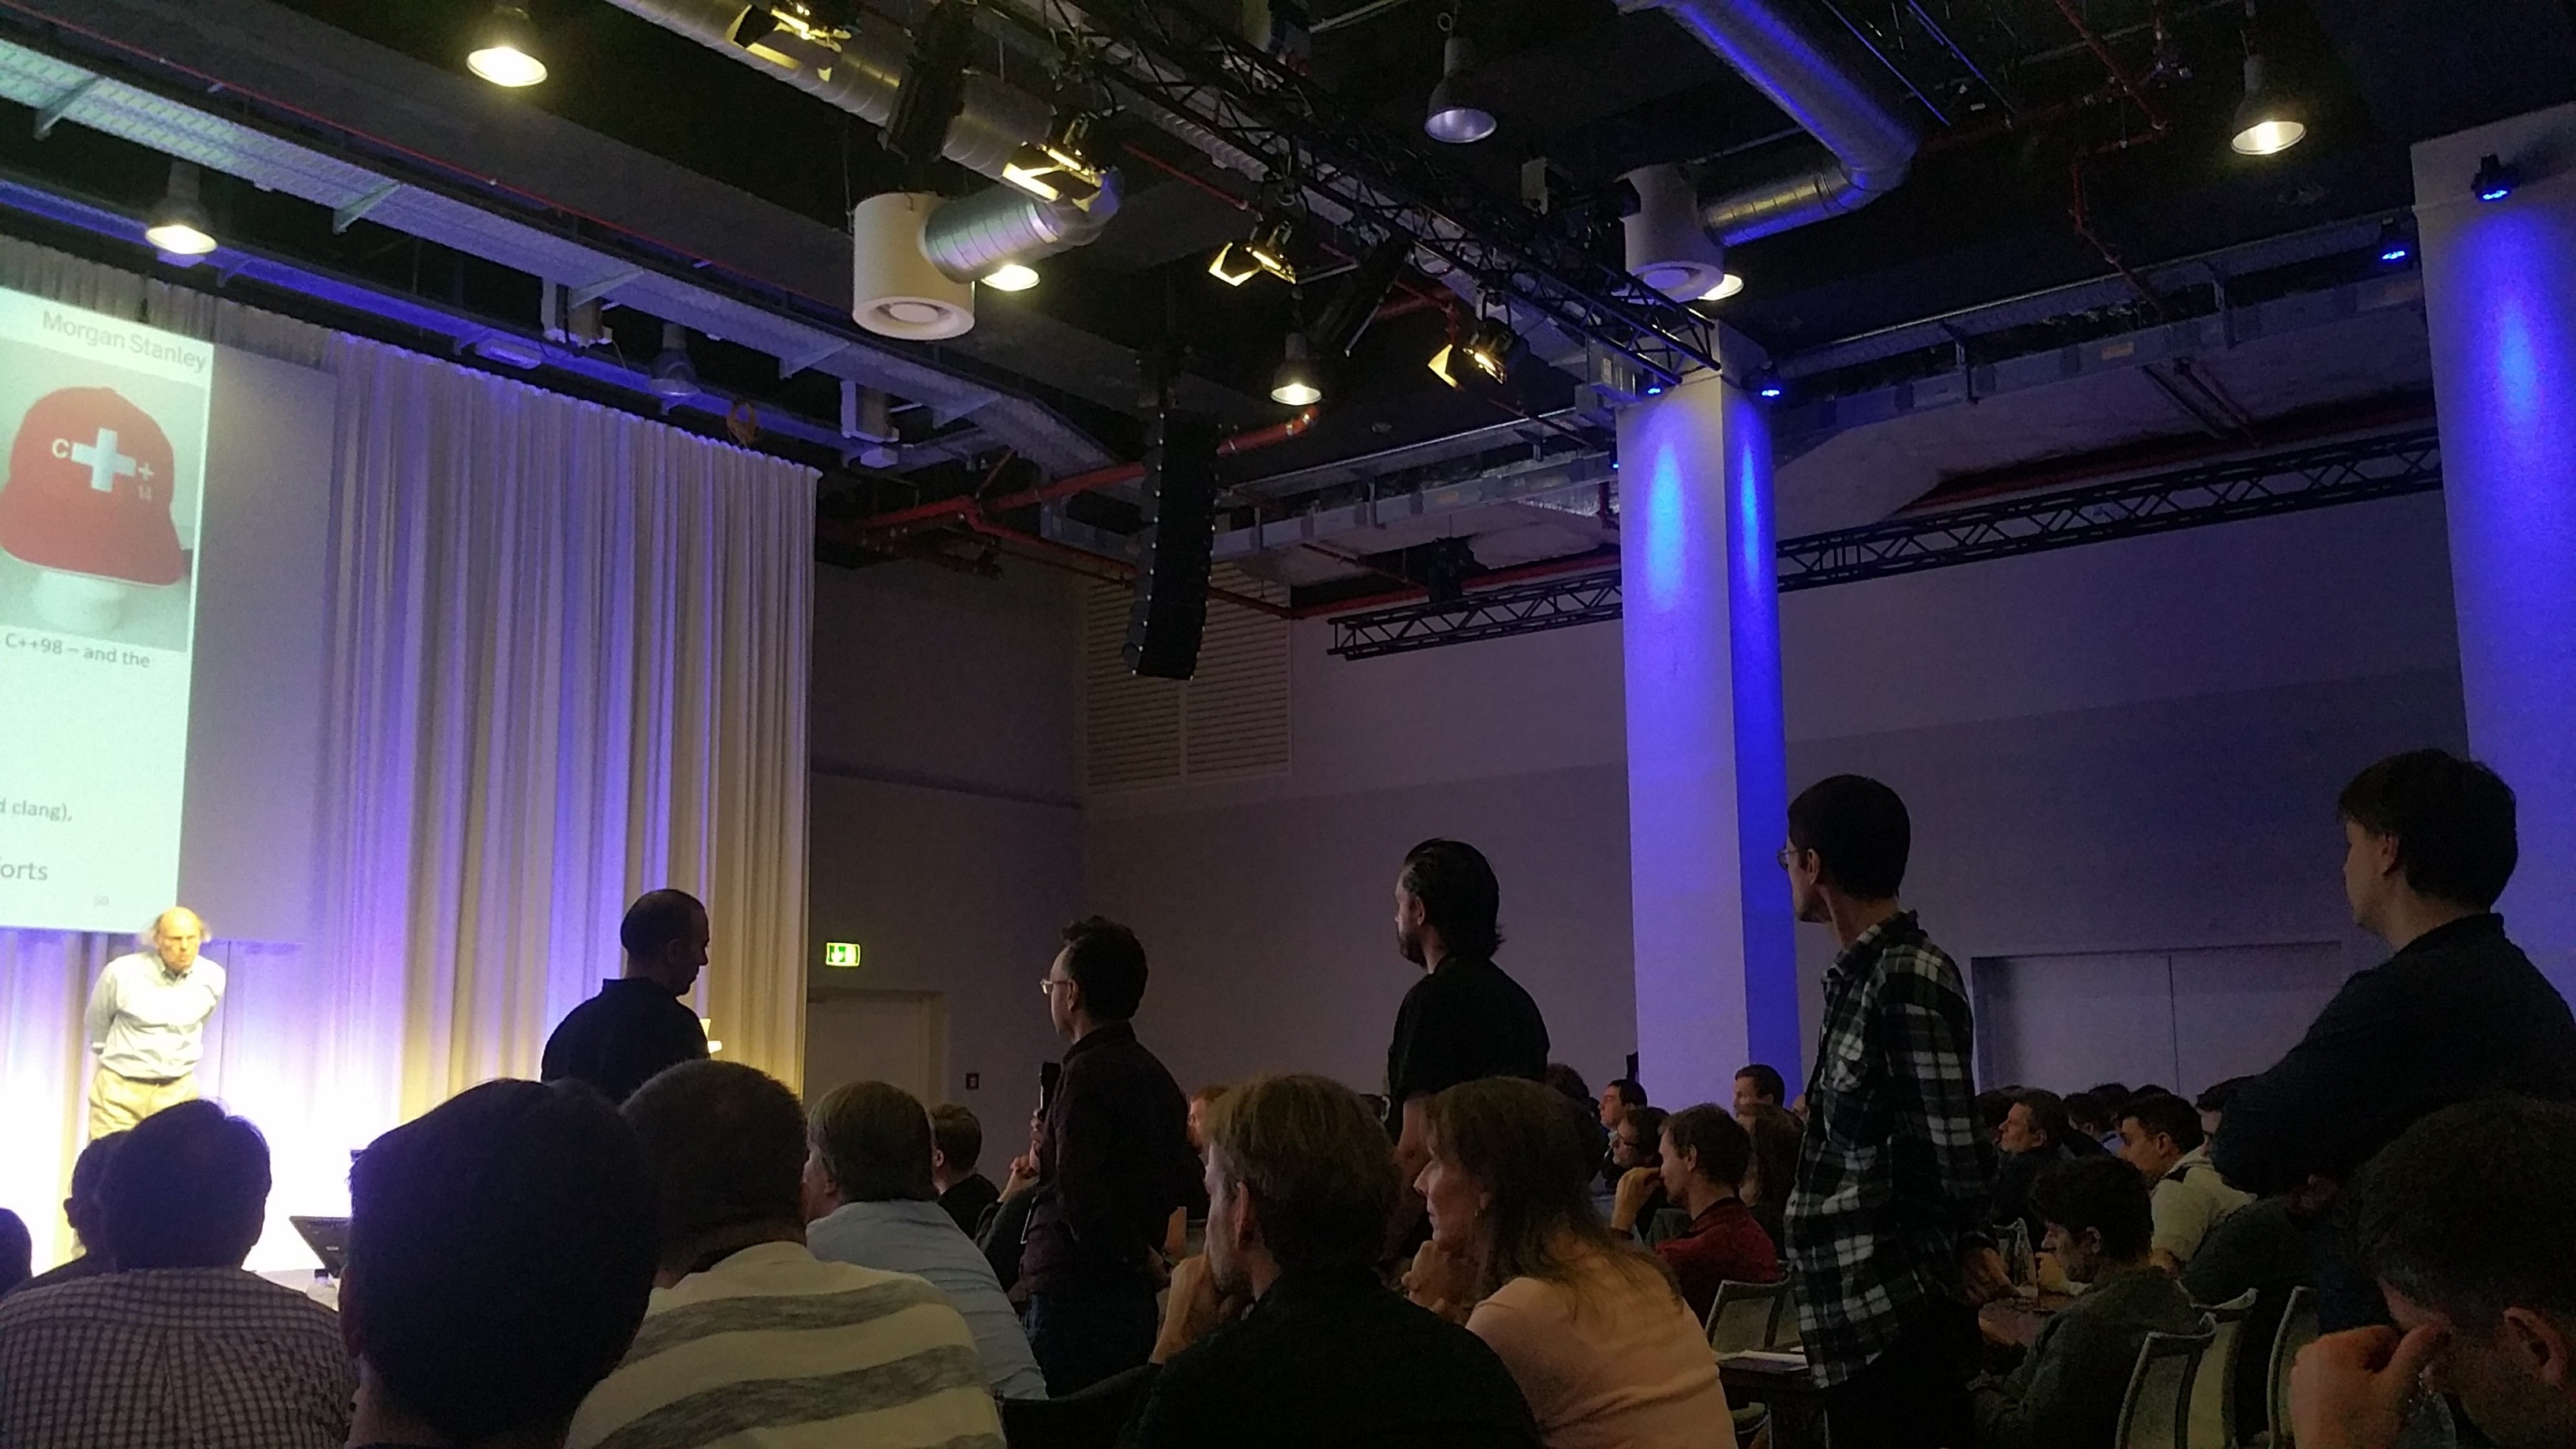
Opening Keynote - Bjarne Stroustrup
What is C++ and what will it become? It was a nice presentation showing the strength of C++ and providing a little history here and there (like code below). Funny quote from the presentation "Only a computer scientist makes a copy then destroys the original"; The committee has a difficult task, making the C++ language less complex, but the only thing the committee can do is add more to it ![]() , but they still succeed (i.e., with
, but they still succeed (i.e., with auto, constexpr, ..).
int i; // 70's?
for (i=0; i<10; i++) a[i] = 0;
----------
for (int i=0; i<10; i++) a[i] = 0; // 80's? no declaration outside the for
----------
for (auto &el : a) el = 0; // mistakes like reading out of bounds no longer possible
                           // ... also mistakes like; for (int i=0; i<10; j++) {}
Boris Schäling asked "Scott Meyers retired from C++ a year ago; do we need to be worried about you?", luckily we don't have to worry ;-). Bjarne answered that he tried a few times to quit C++ in the past, but apparently he is not very good at it ![]() .
.
Learning and teaching Modern C++ - Arne Mertz
The speaker made an interesting point regarding some pitfalls, i.e. that many C++ developers learned C first, pointers, pointer arithmetic, C++03, C++11, .., basically a "layered evolution". However Modern C++ isn't a layered evolution, rather it is a "moving target". Nowadays we prefer make_unique, unique_ptr and therefor why not postpone teaching new, delete, new[], delete[], pointer arithmetic etc. when teaching Modern C++? The same goes for C-style arrays, more complex to teach as opposed to std::array.
Actually kind of sad news; there are still schools in some Countries where C++ is taught with Turbo C++ (see this SO question from a few days ago) compiler (which is extremely outdated). Other notes I scribbled down were for me to check "clang tidy" and adding "isocpp.org" to my RSS feeds.
Wouter van OOijen--a professor teaching C++ in the context of embedded devices--made a good point: the order in which material is presented to students is the most difficult thing to get right. In most books on C++ the order doesn't make sense for embedded, that's why he creates his own material.
Implementation of a multithreaded compile-time ECS in C++14 - Vittorio Romeo
This was quite interesting, maybe it was just me but in the beginning of the presentation it wasn't clear to me what an Entity Component System was, it became clear to me during the talk though. He walked us through the implementation, advanced templating, lambdas, bit fiddling, all quite interesting, maybe a bit too much content for one presentation but very impressive stuff. The room temperature during the presentation was extremely hot, making it sometimes difficult to concentrate and the talk went a bit over the scheduled time.
Some stuff I found interesting: the usage of sparse sets, the use of proxy objects to make sure that certain methods of the library cannot be called at the wrong time.
ctx->step([&](auto& proxy)
    {
        // do something with proxy
    });
He went through a large list of features and how they are implemented ![]()
Ranges v3 and microcontrollers, a revolution -- Odin Holmes
 Quite an awesome talk this one, the speaker is extremely knowledgeable on meta programming and embedded programming.
His company works with devices with very little memory (just a few kilobyte) and this talk was very forward looking.
There was a crash course regarding limitations for such devices, there is limited stack space, how do exceptions and interrupts play along with it.
Quite an awesome talk this one, the speaker is extremely knowledgeable on meta programming and embedded programming.
His company works with devices with very little memory (just a few kilobyte) and this talk was very forward looking.
There was a crash course regarding limitations for such devices, there is limited stack space, how do exceptions and interrupts play along with it.
He then started with real demo/hello world for such a device and demonstrated how even that small code contained bugs and a lot of boilerplate.
The rest of the talk he showed how to improve it, like instead of parsing (dangerously) with scanf (you can overflow the buffer, so you need a "large enough" buffer up-front... "And we all know that coming up with a size for a large enough buffer is easy, right?" ![]() ) can be replaced with a statemachine known at compile time.
Ranges can be applied to lazy evaluate input, and as a result it would consume only the minimal memory.
) can be replaced with a statemachine known at compile time.
Ranges can be applied to lazy evaluate input, and as a result it would consume only the minimal memory.
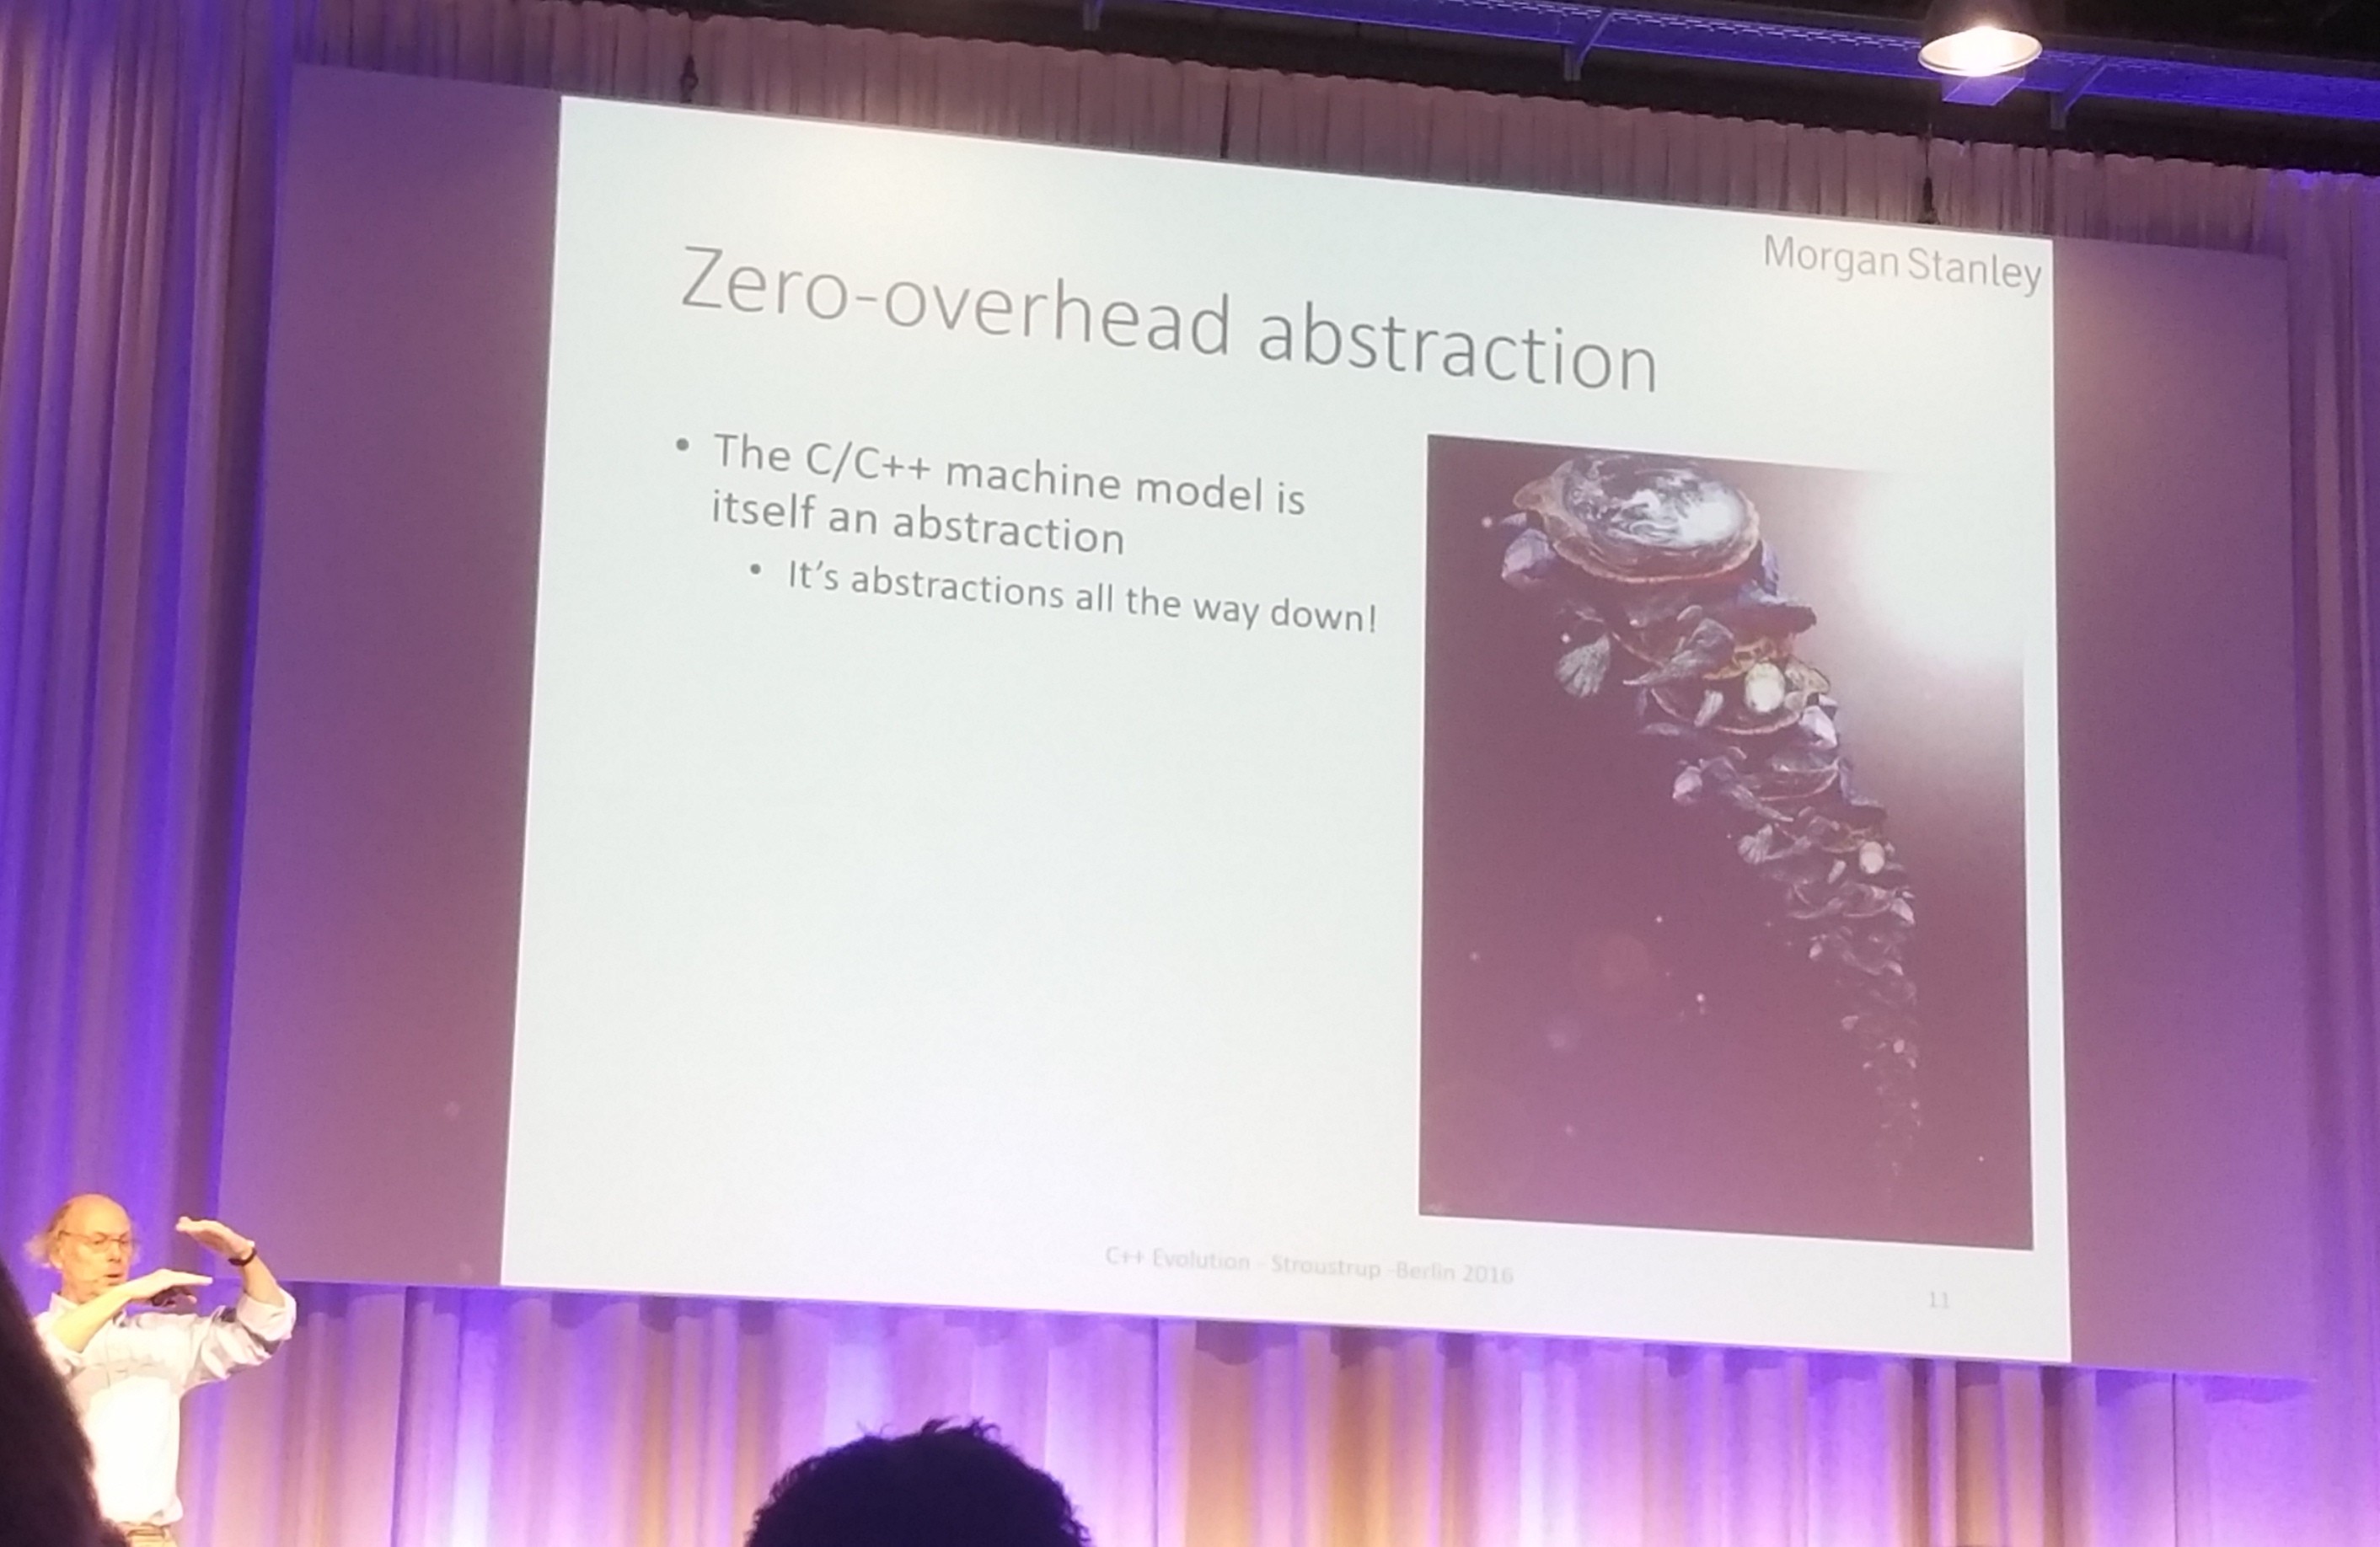
C++ Today - The Beast is back - Jon Kalb
Why was C/C++ successful? It was based on proven track record, and not a "pure theoretical language". High-level abstractions at low cost, with a goal of zero-abstraction principle. In other words; not slower than you could do by coding the same feature by hand (i.e., vtables).
If you like a good story and are curious about why there was a big red button on the IBM 360, the reason behind the C++ "Dark ages" (2000 - 2010), where very little seem to happen, then this is the presentation to watch. Spoiler alert: cough Java cough, OOP was the buzzword at the time, it was "almost as fast", computers got faster and faster, we "solved the performance issue"!
Interesting statements I jotted down "Managed code optimizes the wrong thing (ease of programming)", and regarding Java's finally (try {} catch {} finally {}): "finally violates DRY". He then asked the audience a few times what DRY stands for, which is quite funny as some people realize they were indeed repeating themselves, not all as someone else yelled "the opposite of WET" ![]() .
He also "pulled the age card" when discussing Alexander Stephanov (the author of the STL) "You kids think
.
He also "pulled the age card" when discussing Alexander Stephanov (the author of the STL) "You kids think std::vector grew on trees!".
DAY 2
Functional reactive programming in C++ - Ivan Cukic
Talk of two parts, first functional programming: higher order functions, purity, immutable state. Functional thinking = data transformation. He discussed referential transparency, f.i. replacing any function with its value should produce the same outcome. This can depend on your definition.
int foobar()
{
    std::cout << "Returning 42..." << '\n';
    return 42;
}
Above function when used in int n = foobar(); can be replaced by 42, and the line of code would result in exactly the same thing (n containing 42), however the console output won't be printed. Whether you consider std::cout to count as part of the referential transparency is up to you.
He continued with Object thinking = no getters, ask the object to do it. "Objects tend to become immutable.". I will have to review the presentation to get exactly what was meant by this.
Next: reactive programming, if I am correct this was his definition:
- responds quickly
- resilient to failure
- responsive under workload
- based on message-passing
Note: reacting not replying, i.e., piping Linux shell commands there is only one-way data flow. To conclude, some random notes I made during his talk below.
- He's writing a book on Functional programming in C++
flatmapfrom functional programming does[x, a], [y, b, c]->x, a, y, b, c.- His talk reminded me to lookup the meaning of placing
&&behind a member function declaration.
See below for an example from cppreference.com.
#include <iostream>
struct S {
void f() & { std::cout << "lvalue\n"; }
void f() &&{ std::cout << "rvalue\n"; }
};
int main(){
S s;
s.f(); // prints "lvalue"
std::move(s).f(); // prints "rvalue"
S().f(); // prints "rvalue"
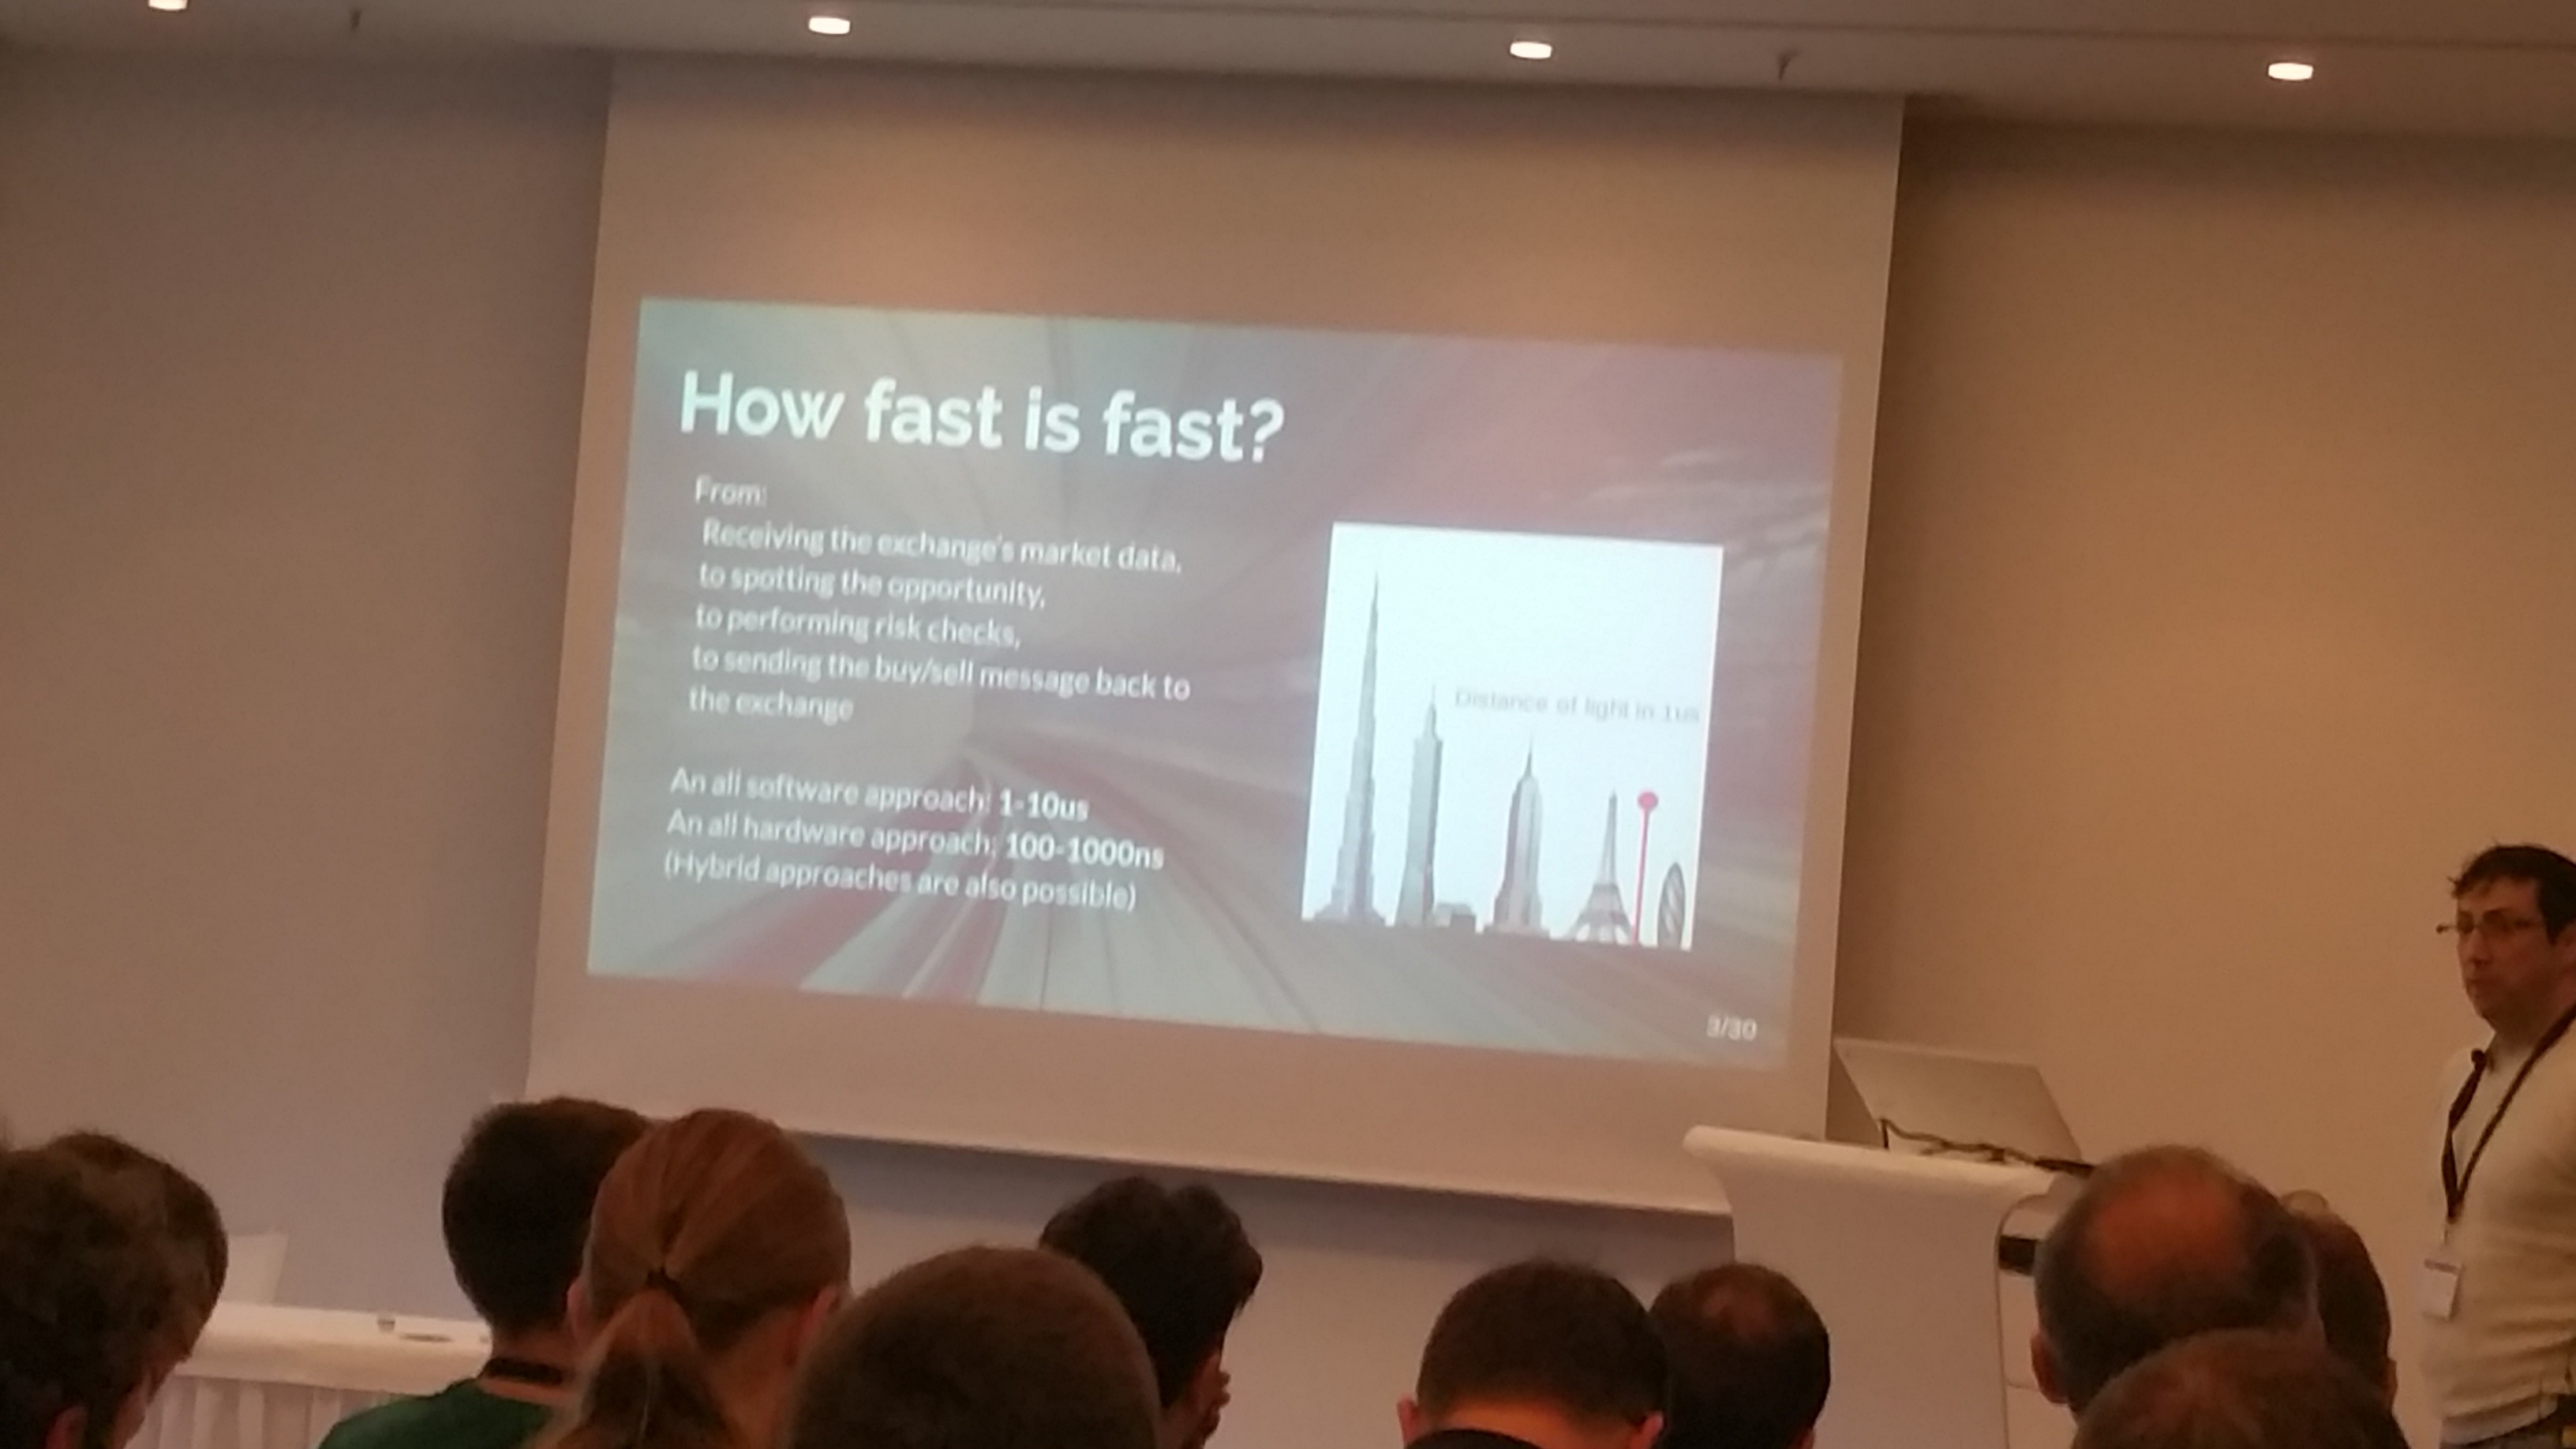
}The Speed Game: Automated Trading Systems in C++ - Carl Cook
 This talk was probably one of the most well attended talks at the conference. The room was packed.
Coming in slightly late I had to sit down on my knees for the entire talk.
Which was worth it, I think I liked this talk most of all I attended.
It was just the right mix of super interesting material and practical advice.
This talk was probably one of the most well attended talks at the conference. The room was packed.
Coming in slightly late I had to sit down on my knees for the entire talk.
Which was worth it, I think I liked this talk most of all I attended.
It was just the right mix of super interesting material and practical advice.
Coming from Amsterdam where Automated Trading companies seem to kind of dominate C++, it has always been very mysterious what exactly it is they do. It felt to me like it was basically the first time the veil was lifted a little bit. It's just amazing to hear how far they go in order to get the lowest latency possible. Within the time it takes for light to travel from the ground to the top of the Eiffel tower they can take an order, assess whether it's interesting or not, and place the order... times ten!
// Some practical advice, instead of the following..
if (checkForErrorA)
    handleErrorA();
elseif (checkForErrorB)
    handleErrorB();
elseif (checkForErrorC)
    handleErrorC();
else
    executeHotPath();

// Aim for this..
uint32_t errorFlags;
if (errorFlags)
    handleError(errorFlags);
else
{
    ... hotpath
}
Really interesting talk to watch whenever it comes online, it shows the importance of optimizing hardware,
bypassing the kernel completely in the hot path, staying in user space for 100%, this includes network I/O (f.i., OpenOnload), cache warming, beware of signed/unsigned conversions, check the assembly, inplace_function (the speakers proposals, stdext::inplace_function<void(), 32>), benchmarking without the 'observable effect' by observing network packets, and more.
One note regarding Network I/O for example; if you read a lot but very little is interesting to the hot path, you may negatively affect your cache. A solution would be to offload all the reads to a different CPU and cherry-pick only the interesting reads and send them to the "hot" CPU.
Lock-free concurrent toolkit for hazard pointers and RCU - Michael Wong
Well, I was a bit tired at this point, so I cannot do the talk justice with a very thorough summary. Even if I could it's better to watch it from Michael Wong himself, because the slides help a lot in understanding the story.
I did learn a few things, maybe the first lesson for me is to try stay away from all of this.. ![]() Still, aside from being super complicated, it's also an interesting topic, and good to know more about.
The ABA problem: he had good slides that visualized actually step-by-step the challenge of updating data in a multi-threading situation, having readers while writing to it, all wrapped in a fun story of Schrödingers Cat (and Zoo).
Solutions discussed were hazard pointers and RCU (Read Copy Update).
Still, aside from being super complicated, it's also an interesting topic, and good to know more about.
The ABA problem: he had good slides that visualized actually step-by-step the challenge of updating data in a multi-threading situation, having readers while writing to it, all wrapped in a fun story of Schrödingers Cat (and Zoo).
Solutions discussed were hazard pointers and RCU (Read Copy Update).
The gains you can get by starting late, having a grace period so you can do multiple updates at the same time are interesting to learn about. Situations where "being lazy" actually pays off!
Lightning talks!
 Surprise! They had secret lightning talks planned. To be honest at first I thought it was a bit long to have 1 hour and 40 minutes planned for a Meeting C++ update/review, so this was a nice surprise.
My favorite lightning talk was from Michael Caisse reading from the standard as if it were a very exiting story, hilarious.
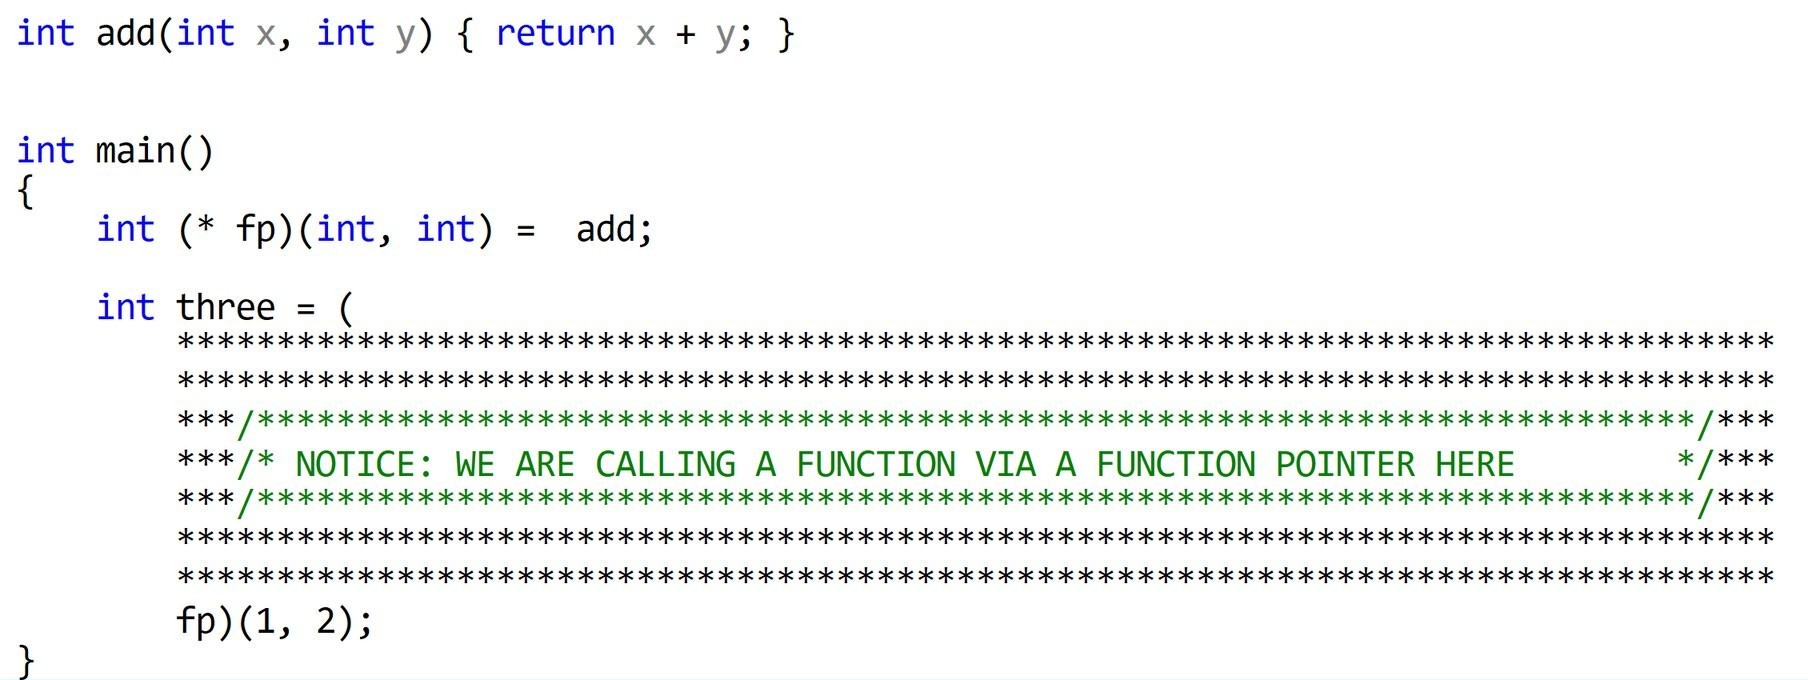
Second James McNellis' "function pointers all the way down" (like "Turtles all the way down", actually Bjarne also had a reference to this in his keynote).
The remaining lightning talks were also very good: Michael Wong, Jens Weller, Chandler Carruth, and Bjarne's.
The latter on Concepts was quite interesting; "what makes a good concept?" It has to have semantics specifying it, which in practice seems to be an efficient design technique. Quite funny was his "Onion principle" on abstractions (IIRC?), "you peel away layer by layer, and you cry more and more as you go along"
Surprise! They had secret lightning talks planned. To be honest at first I thought it was a bit long to have 1 hour and 40 minutes planned for a Meeting C++ update/review, so this was a nice surprise.
My favorite lightning talk was from Michael Caisse reading from the standard as if it were a very exiting story, hilarious.
Second James McNellis' "function pointers all the way down" (like "Turtles all the way down", actually Bjarne also had a reference to this in his keynote).
The remaining lightning talks were also very good: Michael Wong, Jens Weller, Chandler Carruth, and Bjarne's.
The latter on Concepts was quite interesting; "what makes a good concept?" It has to have semantics specifying it, which in practice seems to be an efficient design technique. Quite funny was his "Onion principle" on abstractions (IIRC?), "you peel away layer by layer, and you cry more and more as you go along" ![]() . Also Jens talk was really fun, it started with end of the world scenarios, working towards the future C++ standards.
. Also Jens talk was really fun, it started with end of the world scenarios, working towards the future C++ standards.
C++ metaprogramming: evolution and future directions - Louis Dionne
The closing keynote was a really clear and relaxed presentation of how meta programming evolved,
and in particular how boost::hana did. Again a nice lesson of history where Alexandrescu's Modern C++, boost::mpl, boost::fusion and the like all passed the revue. He showed what you can do with boost::hana at compile-time and runtime. His talk really opened my eyes on using constexpr, integral_constant, differences in meta programming with types and objects, and a lot more. It's amazing what his library can do. He argued the world needs more meta programming, but less template meta programming and concluded by sharing his view for the future.
The conference
There was a fun quiz, with really difficult puzzles (C++ programs) that had to be solved in < 3 minutes each. This was basically similar to peeling Bjarne's Onion.. but in a good way.
Between talks there were lunch-break Meetups planned (each 20 minutes, each had a specific topic). I attended two and my view is that it's a great idea, but the fact people have to come from talks, and leave on time to catch the next one, sometimes caused the time to be way too short (or yourself missing out on a talk because the room is now full).
The organization was super, the drinks and food, especially the second day. The Andel's Hotel is a really good location, the Hotel as well (if you are lucky enough to get a room there). For me it was all really worth the money.
Personally I like to write down a summary for myself, but I hope this blog post was also a fun to read to someone else!
The following steps are to quickly test how this stuff works.
Using my docker images (master, slave) and helper scripts on github, it's easy to get Cloudera Manager running inside a few docker containers. Steps: get most recent docker, install (GNU) screen, checkout the repo, in there do cd cloudera, bash start_all.sh. This should do it. Note that the image(s) require being able to invoke --privileged and the scripts currently invoke sudo. After running the script you get something like (full example output here).
CONTAINER ID        IMAGE                               COMMAND             CREATED             STATUS              PORTS                    NAMES
31e5ee6b7e65        rayburgemeestre/cloudera-slave:3    "/usr/sbin/init"    20 seconds ago      Up 17 seconds                                node003
f052c52b02bf        rayburgemeestre/cloudera-slave:3    "/usr/sbin/init"    25 seconds ago      Up 23 seconds                                node002
1a50df894f28        rayburgemeestre/cloudera-slave:3    "/usr/sbin/init"    30 seconds ago      Up 29 seconds       0.0.0.0:8888->8888/tcp   node001
54fd3c1cf93b        rayburgemeestre/cloudera-master:3   "/usr/sbin/init"    50 seconds ago      Up 48 seconds       0.0.0.0:7180->7180/tcp   cloudera
Not really in the way docker was designed perhaps, it's running systemd inside, but for simple experimentation this is fine. These images have not been designed to run in production, but perhaps with some more orchestration it's possible ![]() .
.
Step 1: install Cloudera Manager
One caveat because of the way docker controls /etc/resolv.conf, /etc/hostname, /etc/hosts, these guys show up in the output for the mount command.
The Cloudera Manager Wizard does some parsing of this (I guess) and pre-fills some directories with values like:
/etc/hostname/<path dn>
/etc/resolv.conf/<path dn>
/etc/hosts/<path dn>
Just remove the additional two paths, and change one to <path dn> only. There is a few of these configuration parameters that get screwed up. (Checked until <= CDH 5.8)
Step 2: install kerberos packages on the headnode
docker exec -i -t cloudera /bin/bash # go into the docker image for headnode

yum install krb5-server krb5-workstation krb5-libs

# ntp is already working

systemctl enable krb5kdc
systemctl enable kadmin
Configuration files need to be fixed, so starting will not work yet.
Step 3: modify /etc/krb5.conf
Into something like:
[logging]
 default = FILE:/var/log/krb5libs.log
 kdc = FILE:/var/log/krb5kdc.log
 admin_server = FILE:/var/log/kadmind.log

[libdefaults]
 dns_lookup_realm = false
 ticket_lifetime = 24h
 renew_lifetime = 7d
 forwardable = true
 rdns = false
 default_realm = MYNET
 default_ccache_name = KEYRING:persistent:%{uid}

[realms]
 MYNET = {
  kdc = cloudera.mynet
  admin_server = cloudera.mynet
 }

[domain_realm]
 .mynet = MYNET
 mynet = MYNET
In this example cloudera.mynet is just hostname --fqdn of the headnode which will be running kerberos.
(Note that mynet / MYNET could also be something like foo.bar / FOO.BAR.)
Step 4: modify /var/kerberos/krb5kdc/kdc.conf
[kdcdefaults]
 kdc_ports = 88
 kdc_tcp_ports = 88

[realms]
 MYNET = {
  #master_key_type = aes256-cts

  master_key_type = aes256-cts-hmac-sha1-96
  max_life = 24h 10m 0s
  max_renewable_life = 30d 0h 0m 0s

  acl_file = /var/kerberos/krb5kdc/kadm5.acl
  dict_file = /usr/share/dict/words
  admin_keytab = /var/kerberos/krb5kdc/kadm5.keytab
  supported_enctypes = aes256-cts:normal aes128-cts:normal des3-hmac-sha1:normal arcfour-hmac:normal camellia256-cts:normal camellia128-cts:normal des-hmac-sha1:normal des-cbc-md5:normal des-cbc-crc:normal aes256-cts-hmac-sha1-96
 }
I specifically added aes256-cts-hmac-sha1-96 as master key and supported encryption types,
and the max_life plus max_renewable_life properties.
But there is a chance Cloudera Manager might add this stuff as well.
Step 5: modify /var/kerberos/krb5kdc/kadm5.acl
*/admin@MYNET *Step 6: initialize the database
# kdb5_util create -r MYNET -s
Loading random data
Initializing database '/var/kerberos/krb5kdc/principal' for realm 'MYNET',
master key name 'K/M@MYNET'
You will be prompted for the database Master Password.
It is important that you NOT FORGET this password.
Enter KDC database master key: ******
Re-enter KDC database master key to verify: ******
Step 7: add master root/admin user
[root@rb-clouderahadoop2 krb5kdc]# kadmin.local
Authenticating as principal root/admin@MYNET with password.
kadmin.local:  addprinc root/admin
WARNING: no policy specified for root/admin@MYNET; defaulting to no policy
Enter password for principal "root/admin@MYNET": ******
Re-enter password for principal "root/admin@MYNET": ******
Principal "root/admin@MYNET" created.
kadmin.local:  ktadd -k /var/kerberos/krb5kdc/kadm5.keytab kadmin/admin
Entry for principal kadmin/admin with kvno 2, encryption type aes256-cts-hmac-sha1-96 added to keytab WRFILE:/var/kerberos/krb5kdc/kadm5.keytab.
Entry for principal kadmin/admin with kvno 2, encryption type aes128-cts-hmac-sha1-96 added to keytab WRFILE:/var/kerberos/krb5kdc/kadm5.keytab.
Entry for principal kadmin/admin with kvno 2, encryption type des3-cbc-sha1 added to keytab WRFILE:/var/kerberos/krb5kdc/kadm5.keytab.
Entry for principal kadmin/admin with kvno 2, encryption type arcfour-hmac added to keytab WRFILE:/var/kerberos/krb5kdc/kadm5.keytab.
Entry for principal kadmin/admin with kvno 2, encryption type camellia256-cts-cmac added to keytab WRFILE:/var/kerberos/krb5kdc/kadm5.keytab.
Entry for principal kadmin/admin with kvno 2, encryption type camellia128-cts-cmac added to keytab WRFILE:/var/kerberos/krb5kdc/kadm5.keytab.
Entry for principal kadmin/admin with kvno 2, encryption type des-hmac-sha1 added to keytab WRFILE:/var/kerberos/krb5kdc/kadm5.keytab.
Entry for principal kadmin/admin with kvno 2, encryption type des-cbc-md5 added to keytab WRFILE:/var/kerberos/krb5kdc/kadm5.keytab.
kadmin.local:  ktadd -kt /var/kerberos/krb5kdc/kadm5.keytab kadmin/changepw
Entry for principal kadmin/changepw with kvno 2, encryption type aes256-cts-hmac-sha1-96 added to keytab WRFILE:/var/kerberos/krb5kdc/kadm5.keytab.
Entry for principal kadmin/changepw with kvno 2, encryption type aes128-cts-hmac-sha1-96 added to keytab WRFILE:/var/kerberos/krb5kdc/kadm5.keytab.
Entry for principal kadmin/changepw with kvno 2, encryption type des3-cbc-sha1 added to keytab WRFILE:/var/kerberos/krb5kdc/kadm5.keytab.
Entry for principal kadmin/changepw with kvno 2, encryption type arcfour-hmac added to keytab WRFILE:/var/kerberos/krb5kdc/kadm5.keytab.
Entry for principal kadmin/changepw with kvno 2, encryption type camellia256-cts-cmac added to keytab WRFILE:/var/kerberos/krb5kdc/kadm5.keytab.
Entry for principal kadmin/changepw with kvno 2, encryption type camellia128-cts-cmac added to keytab WRFILE:/var/kerberos/krb5kdc/kadm5.keytab.
Entry for principal kadmin/changepw with kvno 2, encryption type des-hmac-sha1 added to keytab WRFILE:/var/kerberos/krb5kdc/kadm5.keytab.
Entry for principal kadmin/changepw with kvno 2, encryption type des-cbc-md5 added to keytab WRFILE:/var/kerberos/krb5kdc/kadm5.keytab.
kadmin.local:  exit
This will be the user we will give Cloudera to take over managing kerberos.
Step 8: start services
systemctl start krb5kdc
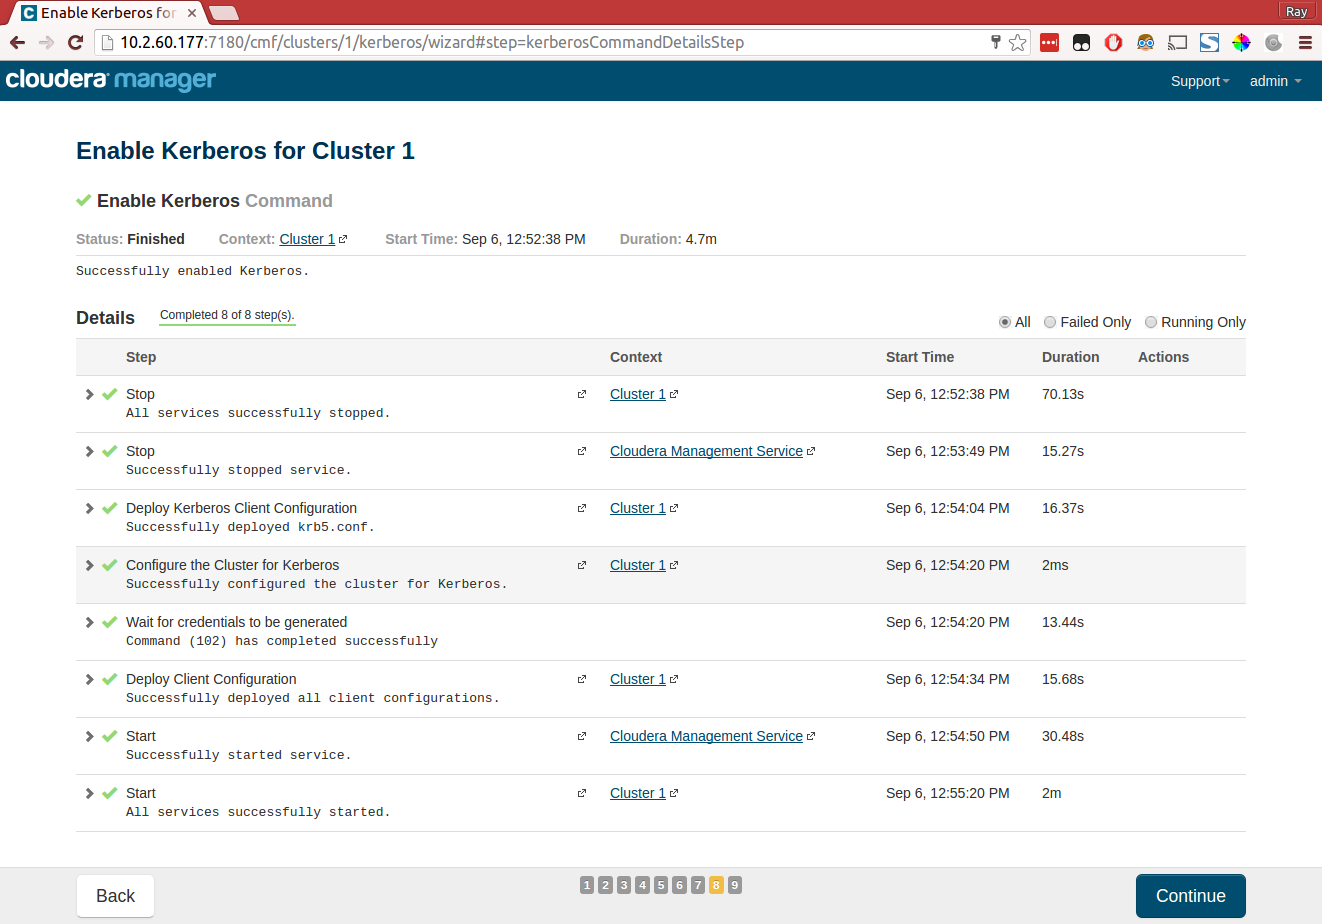
systemctl start kadminStep 9: do the Enable security wizard in Cloudera Manager
This should be self explanatory, but in summary:
- Enable the four checkboxes on the first page of the wizard.
- Next page, kdc =
hostname --fqdnheadnode, realm = MYNET (in our example). Leave other defaults. - Next page, select Manage
krb5.confthrough Cloudera Manager. Leave all defaults. - Next page, Username
root/adminand password you typed in step 7.
The wizard will do it's magic and hopefully succeed without problems.
In case you are looking for a free alternative to Camtasia Studio or many other alternatives... One of my favorite tools of all time, ffmpeg can do it for free!
The simplest thing that will work is ffmpeg -f gdigrab -framerate 10 -i desktop output.mkv (source)
This gives pretty good results already (if you use an MKV container, FLV will give worse results for example).
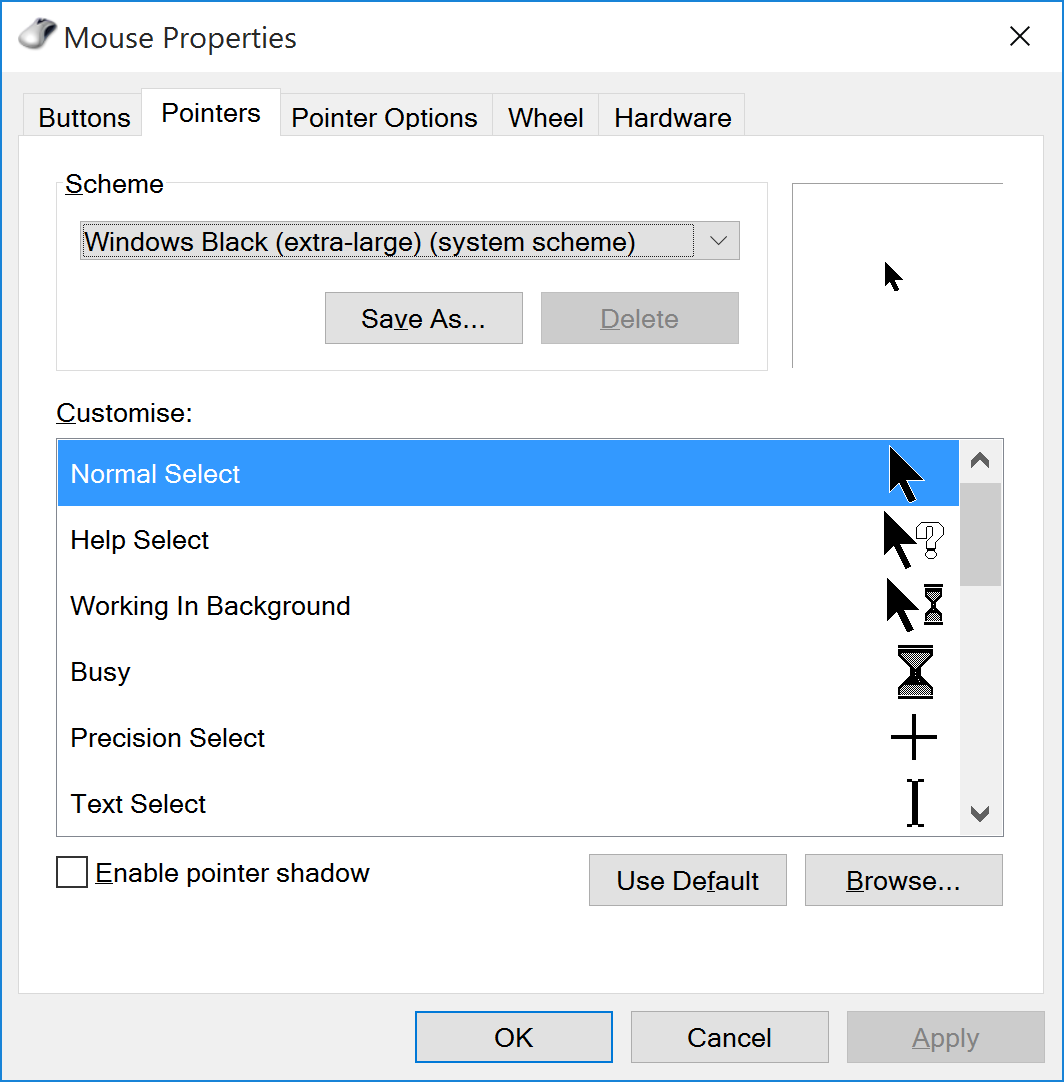
HiDPI: Fix mouse pointer
gdigrab adds a mouse pointer to the video but does not scale it according to HiDPI settings, so it will be extremely small.
You can configure the mouse pointer to extra large to fix that. That mouse pointer won't scale either, but at least you end up with a regular size pointer in the video ![]()
Optional: Use H264 codec
More options you can find here, I've settled with single pass encoding using -c:v libx264 -preset ultrafast -crf 22.
ffmpeg -f gdigrab -framerate 30 -i desktop ^
       -c:v libx264 -preset ultrafast -crf 22 output.mkv
Optional: Include sound in the video
First execute ffmpeg -list_devices true -f dshow -i dummy this will give you directshow devices. (source)
On my laptop this command outputs:
[dshow @ 00000000023224a0] DirectShow video devices (some may be both video and audio devices)
[dshow @ 00000000023224a0]  "USB2.0 HD UVC WebCam"
[dshow @ 00000000023224a0]     Alternative name "@device_pnp_\\?\usb#vid_04f2&pid_b3fd&mi_00#6&11eacec2&0&0000#{65e8773d-8f56-11d0-a3b9-00a0c9223196}\global"
[dshow @ 00000000023224a0]  "UScreenCapture"
[dshow @ 00000000023224a0]     Alternative name "@device_sw_{860BB310-5D01-11D0-BD3B-00A0C911CE86}\UScreenCapture"
[dshow @ 00000000023224a0] DirectShow audio devices
[dshow @ 00000000023224a0]  "Microphone (Realtek High Definition Audio)"
[dshow @ 00000000023224a0]     Alternative name "@device_cm_{33D9A762-90C8-11D0-BD43-00A0C911CE86}\wave_{1DDF1986-9476-451F-A6A4-7EBB5FB1D2AB}"
Now I know the device name I can use for audio is "Microphone (Realtek High Definition Audio)". Use it for the following parameters in ffmpeg -f dshow -i audio="Microphone (Realtek High Definition Audio)".
The end result
I ended up with capture-video.bat like this:
ffmpeg -f dshow -i audio="Microphone (Realtek High Definition Audio)" ^
       -f gdigrab -framerate 30 -i desktop ^
       -c:v libx264 -preset ultrafast -crf 22 output.mkv
This is a resulting video where I used this command, resolution of the video is 3840x2160 and the HiDPI scale is set to 2.5.
Update 1> Add more keyframes for better editing
For this I use the following command, to insert a keyframe every 25 frames (the closer to one, the larger the output file will be):
ffmpeg.exe -i %1 -qscale 0 -g 25 %2The option -qscale 0 is for preserving the quality of the video.
(Changing the container to .mov was probably not necessary, I tried this hoping that Adobe Premiere would support it, but it didn't!)
Update 2> Editing 4K on Windows 10...
Found the following tool for editing: Filmora and (on my laptop) it was able to smoothly edit the footage. They support GPU acceleration, but the additional keyrames really help with a smooth experience.
![]()
Once you get the hang of it (shortcut keys are your friend) it's pretty easy to cut & paste your videos.
Update 3> Support Adobe Premiere
As I discovered Adobe Premiere earlier, doesn't like MKV, but it also doesn't like 4:4:4 (yuv444p), the pixel format used by default (it seems).
You can view such information using ffprobe <VIDEO FILE>. Anyway, it seems to like yuv420p, so add -pix_fmt yuv420p to make it work for Premiere:
ffmpeg.exe -i input.mkv -qscale 0 -g 25 -pix_fmt yuv420p output.mov A crazy idea, building a profiler/visualizer based on strace output. Just for fun. But, who knows there may even be something useful we can do with this..
The following image shows exactly such a visualization for a specific HTTP GET request (f.i., to http://default-wordpress.cppse.nl/wp-admin/index.php (URL not accessible online)).
The analysis from the image is based on the strace log output from the Apache HTTP server thread handling the request. Parameters for the strace call include -f and -F so it includes basically everything the Apache worker thread does for itself.
(If it were to start a child process, it would be included.)

This request took 1700 milliseconds, which seems exceptionally slow, even for a very cheap micro compute instance. It is, I had to cheat a little by restarting Apache and MySQL in advance, to introduce some delays that make the graph more interesting. ![]() It's still still normal though that
It's still still normal though that strace will slow down the program execution speed.
I grouped all strace lines by process ID and their activity on a specific FD (file descriptor). Pairs like open()/close() or socket()/close() introduce a specific FD and in between are likely functions operating on that FD (like read()/write()). I group these related strace lines together and called them "stream"s in the above image.
In the image you can see that the longest and slowest "stream" is 1241 milliseconds, this one is used for querying MySQL and probably intentionally closed last to allow re-use of the DB connection during processing of the request.
The three streams lower in the visualization follow each other sequentially and appear to be performing a lookup in /etc/hosts, follewed by two DNS lookups directed to 8.8.4.4.
Why are we doing this? (Other than because it's Awesome!)
This works for any strace output, but my idea originated while doing web development. This was for a relatively complicated web application, that was divided in many sub-systems that communicate mostly via REST calls with each other. All these systems had lots of external calls to other systems, and I wanted a view where I could see regardless of which sub-system or actual PHP code being executed, how the performance was for specifically: I/O with (i.e. for i18n/locale) files, scripts, SQL queries to MySQL, Oracle, the REST API calls to system X, Y & Z, Redis, Memcached, Solr, Shared memory even and Disk caching.
If only there was a tool really good at capturing that kind of I/O... ahh yeah there is, strace!
I switched jobs 7 months ago, before applying my strace tool to this code-base, but I've applied it to similar complex applications with success.
We already had tools for (more traditional) profiling of PHP requests. Quite often the interpretation was difficult, probably because of a lot of nasty runtime reflection being used. Also when you needed to follow a slow function (doing a REST call) it was a lot of effort to move profiling efforts to the other system (because of OAuth 1.0b(omg..), expired tokens, ..). Nothing unsolveable of course, but with strace you can just trace everything at once on a development environment (especially in Vagrant which we used), spanning multiple vhosts. If it's just you on the VM, perhaps you can strace the main Apache PID recursively, I didn't try that however, but I think that would work.
Products like NewRelic provide dashboards for requests where you can gain such
deep insights, "off the shelve", basically, but the downside is that it's not cheap.
NewRelic f.i. hooks into Apache & PHP and has access to actual PHP function calls, SQL queries, etc.
strace cant do that, because it only sits between the process(es) and the Linux kernel.
First, let's take one step back & properly parse the strace output..
It quickly became apparent that I couldn't get away with some trivial regex for parsing it, so I turned to bnfc and created the following BNF grammer to generate the parser. I was quite suprised that this was so easy that it took me less than a working day to find a tool for the job, learn it and get the grammer right for some strace output.
With this tool you are provided with an autogenerated base class "Skeleton" which you can extend to create your own Visitor implementation. With this pattern it becomes quite easy to extract some meta-data you are interested in. I will show a simply example.
The grammer
I came up with the following grammer that bnfc uses to generate the Parser. Reading it from top to bottom is more or less the way you can incrementally construct this kind of stuff. You start really small; first chunking multiple strace-lines into single strace-lines, then chunk strace-lines into Pid, Timestamp and (remaining) Line. Then further specify a Pid, the Timestamp, Line, etc., slowly making the grammer more coarse-grained.
EStraceLines.          StraceLines         ::= [StraceLine];
EStraceLine.           StraceLine          ::= [Pid] [Timestamp] Line;

EPidStdOut.            Pid                 ::= "[pid " PidNumber "] ";
EPidOutput.            Pid                 ::= PidNumber [Whitespace] ;
EPidNumber.            PidNumber           ::= Integer;

ETimestamp.            Timestamp           ::= EpochElapsedTime;

ELine.                 Line                ::= Function "(" Params ")" [Whitespace] "=" [Whitespace] ReturnValue [TrailingData];
ELineUnfinished.       Line                ::= Function "(" Params "<unfinished ...>";
ELineContinued.        Line                ::= "<... " Function " resumed> )" [Whitespace] "=" [Whitespace] ReturnValue [TrailingData];
ELineExited.           Line                ::= "+++ exited with" [Whitespace] Integer [Whitespace] "+++" ;

EFunction.             Function            ::= Ident ;
EFunctionPrivate.      Function            ::= "_" Ident ;

EParams.               Params              ::= [Param];

EParamArray.           Param               ::= "[" [Param] "]" ;
EParamObject.          Param               ::= "{" [Param] "}" ;
EParamComment.         Param               ::= "/* " [CommentString] " */";
EParamInteger.         Param               ::= Number ;
EParamFlags.           Param               ::= [Flag] ;
EParamIdent.           Param               ::= Ident ;
EParamString.          Param               ::= String ;
EParamWhitespace.      Param               ::= Whitespace ;
EParamAddress.         Param               ::= Address ;
EParamDateTime.        Param               ::= DateYear "/" DateMonth "/" DateDay "-" TimeHour ":" TimeMinute ":" TimeSecond ;
EParamKeyValue.        Param               ::= Param "=" Param ;
EParamKeyValueCont.    Param               ::= "...";
EParamExpression.      Param               ::= Integer Operator Integer;
EParamFunction.        Param               ::= Function "(" [Param] ")" ;

EDateYear.             DateYear            ::= Integer ;
EDateMonth.            DateMonth           ::= Integer ;
EDateDay.              DateDay             ::= Integer ;
ETimeHour.             TimeHour            ::= Integer ;
ETimeMinute.           TimeMinute          ::= Integer ;
ETimeSecond.           TimeSecond          ::= Integer ;

EOperatorMul.          Operator            ::= "*";
EOperatorAdd.          Operator            ::= "+";

EEpochElapsedTime.     EpochElapsedTime    ::= Seconds "." Microseconds ;
ESeconds.              Seconds             ::= Integer ;
EMicroseconds.         Microseconds        ::= Integer ;

ECSString.             CommentString       ::= String ;
ECSIdent.              CommentString       ::= Ident ;
ECSInteger.            CommentString       ::= Integer ;

ENegativeNumber.       Number              ::= "-" Integer;
EPositiveNumber.       Number              ::= Integer;

EFlag.                 Flag                ::= Ident;
EFlagUmask.            Flag                ::= Integer;

ERetvalAddress.        ReturnValue         ::= Address ;
ERetvalNumber.         ReturnValue         ::= Number ;
ERetvalUnknown.        ReturnValue         ::= "?";

EAddress.              Address             ::= HexChar;

ETrailingDataConst.    TrailingData        ::= " " [Param] " (" [CommentString] ")";
ETrailingDataParams.   TrailingData        ::= " (" [Param] ")" ;

ESpace.                Whitespace          ::= " ";
ESpace4x.              Whitespace          ::= "    ";
ETab.                  Whitespace          ::= "    ";

terminator             CommentString       "" ;
terminator             Param               "" ;
terminator             Pid                 " " ;
terminator             Timestamp           " " ;
terminator             TrailingData        "" ;
terminator             Whitespace          "" ;

separator              CommentString       " " ;
separator              Flag                "|" ;
separator              Param               ", " ;
separator              Pid                 " " ;
separator              StraceLine          "";

token HexChar ('0' 'x' (digit | letter)*);
Given the above grammer bnfc can parse this strace line 15757 1429444463.750111 poll([{fd=3, events=POLLIN|POLLPRI|POLLRDNORM|POLLRDBAND}], 1, 0) = 1 ([{fd=3, revents=POLLIN|POLLRDNORM}]) into an Abstract Syntax Tree.
[Abstract Syntax]

(EStraceLines [
    (EStraceLine
        [(EPidOutput [(EPidNumber 15757)])]
        [(ETimestamp [(EEpochElapsedTime
                         [(ESeconds 1429444463)]
                         [(EMicroseconds 750111)])])]
        [(ELine
            [(EFunction "poll")]
            [(EParams [
                (EParamArray [
                    (EParamObject [
                        (EParamKeyValue (EParamIdent "fd")
                                        (EParamInteger [(EPositiveNumber 3)])),
                        (EParamKeyValue (EParamIdent "events")
                                        (EParamFlags [
                                            (EFlag "POLLIN"),
                                            (EFlag "POLLPRI"),
                                            (EFlag "POLLRDNORM"),
                                            (EFlag "POLLRDBAND")]))])]),
                (EParamInteger [(EPositiveNumber 1)]),
                (EParamInteger [(EPositiveNumber 0)])])]

            ESpace ESpace

            [(ERetvalNumber [(EPositiveNumber 1)])]

            [(ETrailingDataParams
                [(EParamArray
                    [(EParamObject [
                        (EParamKeyValue (EParamIdent "fd")
                                        (EParamInteger [(EPositiveNumber 3)])),
                        (EParamKeyValue (EParamIdent "revents")
                                        (EParamFlags [
                                            (EFlag "POLLIN"),
                                            (EFlag "POLLRDNORM")]))])])])
            ]
          )
        ]
     )
])
No matter how nested these lines get, it will parse them as long as I didn't forget anything in the grammer. (So far it seems to be complete to parse everything.)
Visitor example
Using the BNF grammer, the above structure and occasional peeking at the generated Skeleton base class, you can simply override methods in your own visitor to do something "useful". The following visitor is a less "useful" but simple example that outputs all the strings captured for strace lines containing the open() function. Just to illustrate how you use this Visitor.
class OutputOpenVisitor : public Skeleton
{
    string timestamp;
    string function;
    string strings;
public:
    void visitEStraceLine(EStraceLine* p)
    {
        timestamp = "";
        function  = "";
        strings   = "";
        Skeleton::visitEStraceLine(p);
        if (function == "open") {
            cout << timestamp << " " << function << " " << strings << endl;
        }
    }
    void visitEFunction(EFunction* p)
    {
        function = p->ident_;
        Skeleton::visitEFunction(p);
    }
    void visitEEpochElapsedTime(EEpochElapsedTime *p)
    {
        auto secs      = static_cast<ESeconds *>(p->seconds_);
        auto microsecs = static_cast<EMicroseconds *>(p->microseconds_);
        timestamp = to_elasticsearch_timestamp(secs, microsecs);
        Skeleton::visitEEpochElapsedTime(p);
    }
    void visitString(String x)
    {
        strings.append(x);
        Skeleton::visitString(x);
    }
};
You can find this example in the examples forder in the git repository here.
After compiling this example into strace-output-visualizer:
# capture a strace log
trigen@firefly:/projects/strace-output-parser[master]> strace -f -F -ttt -s 512 -o test.log uptime
17:53:02 up 32 days, 22:44, 23 users,  load average: 2.39, 2.20, 2.12

# strace log contains stuff like
trigen@firefly:/projects/strace-output-parser[master]> head -n 10 test.log
19151 1458147182.196711 execve("/usr/bin/uptime", ["uptime"], [/* 47 vars */]) = 0
19151 1458147182.197415 brk(0)          = 0x7c1000
19151 1458147182.197484 access("/etc/ld.so.nohwcap", F_OK) = -1 ENOENT (No such file or directory)
19151 1458147182.197555 mmap(NULL, 8192, PROT_READ|PROT_WRITE, MAP_PRIVATE|MAP_ANONYMOUS, -1, 0) = 0x7f45cd85e000
19151 1458147182.197618 access("/etc/ld.so.preload", R_OK) = -1 ENOENT (No such file or directory)
19151 1458147182.197679 open("/etc/ld.so.cache", O_RDONLY|O_CLOEXEC) = 3
19151 1458147182.197740 fstat(3, {st_mode=S_IFREG|0644, st_size=156161, ...}) = 0
19151 1458147182.197813 mmap(NULL, 156161, PROT_READ, MAP_PRIVATE, 3, 0) = 0x7f45cd830000
19151 1458147182.197888 close(3)        = 0
19151 1458147182.197969 access("/etc/ld.so.nohwcap", F_OK) = -1 ENOENT (No such file or directory)

# pipe the log through the example program
trigen@firefly:/projects/strace-output-parser[master]> cat test.log | ./strace-output-parser
2016-03-16T16:53:02.198Z open /etc/ld.so.cache
2016-03-16T16:53:02.198Z open /lib/x86_64-linux-gnu/libprocps.so.3
2016-03-16T16:53:02.199Z open /lib/x86_64-linux-gnu/libc.so.6
2016-03-16T16:53:02.200Z open /sys/devices/system/cpu/online
2016-03-16T16:53:02.200Z open /usr/lib/locale/locale-archive
2016-03-16T16:53:02.200Z open /etc/localtime
2016-03-16T16:53:02.201Z open /proc/uptime
2016-03-16T16:53:02.202Z open /var/run/utmp
2016-03-16T16:53:02.273Z open /proc/loadavg
Opposed to a simple Visitor like this example, I parse all the lines, prepare a JSON representation for each line and store that in ElasticSearch. This way selecting and filtering can be done afterwards. And also ElasticSearch is really a fast solution in case you want to do more complex queries on your log.
A Proof of concept for Web
This time at the beginning of each request I have PHP instruct some script to run a strace on the process id for the current PHP script's pid (or rather the Apache worker's) and all it's (virtual) threads and sub processes. (If I would track the Request accross the stack with "Cross application tracing" you can even combine all the relevant straces for a given request. I didn't implement this (again) because of I switched jobs. (Info on Cross application tracing in newrelic). This is even relatively easy to implement if you have a codebase where you can just make the change (like inject a unique id for the current request in curl call for example).)
The following image and code shows how I capture straces from specific PHP requests, like the wordpress example I started this blog with. You can skip this part. Eventually these straces are linked to a specific request, ran through a slightly more elaborate Visitor class and fed into ElasticSearch for later processing.
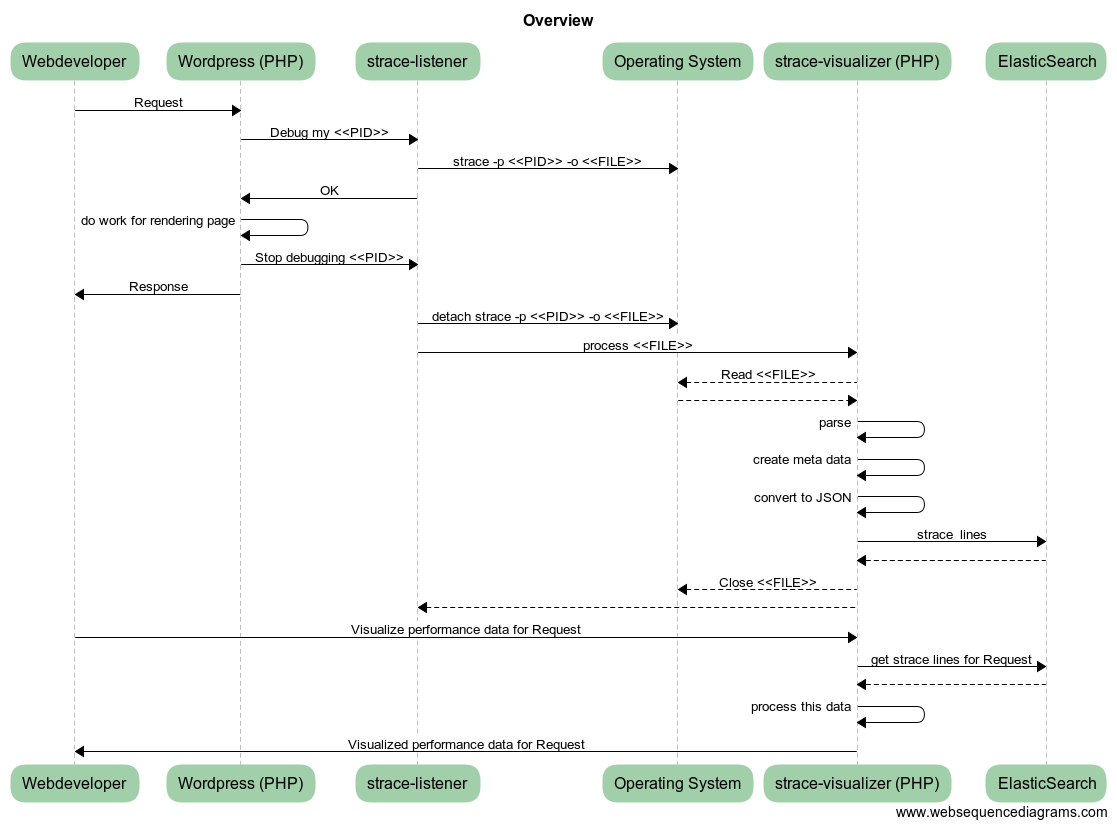
(This omits also some other details w/respect to generating a UUID for each request, and keeping track of what strace outputs are related to each request.)
Inject in your application 'header', i.e., top index.php:
register_shutdown_function(function () { touch("/tmp/strace-visualizer-test/done/" . getmypid()); });
$file = "/tmp/strace-visualizer-test/todo/" . getmypid();
touch($file);
while (file_exists($file)) { sleep(1); } // continue with the request when removed from todo folder
A separate long running process runs the following:
trigen@CppSe:~/strace-visualizer-test> cat run.ksh
#!/bin/ksh93
mkdir -p /tmp/strace-visualizer-test/todo
mkdir -p /tmp/strace-visualizer-test/done
while true; do
    find /tmp/strace-visualizer-test/todo/ -type f | \
        xargs -I{} -n 1 sh -c "strace -f -F -ttt -s 4096 -o \$(basename {}).strace -p \$(basename {}) & rm -rf {};"
    find /tmp/strace-visualizer-test/done/ -type f | \
        xargs -I{} -n 1 sh -c "(ps axufw | grep [s]trace.*\$(basename {}) | grep -v grep | awk -F ' ' '{print \$2}' | xargs -n 1 kill -1 ) & (sleep 1; rm -rf {};)"
    printf ".";
done
This way you end up with .strace files per process ID (it should probably include a timestamp too).
The long running process removes the file the client checks from the todo folder as soon as it started strace.
That way the client will no longer block and the interesting stuff will be captured.
It uses a shutdown handler to instruct the long running process to stop the capture (the Apache thread won't exit, it will wait for a next request).
Final step, To ElasticSearch!
I use a Visitor and my strace parser to create JSON representations for the strace log lines. Containing the meta-data I need: file descriptors, an array with all strings, a timestamp that ElasticSearch can understand out of the box, etc.
To get to my previous example, I can use cat test.log | ./strace-output-parser elasticsearch localhost 9200 strace_index to import the parsed lines to ElasticSearch.
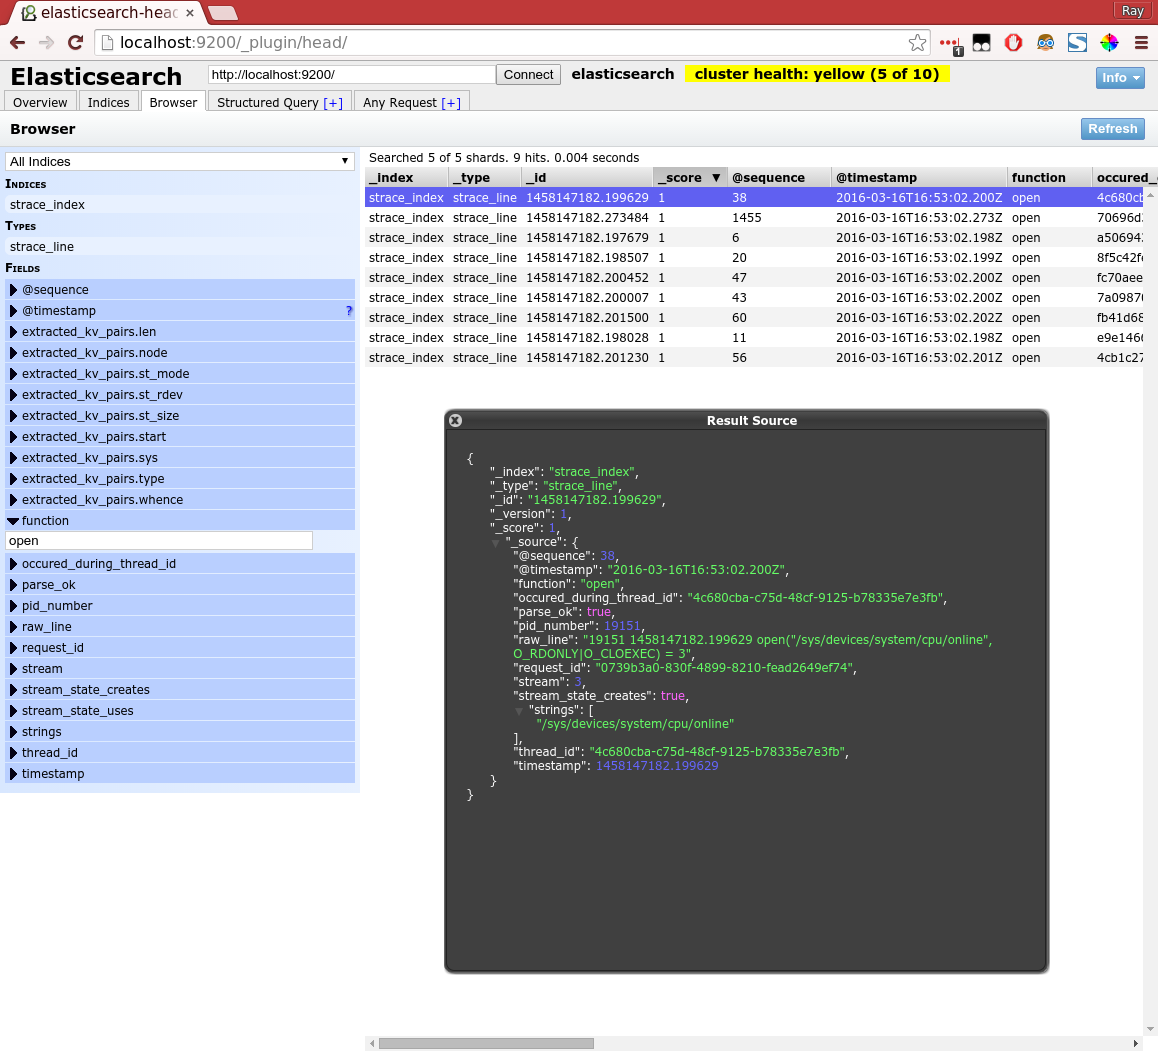
In above example I use filtering with a plugin called "head" to basically make the same selection as I did with the simple visitor example. I also highlighted one specific line to show the JSON representation.
I used PHP for processing the wordpress strace output from ElasticSearch and generated the visualization from the very first image in this blog post. You can view the HTML output here.
Hopefully this blog post was interesting to read, and maybe you find some use for the strace parser yourself. If you do, please let me know, that would be fun to know ![]() .
.
Settings for Tide graph Casio G-Shock GLX 150
Deploying owncloud via Helm on Kubernetes
How to print an endlessly folding card
i3 floating point window resize percentage wise and centered
My visit to Meeting C++ 2016!
Kerberizing Cloudera Manager
How to screen capture in Windows 10 with HiDPI support
Profiling and visualizing with GNU strace
How to "inspect element" XUL applications
How to debug XUL applications
Circlix Clock
Improve performance Jetbrains IDE when working on remote machine
Enable fsnotifier for Jetbrains IDE's like PyCharm over NFS/SSHFS network share
Nagios 4 + Nagvis + Nagiosgraph + Nagios plugins Dockerfile / Docker image
Qt Applications in Browser
Tweak Battle....
Example rendered video
Zend server And the Return of the Oracle Instant Client
Visualize Issue Ranks in Atlassian Jira Agile board
PhpStorm or IntelliJ suddenly hangs / freezes / keyboard not responsive/ unresponsive while editing in Linux / Ubuntu
Deflate and Gzip compress and decompress functions
Optimizing your website for performance
Lame PHP Parser, visualization and how cool hhvm is!
PHP Benelux 2014
Use cache in http proxy for debugging in webdevelopment
Install NVIDIA proprietary drivers in Ubuntu 13.10 or Linux mint 15/16
Free HTTP proxy for debugging purposes with GUI
Away- nicknames coloring in nicklist mIRC
Visual studio shortcut keys / settings
Raspberry pi camera streaming with crtmpserver test
Video streaming from code with SFML and ffmpeg
![nl][] Dutch PHP Conference 2013
![nl][] Tweakers fotoalbum images uploader
sanitizer - a shortcut key app with explorer integration
benchmarklib: a small benchmarking library
![nl][] watermarker tool
Fixing slow phpmyadmin by rewriting queries using mysql-proxy
ksh "pushd .", "popd" and "dirs" commands
Generating gradients
spf13 vim distribution
phpfolding.vim : Automatic folding of PHP functions, classes,.. (also folds related PhpDoc)
Visualizing (inverse) square root optimizations
Configure highlight weechat in screen and putty
Meta log monitor (or scriptable tail with GUI)
Firefox select behaviour and H264 support
Cool way to provide multiple iterators for your class (C++)
X, Y to Latitude + Longitude functions for (google) maps
PhpStorm and Ideavim {Escape,C-c,C-[} responsiveness
Tweakers logo test
Firebird IBPP use in non-unicode project
Automatic nickname in channel and nicklist colouring in mIRC
Allegro 5 separate process for rendering
Allegro 5 and wxWidgets example
Proxy securely through ANY corporate proxy/firewall
GNU Screen Navigator V2
Some CGI "tips"
Inline printf compatible with char *
Render on top of mplayer using custom window
Starcry rendered videos
Behaviours engine
DialogBlocks Howto
Compiling with DialogBlocks
Git, github, Mercurial, bitbucket
SuperMouser - mouseless navigation
Collection of wallpapers
BASE64 COMMANDLINE
Singleton notepad.exe
Starcry rendered frame images
GNU Screen Navigator
PHP debugging in practice!
Photoshop blenders for allegro
Launch of yet another blog ii
Common Lisp wallpaper
Improving the outline for the Adornment of the Middle Way
Using allegro with wxWidgets
Launch of yet another blog
Motion blur
Functional programming
Enable wake-on-lan on Linux Debian (4.0)

Topics:
Other interests:
EBPF Flamegraphs C++ Ubuntu 20.04
Site generated using ![]() ArticleManager © 2010-2013
ArticleManager © 2010-2013