Neither one nor Many
Software engineering blog about my projects, geometry, visualization and music.
I remember having something like this as a child: http://www.endlessfoldingcard.com/endless-folding-card-p-768-918.html. It was not that one but something similar, a flyer for some stupid product. I was fascinated by it and could keep folding it for hours. It was nice made out of some very strong paper/cardboard, unfortunately I probably got rid of it at some point.
It took me a long time to find it again, every now and then I would try to look it up on Google (with years in between), unable to find it. Until I had a moment of clarity and tried the additional keyword "Endless", and finally found something that I remembered.
Figuring out how it works
All the YouTube videos I found would basically fold the thing together, and then decorate the card afterward, however I wanted to print it beforehand in such a way that it would turn out nicely when folded. To be honest this one does attempt to explain some of the layouting, but it wasn't clear enough for me. This is another video that shows how to fold it clearly.
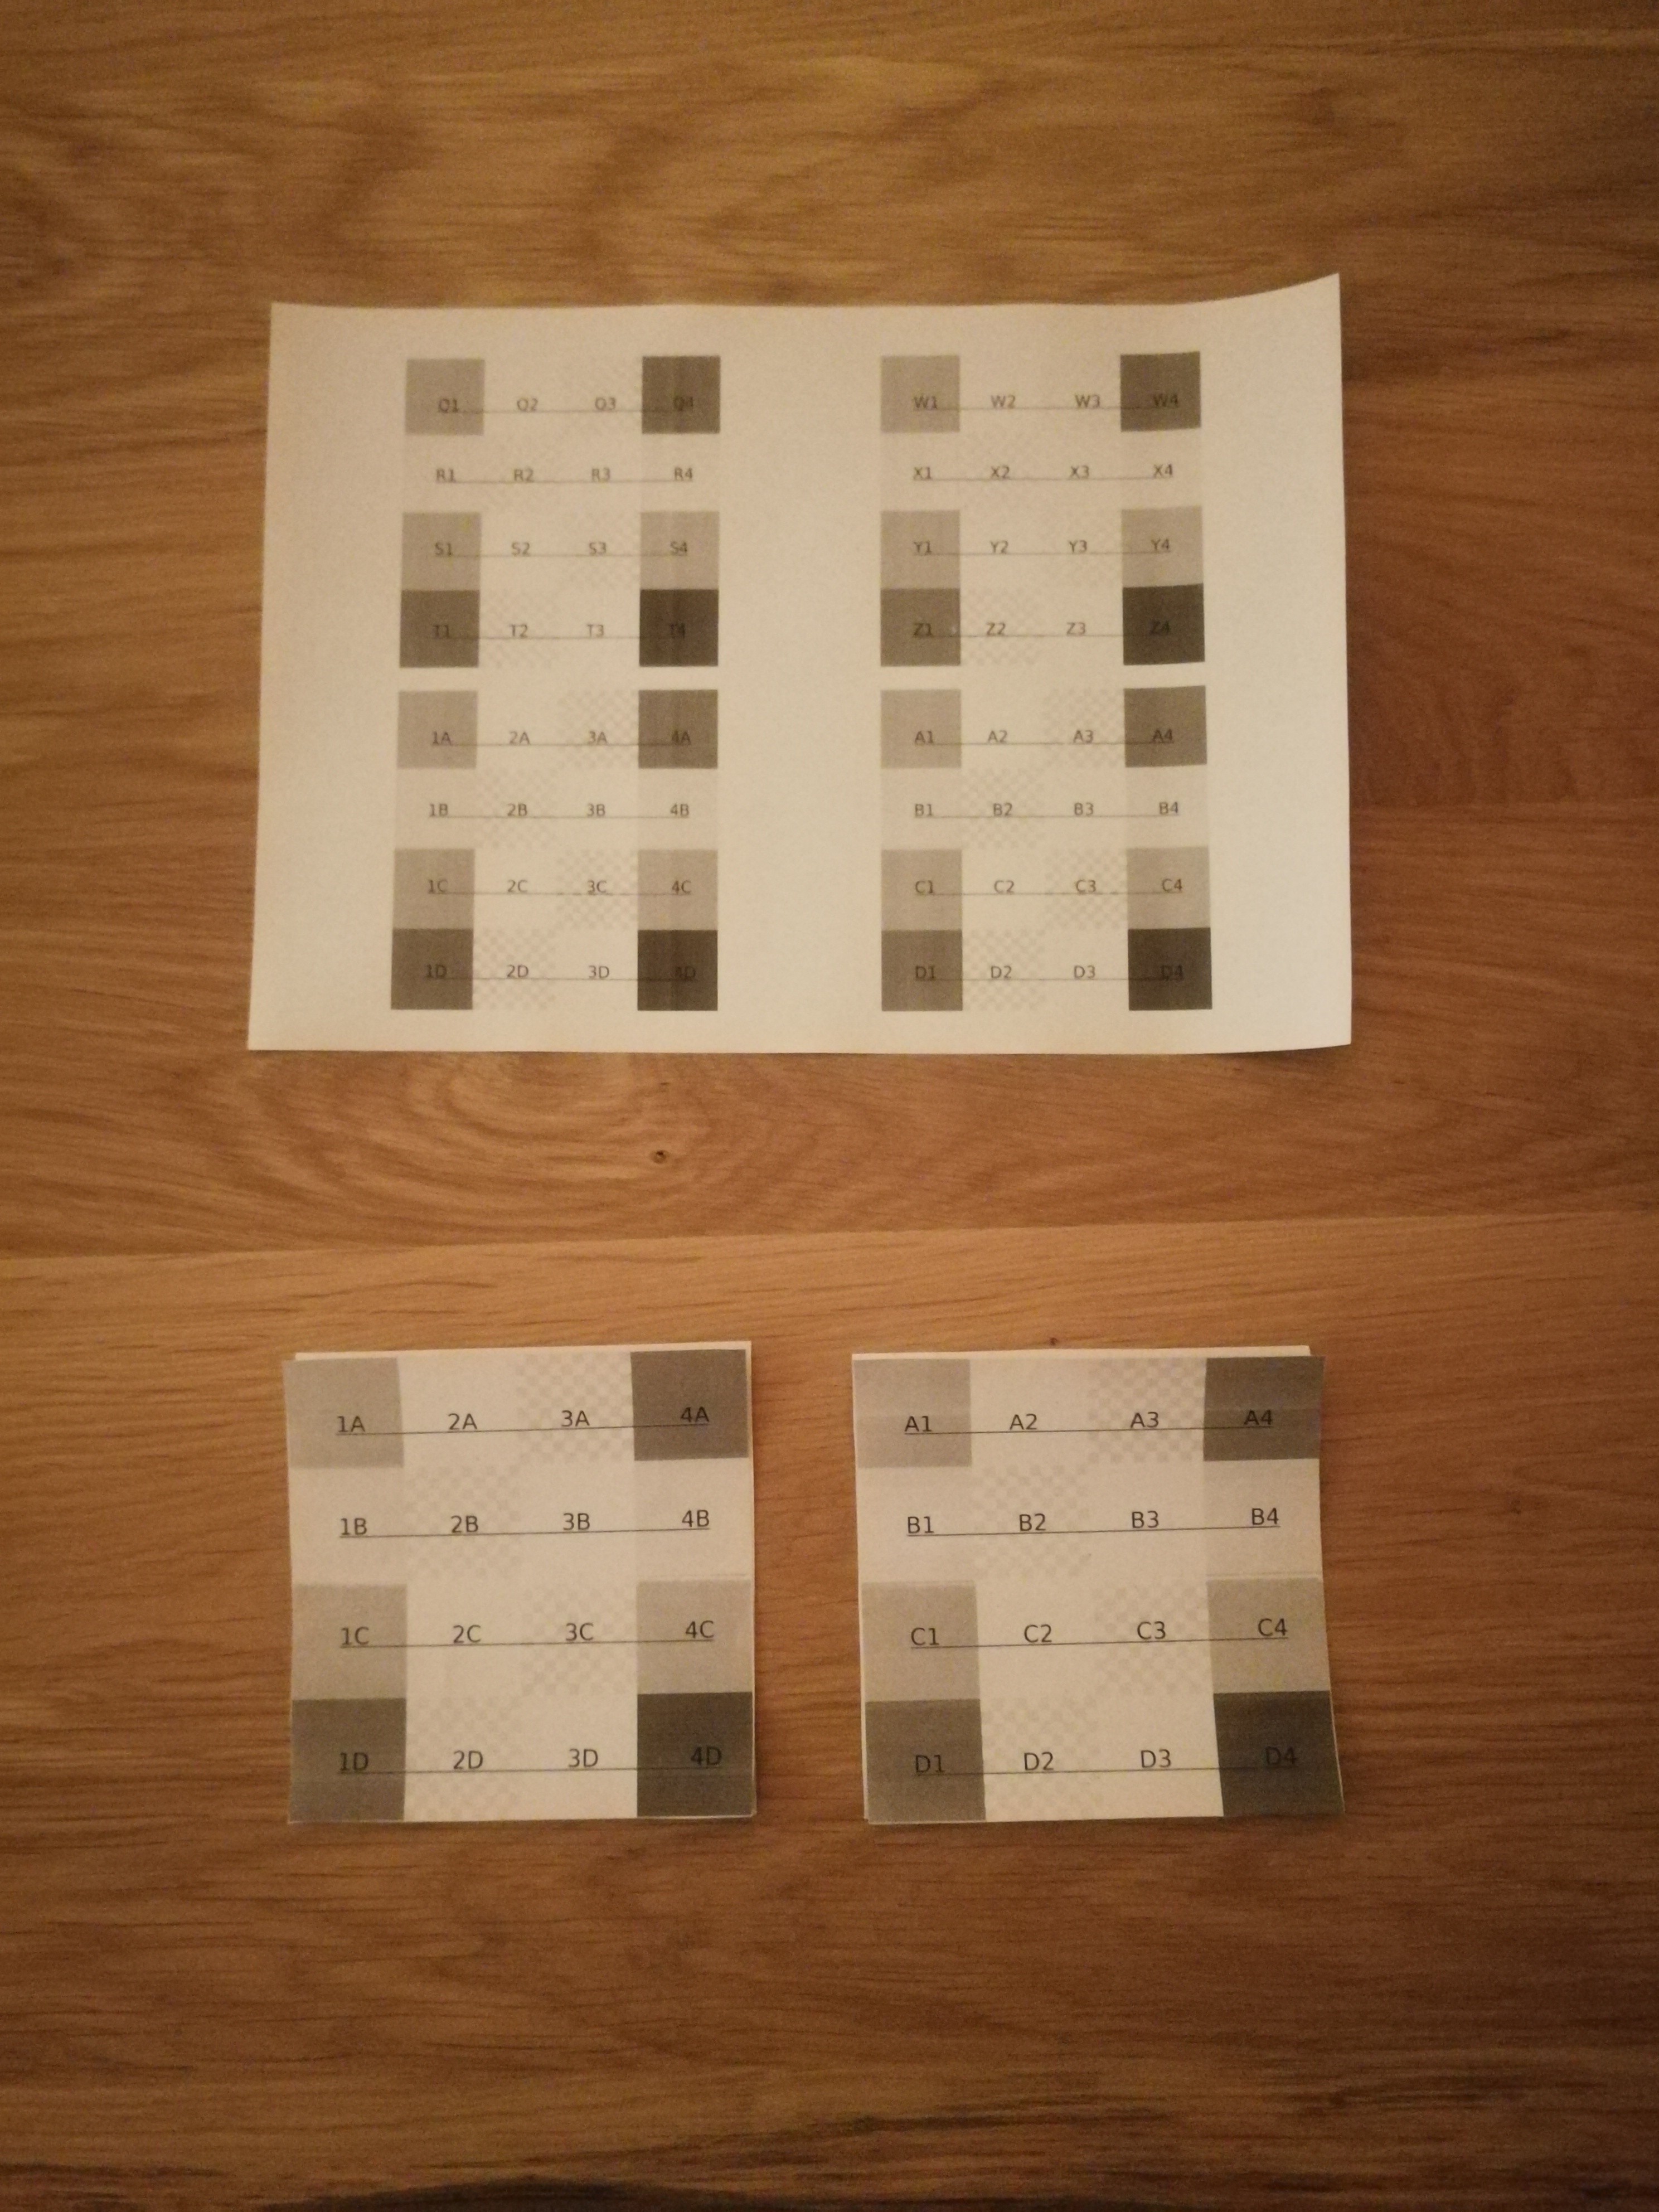
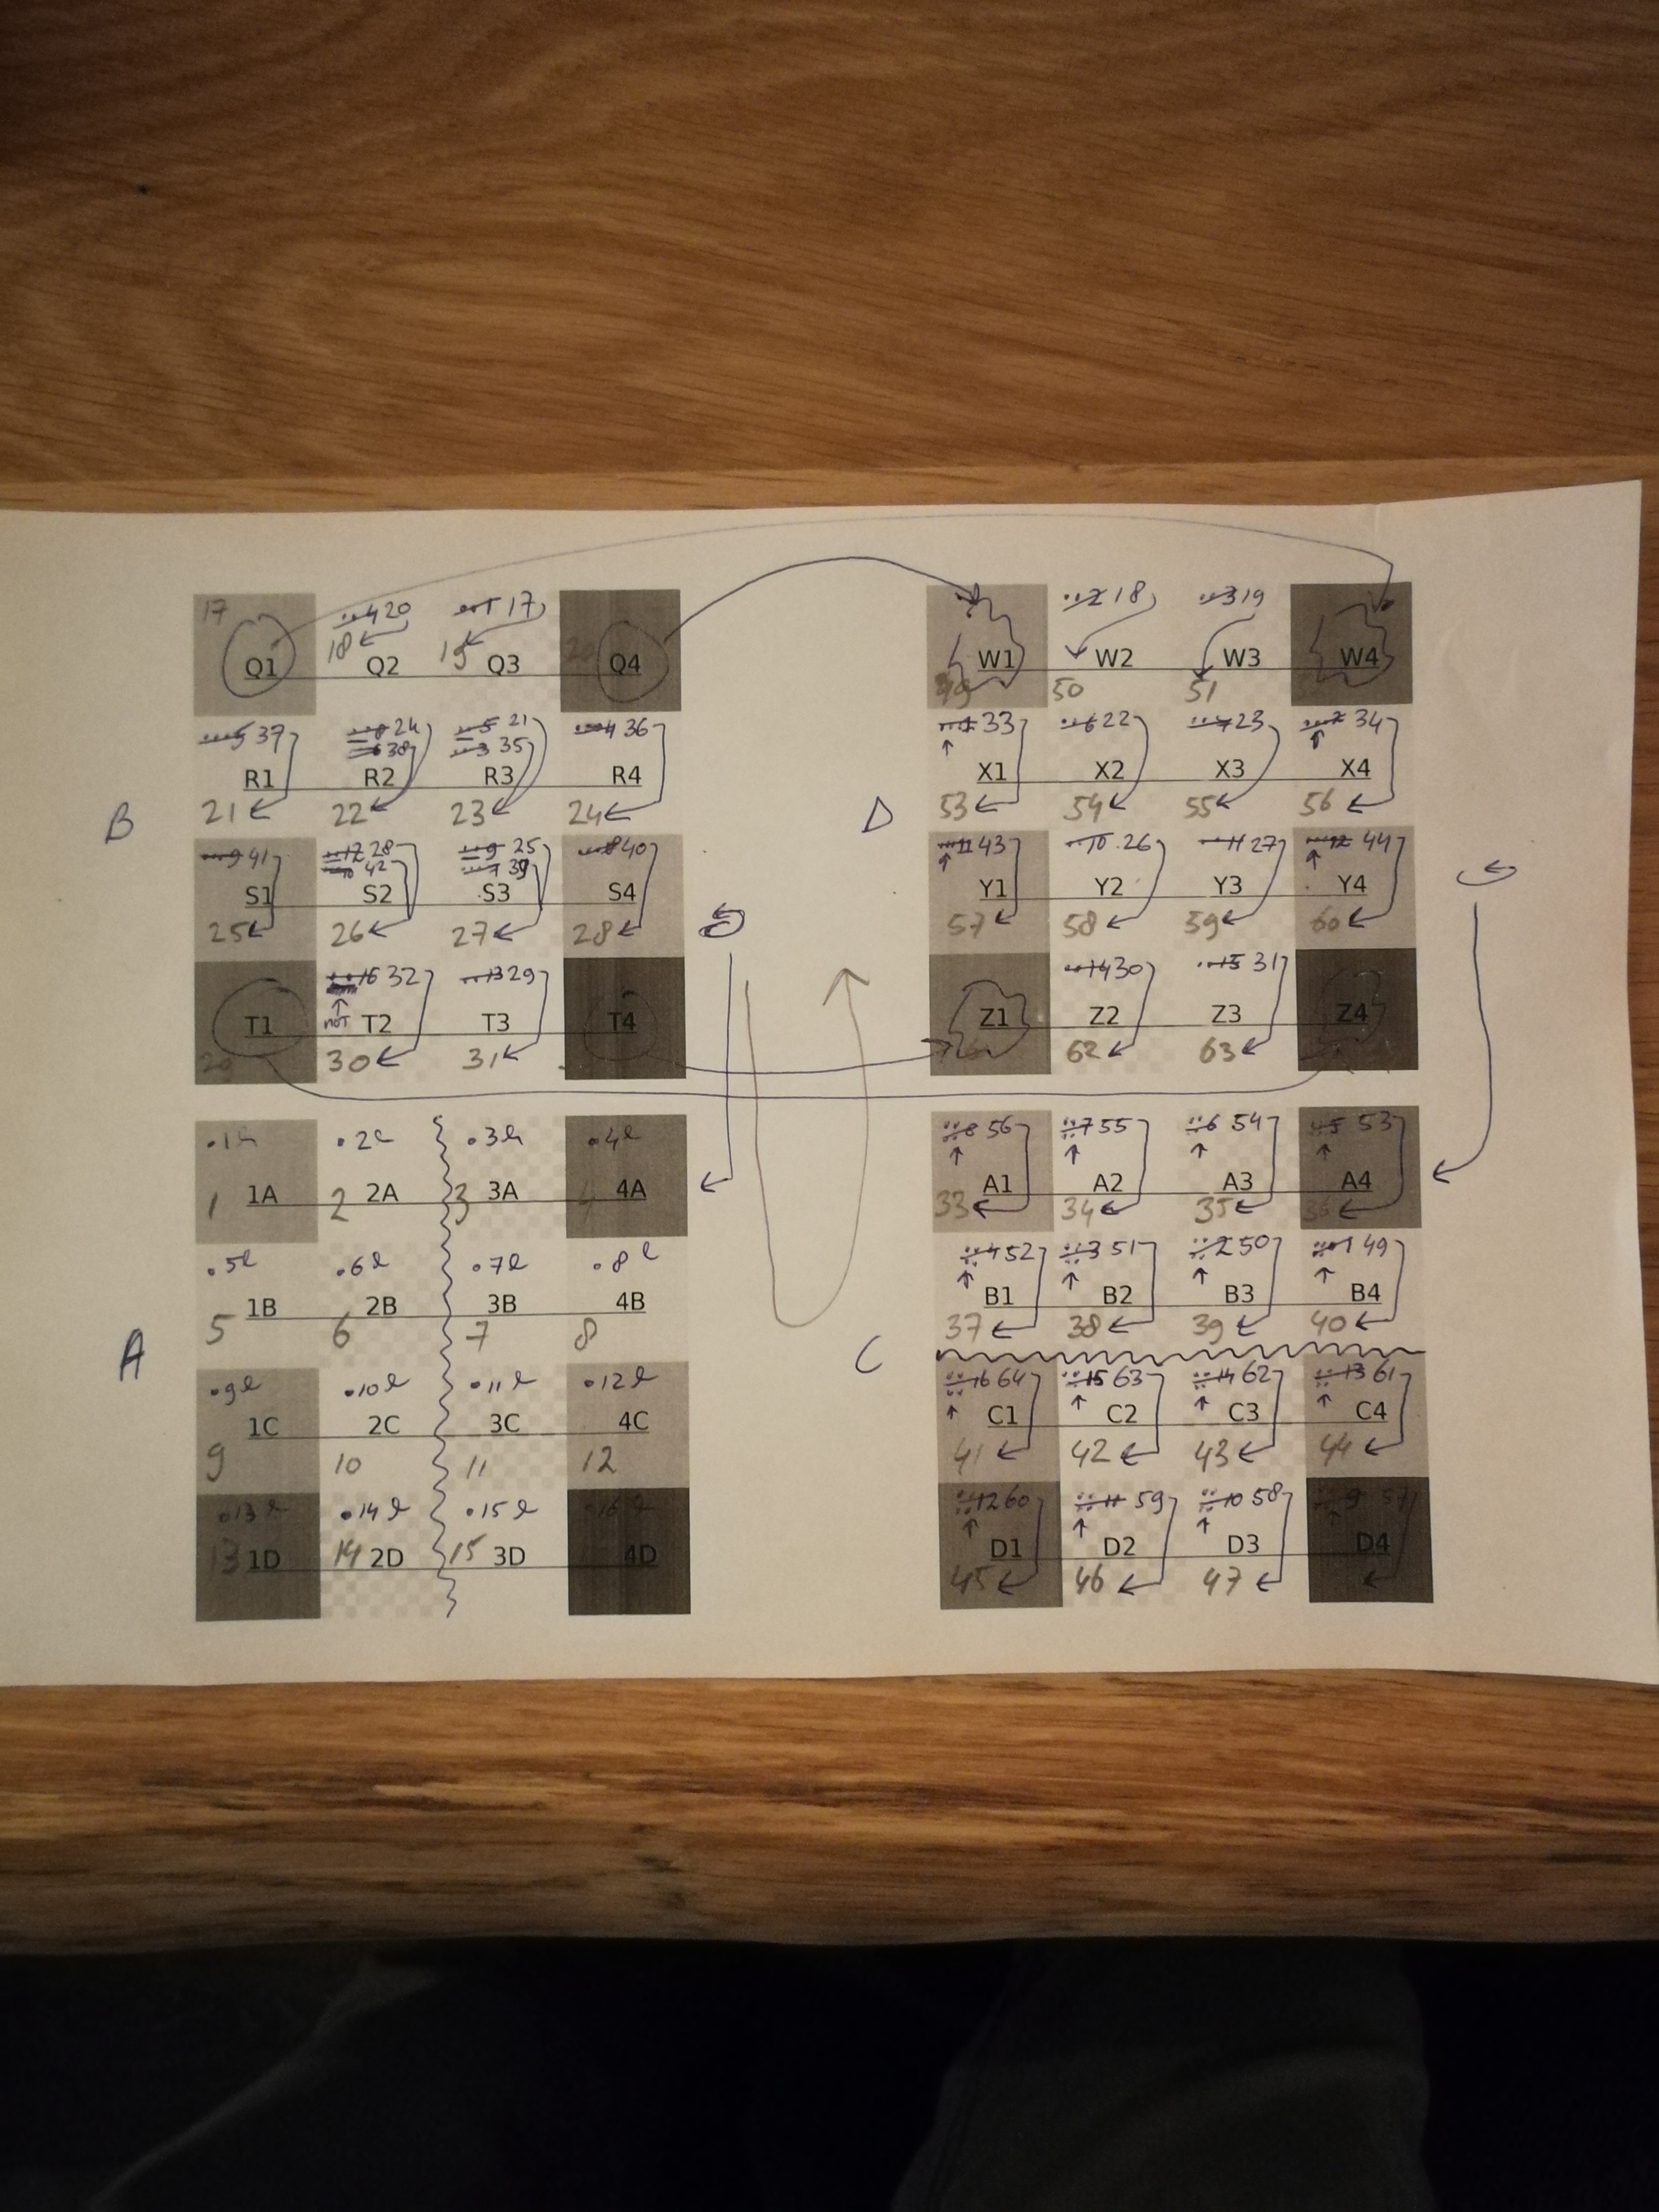
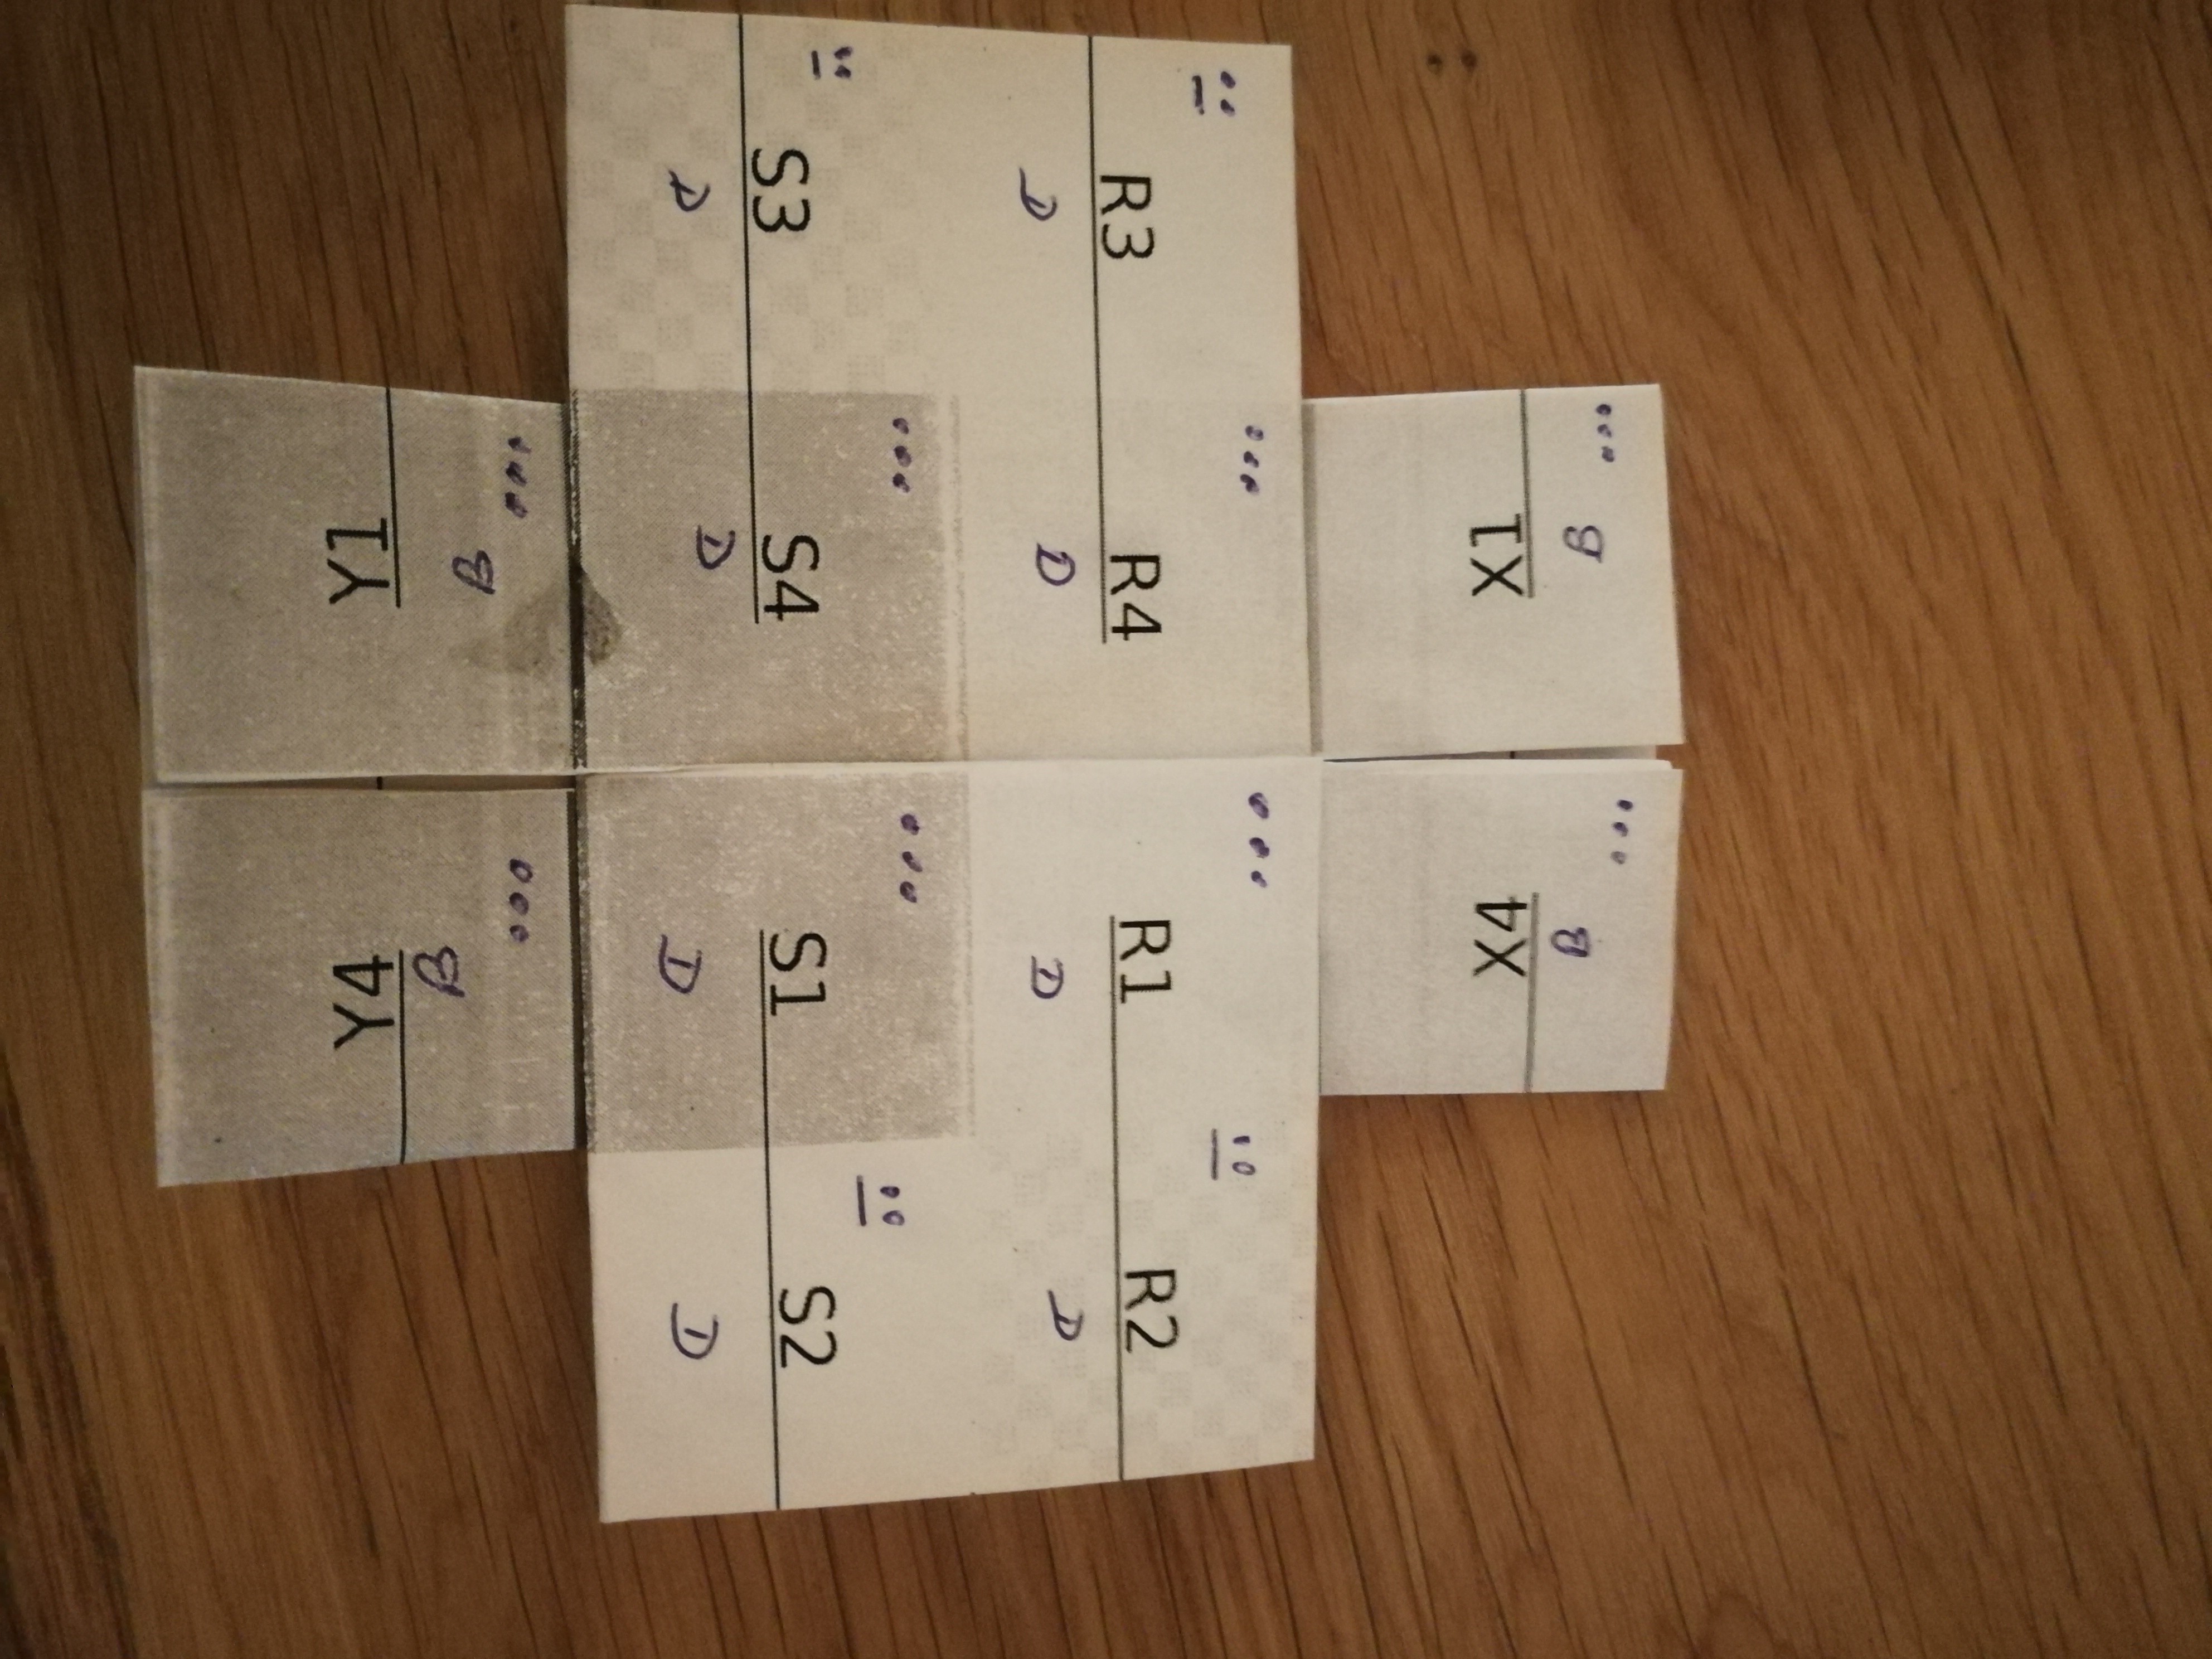
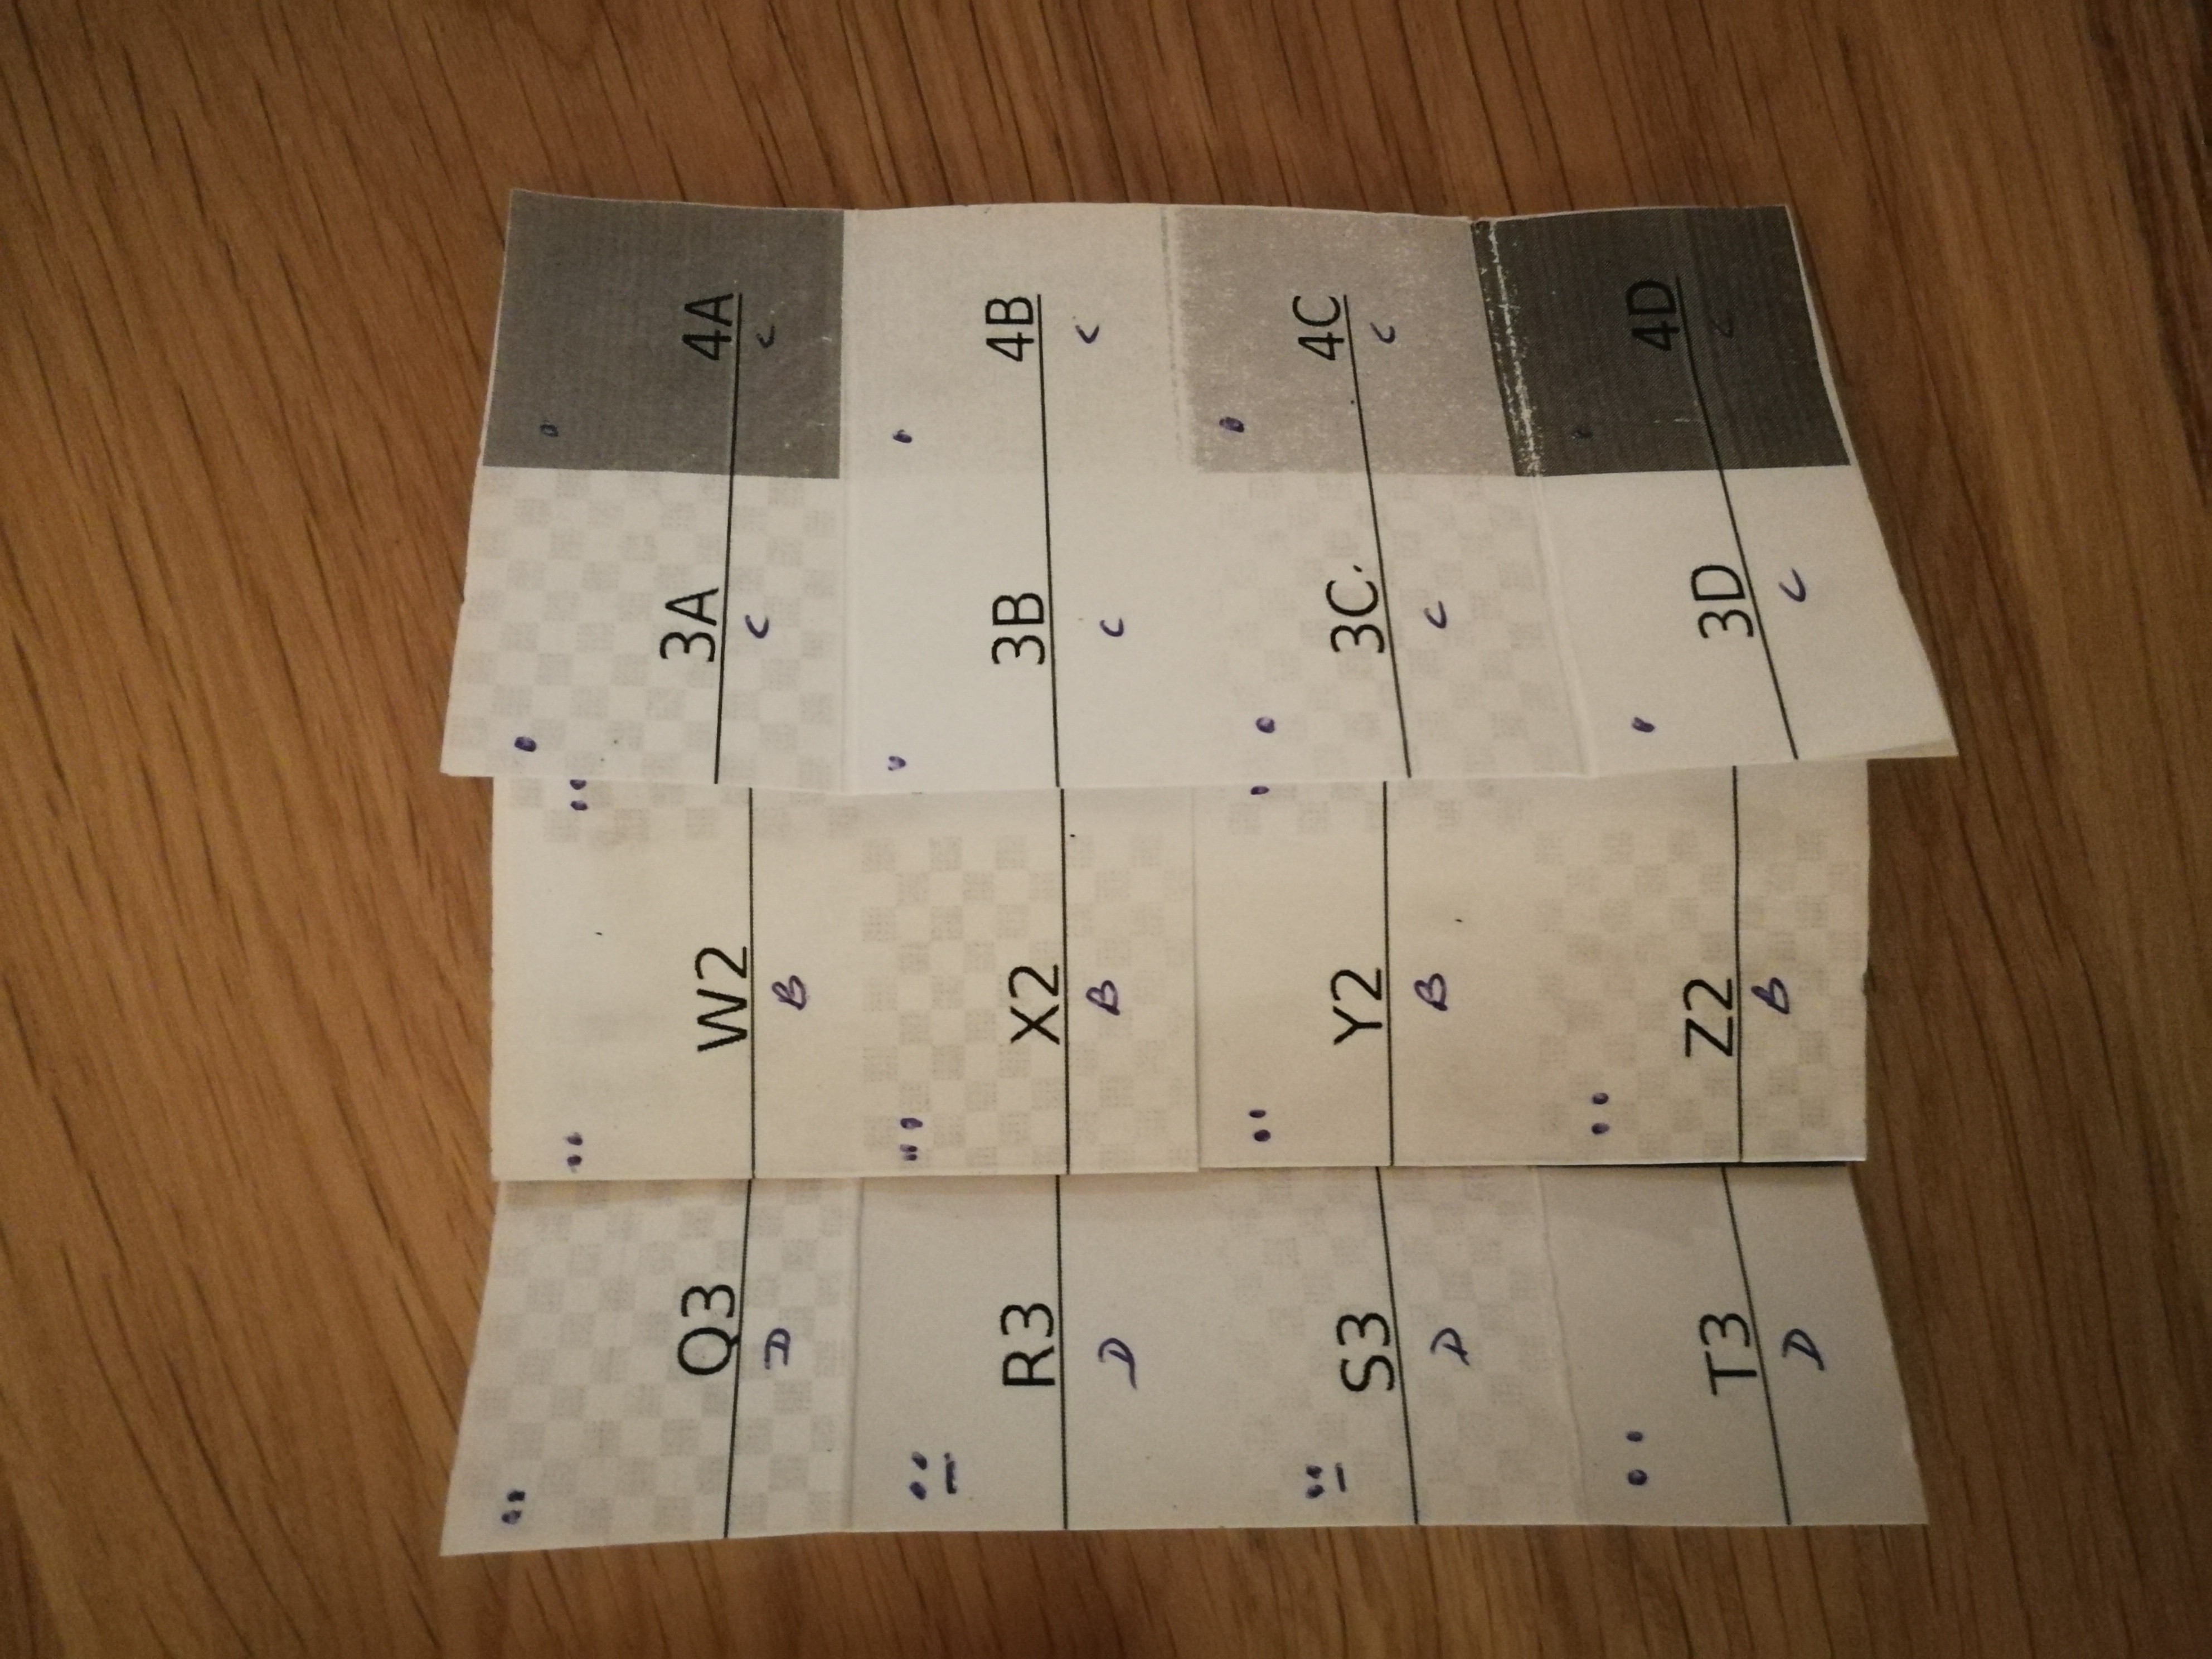
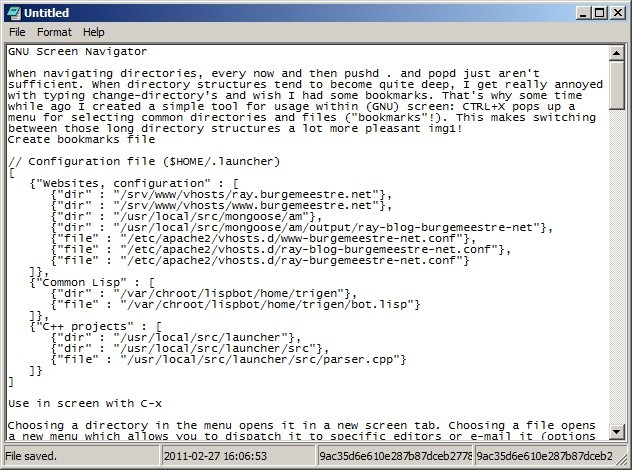
There are a few things that you will notice when you fold one, some parts of the card stay constant for example, and not all views have corners. Anyway I decided to treat it as a grid of tiles. I just printed 2 two-sided pieces of paper with unique numbers for each tile. Then I deciphered which tiles end up where after folding, and which ones are rotated 180 degrees. See madness below.
See the cardboard in action here: VID_20180531_011204.mp4
Design and print the card!
Designing the card in something like gimp is a lot of work of course, and it would be hell if you need to prepare it manually for printing.
Luckily I wrote a C++ program that uses the very cool Selene Image library, which I learned about via the Dutch C++ User Group ![]() ,
Michael (the author) gave an awesome lightning talk about it. It was good timing because a few days after that I needed to write this program.
,
Michael (the author) gave an awesome lightning talk about it. It was good timing because a few days after that I needed to write this program.
I didn't put this code on github, but here is the source code:
// This file is using the `Selene` library.
// Copyright 2017-2018 Michael Hofmann (https://github.com/kmhofmann).
// Distributed under MIT license. See accompanying LICENSE file in the top-level directory.

#include <selene/img/ImageAccess.hpp>
#include <selene/img/ImageDataToImage.hpp>
#include <selene/img/ImageToImageData.hpp>
#include <selene/img_io/IO.hpp>
#include <selene/img_ops/Algorithms.hpp>
#include <selene/img_ops/Transformations.hpp>
#include <selene/io/FileReader.hpp>
#include <selene/io/FileWriter.hpp>

#include <cassert>
#include <iostream>
#include <string>

#include <boost/filesystem.hpp>

using namespace sln::literals;

struct tile
{
  size_t index;
  size_t folded_index;
  bool flipped;
};

struct tile_index
{
  sln::PixelIndex x;
  sln::PixelIndex y;
};

// clang-format off
std::array<tile, 64> tiles {{
  /**
   * There are basically four sides (a,b,c,d), which I've divided into 16 tiles per side.
   * Side a & b will be printed on one piece of paper, double sided, as will sides c & d.
   * In total there are 64 tiles, and this table basically combines two states for each tile.
   *
   * When designing you create four "views" for each side, which is the desired outcome,
   * or the first state of each tile. Like:
   * {1, 2, 3, ..., 17, 18, 19, ..., 62, 53, 64.} (nothing will be rotated)
   *
   * But once you print them and glue them together, and you fold your way through the card,
   * the tiles appear in different order, and sometimes even rotated 180 degrees.
   * This is the second state of the tiles. Something like:
   * {1, 2, 3, ..., 19, 50, 51, ..., 43+rotate, 42+rotate, 43+rotate}
   *
   * Both states are combined in this table, for each tile the following fields:
   * - index: the tile number (for the first state)
   * - folded index: the tile number (for the second state)
   * - flipped: whether the tile is rotated 180 degrees in the 2nd state.
   *
   * So basically what needs to happen is move each tile from index -> folded_index, rotate
   * if needed, and you can just print the resulting images and when you assemble the card
   * all your designs appear the way you intended them to. Doing this in something like
   * Photoshop or Gimp would be a huge pain, so that's why I made this program.
   */
  // a
  {1, 1, false},   {2, 2, false},   {3, 3, false},   {4, 4, false},
  {5, 5, false},   {6, 6, false},   {7, 7, false},   {8, 8, false},
  {9, 9, false},   {10, 10, false}, {11, 11, false}, {12, 12, false},
  {13, 13, false}, {14, 14, false}, {15, 15, false}, {16, 16, false},

  // b (corner tiles are glued)
  {17, 19, false}, {18, 50, false}, {19, 51, false}, {20, 18, false},
  {21, 23, false}, {22, 54, false}, {23, 55, false}, {24, 22, false},
  {25, 27, false}, {26, 58, false}, {27, 59, false}, {28, 26, false},
  {29, 31, false}, {30, 62, false}, {31, 63, false}, {32, 30, false},

  // c (corner tiles are unset, tiles on left and right are similar as previous (side b))
  {33, 0, false},  {34, 53, true},  {35, 56, true},  {36, 0, false},
  {37, 0, false},  {38, 24, false}, {39, 21, false}, {40, 0, false},
  {41, 0, false},  {42, 28, false}, {43, 25, false}, {44, 0, false},
  {45, 0, false},  {46, 57, true},  {47, 60, true},  {48, 0, false},

  // d (corner tiles are glued)
  {49, 40, true},  {50, 39, true},  {51, 38, true},  {52, 37, true},
  {53, 36, true},  {54, 35, true},  {55, 34, true},  {56, 33, true},
  {57, 48, true},  {58, 47, true},  {59, 46, true},  {60, 45, true},
  {61, 44, true},  {62, 43, true},  {63, 42, true},  {64, 41, true},
}};
// clang-format on

template <typename PixelType>
sln::Image<PixelType> load_image(const char* filename)
{
  auto img_data = sln::read_image(sln::FileReader(filename));
  if (!img_data.is_valid())
  {
    std::cerr << "Image data could not be decoded." << std::endl;
  }
  const auto img = sln::to_image<PixelType>(std::move(img_data));
  assert(img.is_valid());
  return img;
}

template <typename T>
void copy(T src, T dst)
{
  for (auto y = 0_idx; y < src.height(); ++y)
  {
    for (auto ptr = src.data(y), end = src.data_row_end(y), ptr2 = dst.data(y); ptr != end; ++ptr, ++ptr2)
    {
      *ptr2 = *ptr;
    }
  }
}

int main()
{
  // load the four all-equal in size views for the endless card
  auto img1 = load_image<sln::Pixel_8u4>("card_a.png");
  auto img2 = load_image<sln::Pixel_8u4>("card_b.png");
  auto img3 = load_image<sln::Pixel_8u4>("card_c.png");
  auto img4 = load_image<sln::Pixel_8u4>("card_d.png");

  assert(img1.width() == img2.width() && img1.height() == img2.height());
  assert(img2.width() == img3.width() && img2.height() == img3.height());
  assert(img3.width() == img4.width() && img3.height() == img4.height());

  // concat all images into one long image, making it easier to calculate coordinates for each tile
  sln::Image<sln::Pixel_8u4> input(img1.width(), sln::to_pixel_length(img1.height() * 4));
  sln::Image<sln::Pixel_8u4> output = clone(input);

  copy(img1, sln::view(input, 0_idx, 0_idx, img1.width(), img1.height()));
  copy(img2, sln::view(input, 0_idx, sln::to_pixel_index(img1.height() * 1), img1.width(), img1.height()));
  copy(img3, sln::view(input, 0_idx, sln::to_pixel_index(img1.height() * 2), img1.width(), img1.height()));
  copy(img4, sln::view(input, 0_idx, sln::to_pixel_index(img1.height() * 3), img1.width(), img1.height()));

  // helper lambda to get coordinate for a given tile number
  const auto tile_width = sln::to_pixel_length(img1.width() / 4);
  const auto tile_height = sln::to_pixel_length(img1.height() / 4);
  auto index_to_x_and_y = [=](size_t index) -> tile_index {
    const size_t x = ((index - 1) % 4) * static_cast<sln::PixelLength::value_type>(tile_width);
    const size_t y = ((index - 1) / 4) * static_cast<sln::PixelLength::value_type>(tile_height);
    return {sln::to_pixel_index(x), sln::to_pixel_index(y)};
  };

  // copy each tile to the correct location for printing the endless card
  for (const auto& tile : tiles)
  {
    auto src_index = index_to_x_and_y(tile.index);
    auto dst_index = index_to_x_and_y(tile.folded_index);
    if (tile.folded_index == 0)
    {
      continue;
    }
    auto src = sln::view(input, src_index.x, src_index.y, tile_width, tile_height);
    auto dst = sln::view(output, dst_index.x, dst_index.y, tile_width, tile_height);
    if (tile.flipped)
    {
      copy(sln::rotate<sln::RotationDirection::Clockwise180>(src), dst);
    }
    else
    {
      copy(src, dst);
    }
  }

  // debug
  sln::write_image(to_image_data_view(input, sln::PixelFormat::RGBA), sln::ImageFormat::PNG,
                   sln::FileWriter("result.png"));
  sln::write_image(to_image_data_view(output, sln::PixelFormat::RGBA), sln::ImageFormat::PNG,
                   sln::FileWriter("result2.png"));

  // write the resulting cards ready to print, result a + b double sided, and c + d double sided.
  sln::write_image(
      to_image_data_view(sln::view(output, 0_idx, 0_idx, img1.width(), img1.height()), sln::PixelFormat::RGBA),
      sln::ImageFormat::PNG, sln::FileWriter("result_a.png"));
  sln::write_image(
      to_image_data_view(sln::view(output, 0_idx, sln::to_pixel_index(img1.height() * 1), img1.width(), img1.height()),
                         sln::PixelFormat::RGBA),
      sln::ImageFormat::PNG, sln::FileWriter("result_b.png"));
  sln::write_image(
      to_image_data_view(sln::view(output, 0_idx, sln::to_pixel_index(img1.height() * 2), img1.width(), img1.height()),
                         sln::PixelFormat::RGBA),
      sln::ImageFormat::PNG, sln::FileWriter("result_c.png"));
  sln::write_image(
      to_image_data_view(sln::view(output, 0_idx, sln::to_pixel_index(img1.height() * 3), img1.width(), img1.height()),
                         sln::PixelFormat::RGBA),
      sln::ImageFormat::PNG, sln::FileWriter("result_d.png"));

  return 0;
}
Input & Output
The program reads card_a.png, card_b.png, card_c.png, card_d.png.
Does it's magic and procudes: result_a.png, result_b.png, result_c.png, result_d.png.
 <-- the *input* images
  <-- the *output* images
As you can see the resulting images look a bit weird, but when printed double sidedly, card A and B on one side, and card C and D on the other side of the paper, you can cut them out and fold them.
How to fold?
This is how I did it, I didn't plan to make a blog post so I didn't completely document every step. But at least on this picture should give you an idea:
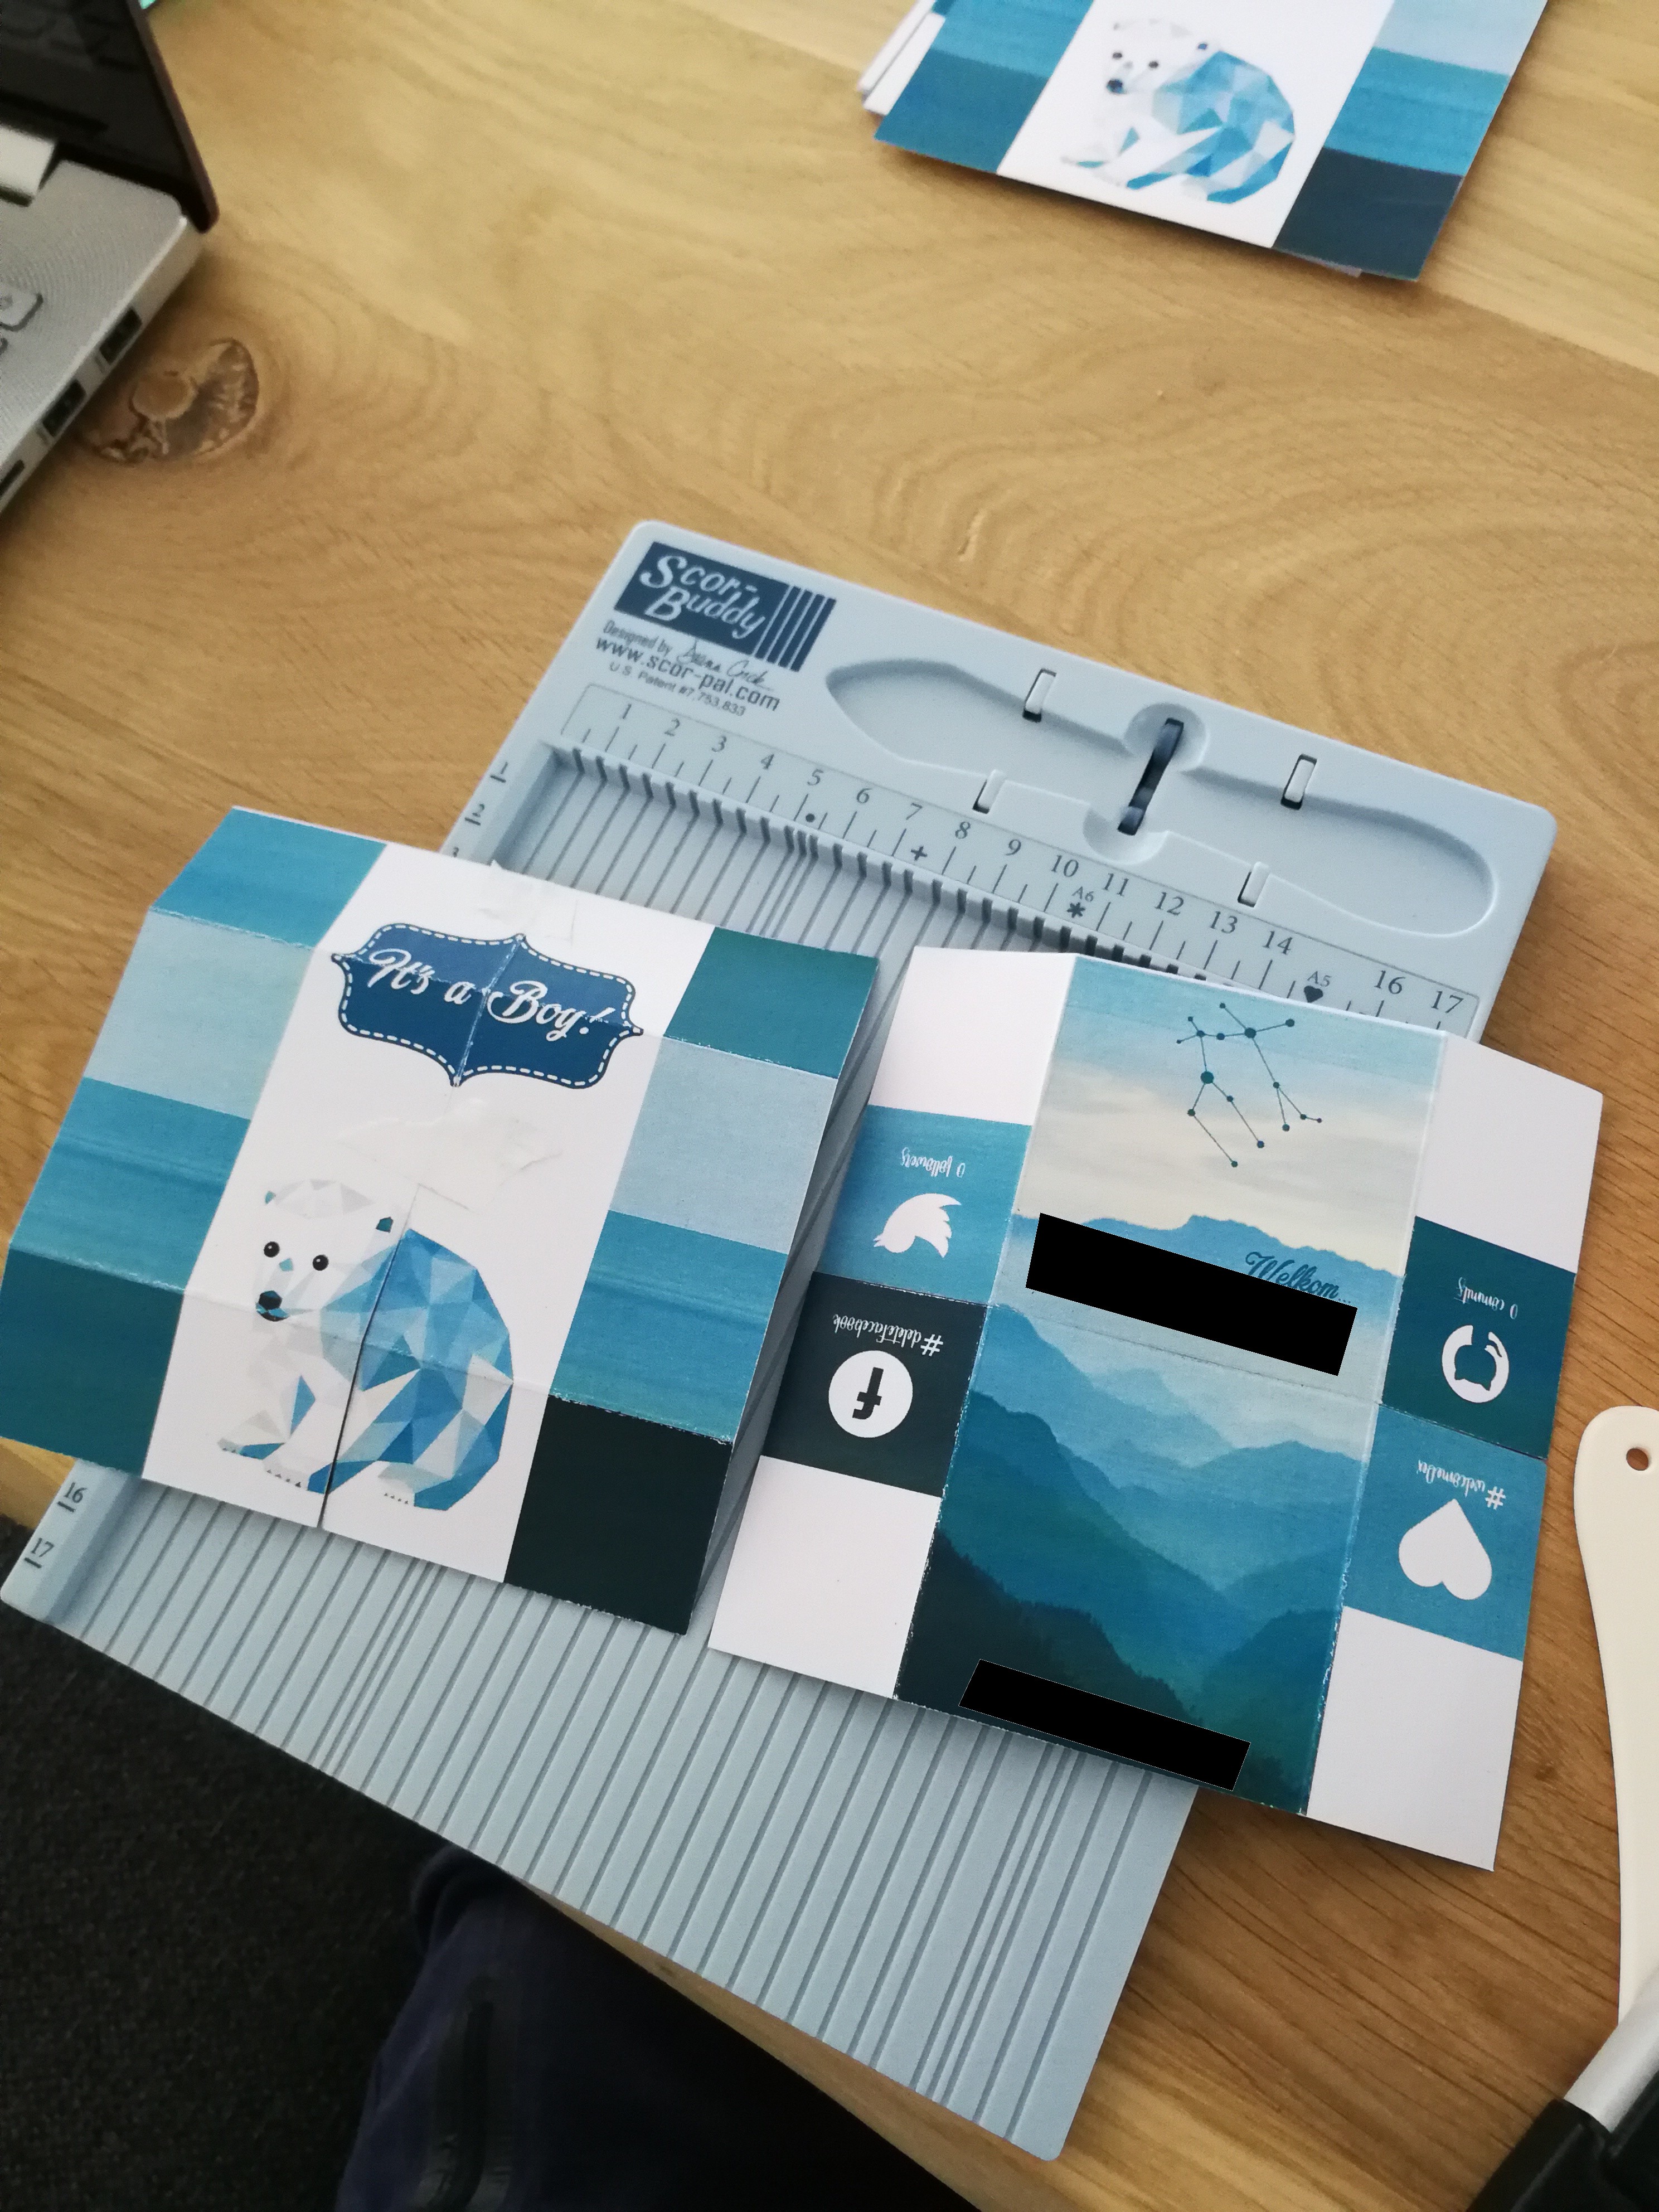
For folding I bought a "Scor-Pal", I can recommend this tool it makes nice folds, doing without would give crappy results on thick paper IMO.
The polar bear piece of paper is side A & C, and cut in the middle already, and two horizontal pre-folds are made (sloppy ones though ![]() ).
The other two sides
).
The other two sides C & D are pre-folded as well, but I didn't cut it horizontally yet.
After cutting, glue the white edges on sides B & C together, and have it dry, the card should be done.
Conclusion
After having folded about 60 of these I finally got the hang of it and I could produce pretty slick cards. One thing I did was print myself with a color laser printer on very thick paper, this gave "meh" results, the toner had trouble sticking to the paper especially after folding. I recommend doing the printing at a specialized shop, maybe to avoid the toner letting loose, but also because aligning both sides is important. Not all printers are great at this I've discovered, especially if you have to use the manual feed for the thick paper.
What worked best is this order:
- Printing both sides
- Cut out the two sides with something like

- Do the (in total four) pre-folds on both pieces of paper (do them in the right direction)
- Cut the first one vertically, perfectly in the middle.
- Cut the second one horizontally, perfectly in the middle.
- Put glue on the corners for the second one now (the one cut horizontally)
- Then align those two pieces perfectly so it appears whole again.
- One by one add the other (the one cut vertically) two pieces, you'll find with the glue still wet it's easy to adjust.
- When done, let it dry, and later on pre-fold some more for the definitive card.


Most people are probably familiar with gdb, and Ribamar pointed out to me there is also a ncurses frontend inside gdb.
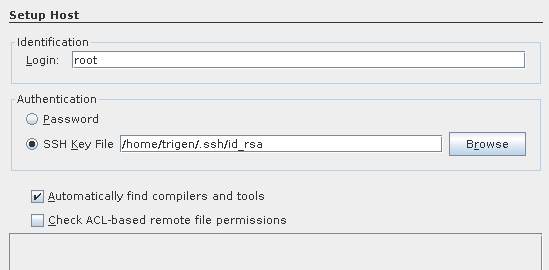
But in case anyone is interested I learned that NetBeans also supports remote debugging. Even though it's not the most modern IDE in the world, and it's vi emulation is cumbersome ![]() , it seems to have pretty good support for remote-debugging.
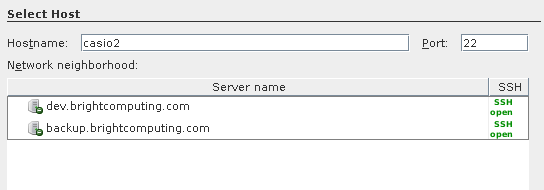
It will just login to some machine via ssh (i.e., dev11 or a real cluster), and issue
, it seems to have pretty good support for remote-debugging.
It will just login to some machine via ssh (i.e., dev11 or a real cluster), and issue gdb <something> and wrap around it. If you make sure it knows where the sources files are on your development machine, you can use all the step-debugging features.
The only downside is that loading up cmd in gdb takes a while probably ~ 30 seconds. Still it's a lot faster than debugging with print-statements and recompiling.
For cmsh it's already a lot faster and on top of that you can issue a command multiple times via the REPL, so you can step debug it multiple times within the same gdb session.
(Beware though that you probably need to connect again as your connection may be lost)
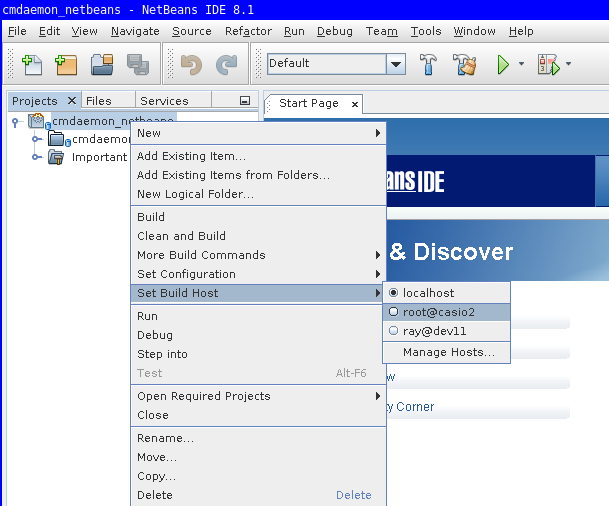
Example workflow
To show off how it works first with CMDaemon. My workflow is to create a unit-test that fails, set a breakpoint in the unit-test and start the debug.
 -
- 
break point set followed by the debugger stopping execution at that point.
 -
- 
step-into example, select the function to step into -and click the button highlighted with -.
There is also the F7 key to "step into", but be prepared to step into assembly a lot of times (use CTRL+F7 to step out, and try again). You will jump into the -> operator, shared pointer dereferences, std::string constructors, before getting into the function you want. (Also note that the first time you step into assembly it will be very slow, but it will get faster the next few times).
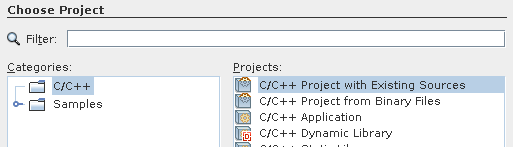
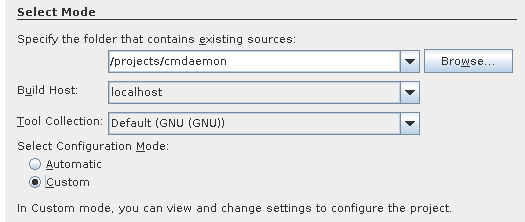
Wizard example to debug cmd unit test
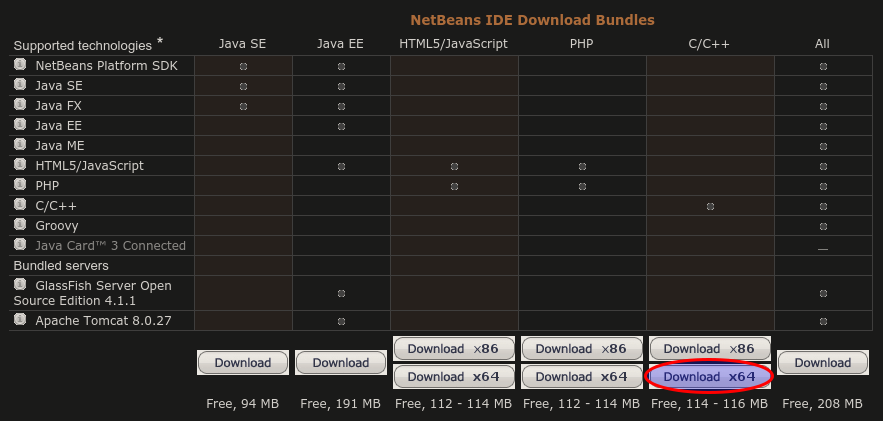
Download from https://netbeans.org/downloads/
chmod +x netbeans-8.1-cpp-linux-x64.sh./netbeans-8.1-cpp-linux-x64.sh 
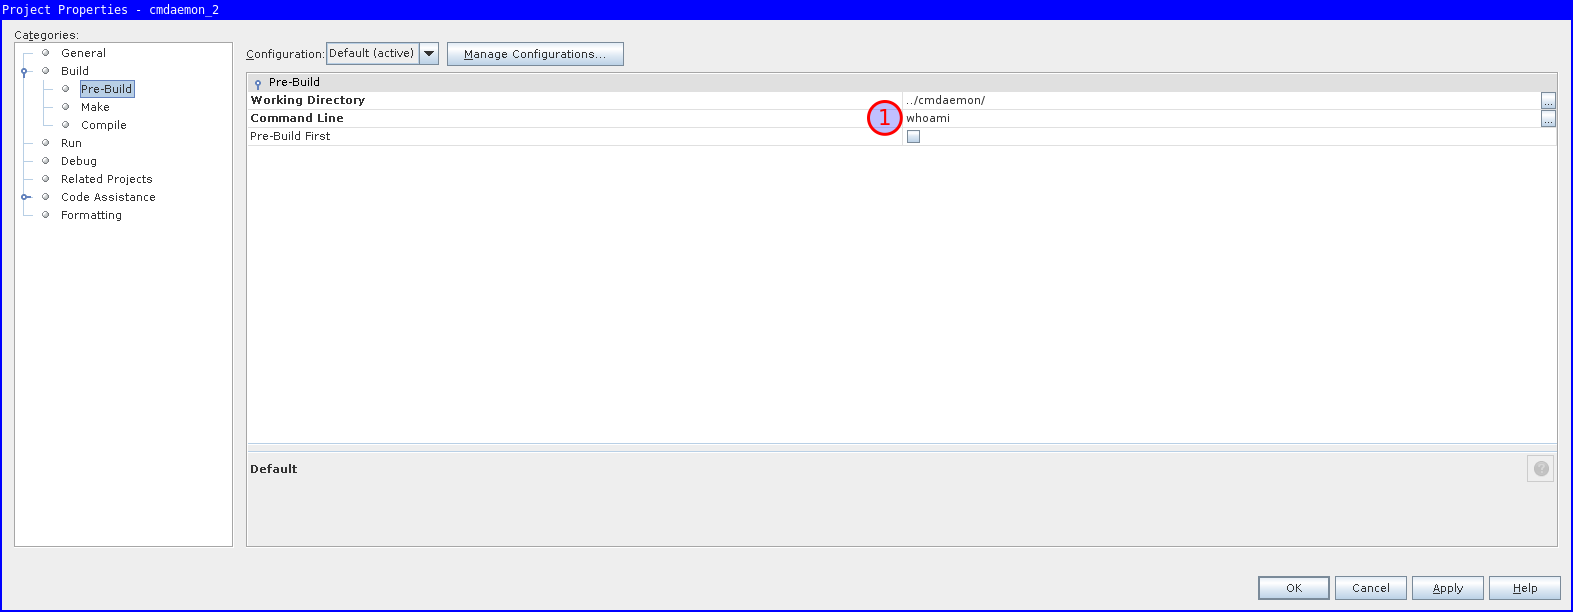
Note that you want to set some bogus command like
whoami. Netbeans will try to be smart and clean your project directory for you
(and rebuild without using multiple cores, ..)

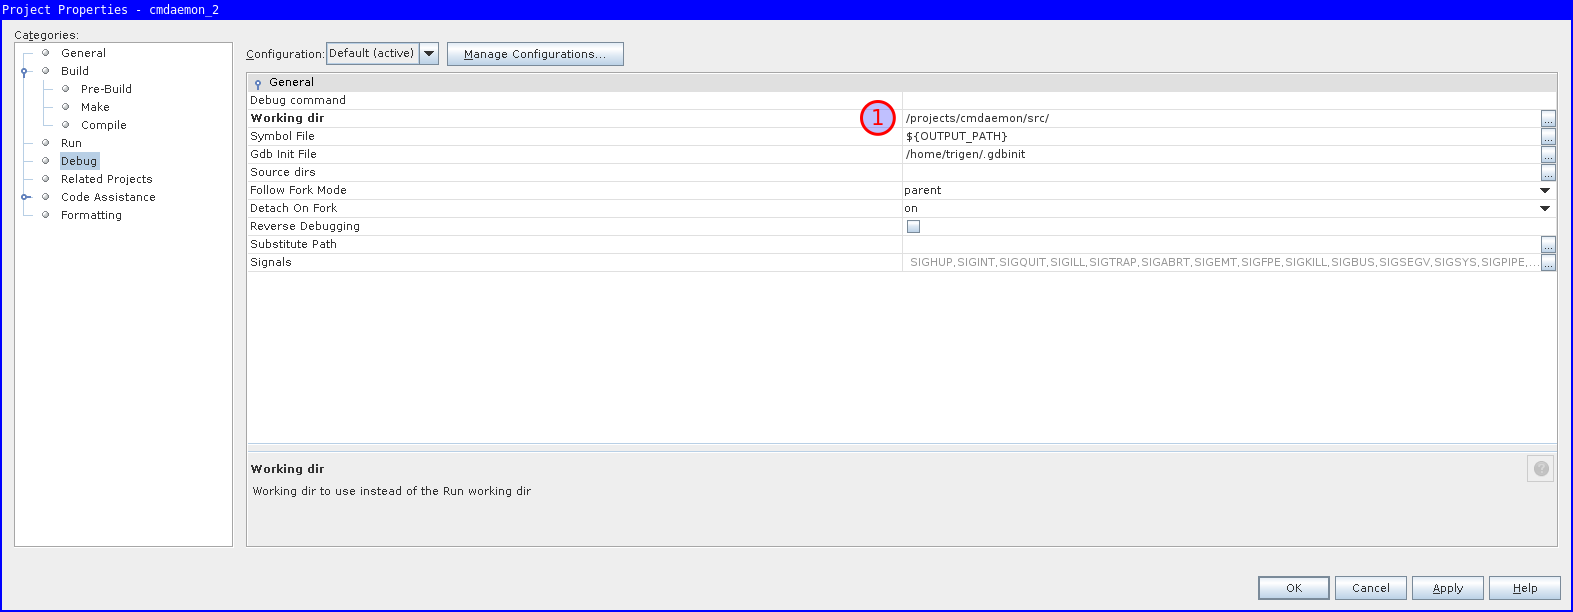
Note the working directory should be including src.
This is to help gdb later with finding source code.


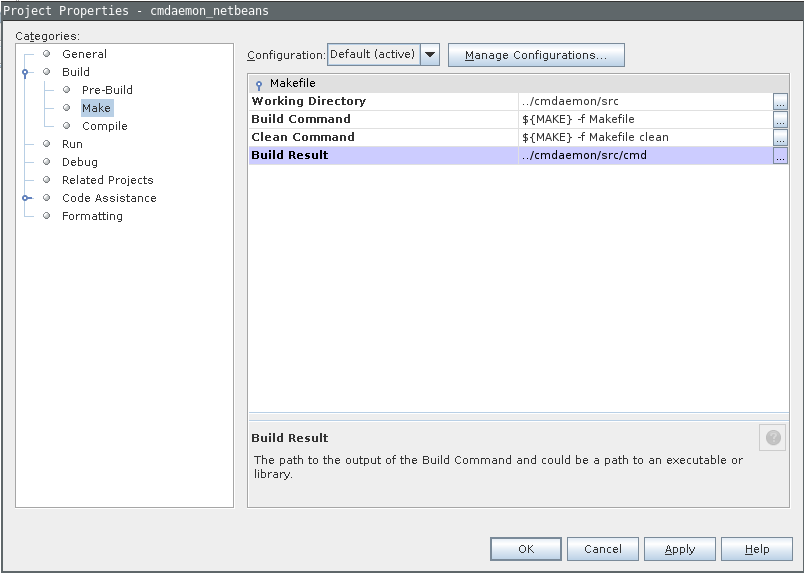
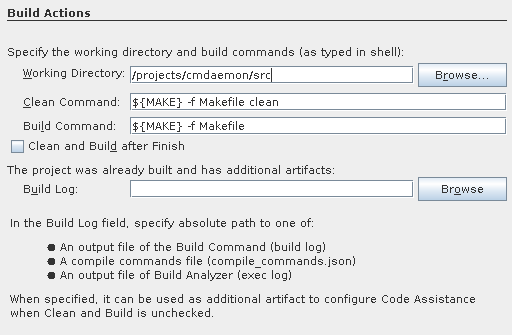
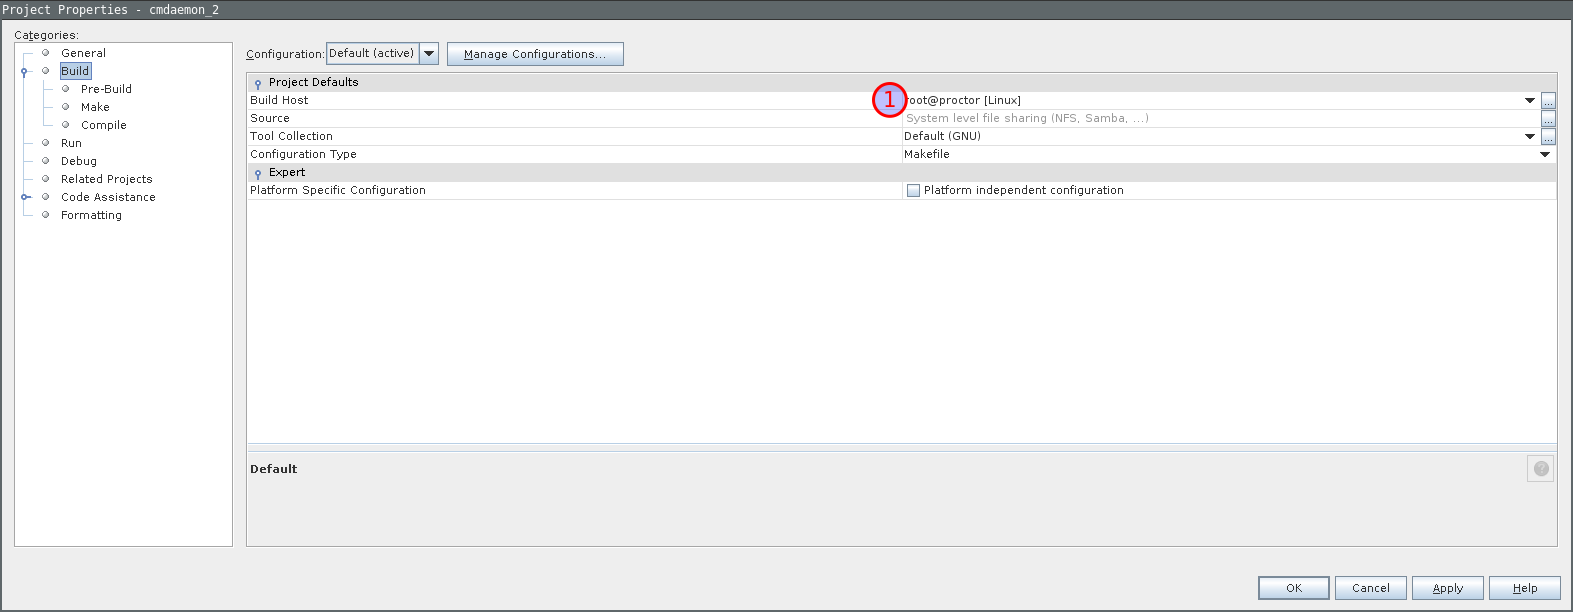
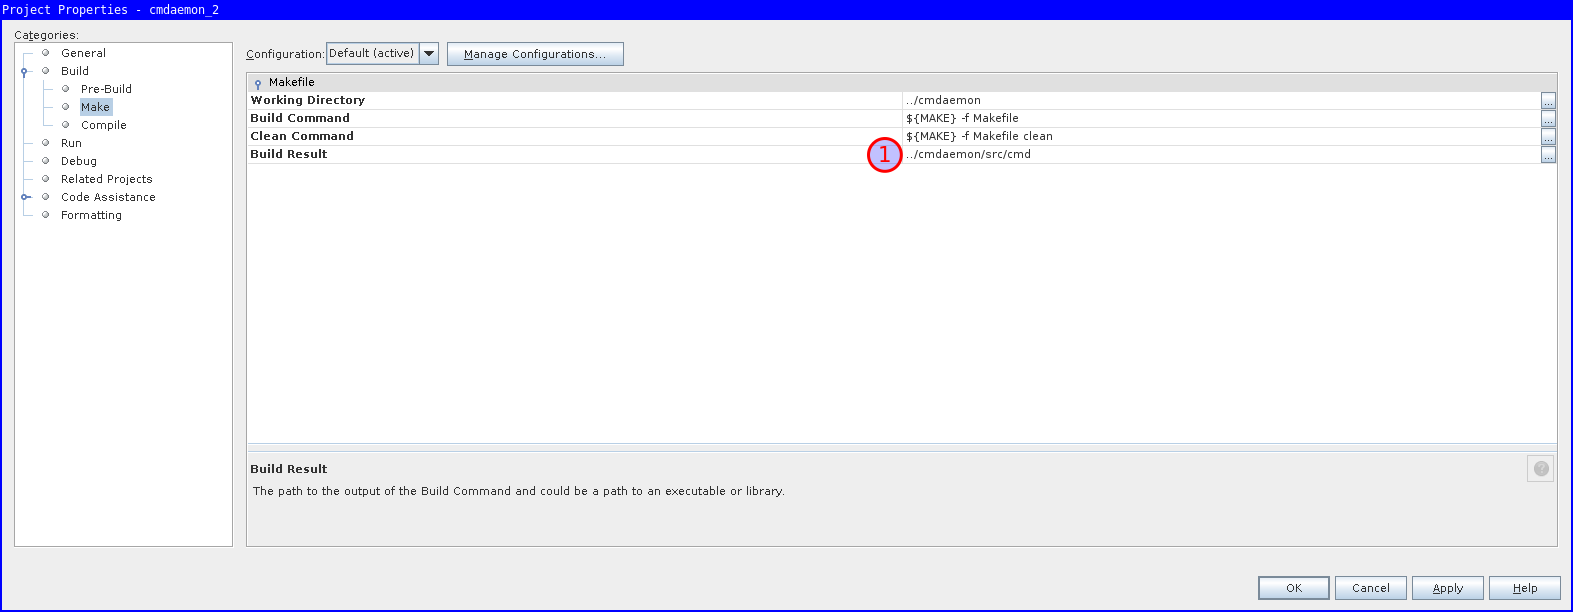
There is one fix needed that the Wizard didn't set properly for us.
Go to project properties, Build / Make, and set Build Result to the executable.
The remote debugger will use this value for issuing with gdb, and it's somehow empty by default.

Use ALT+SHIFT+o to Jump to the file containing the test.
Set a breakpoint there using CTRL+F8
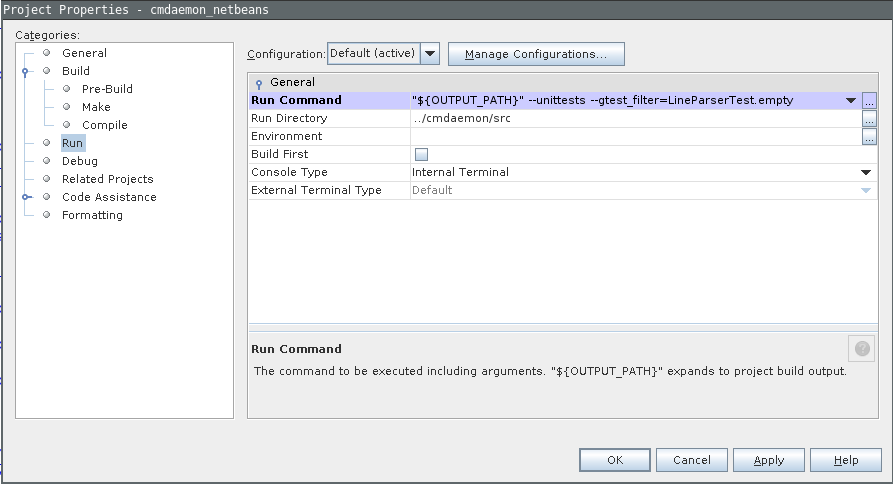
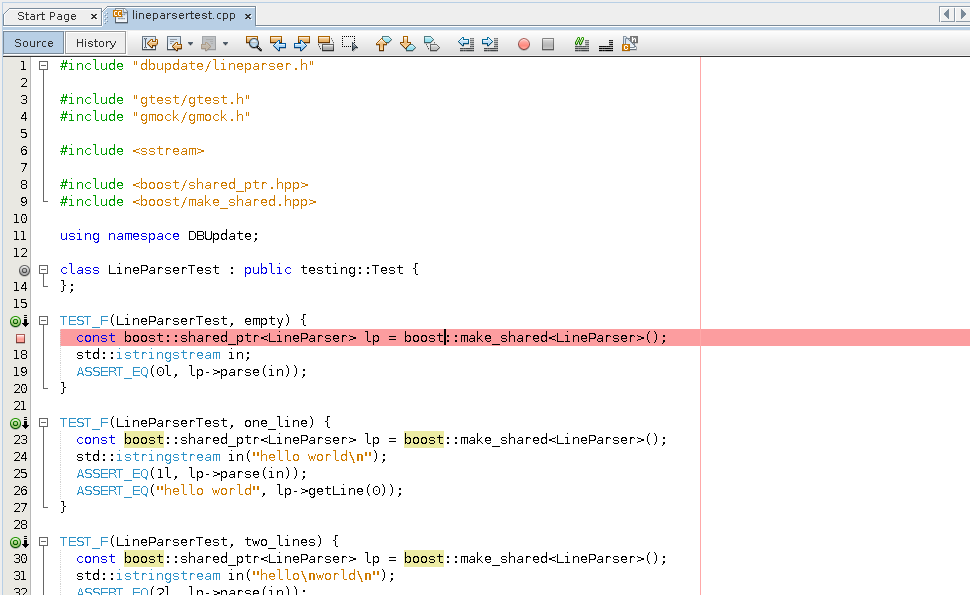
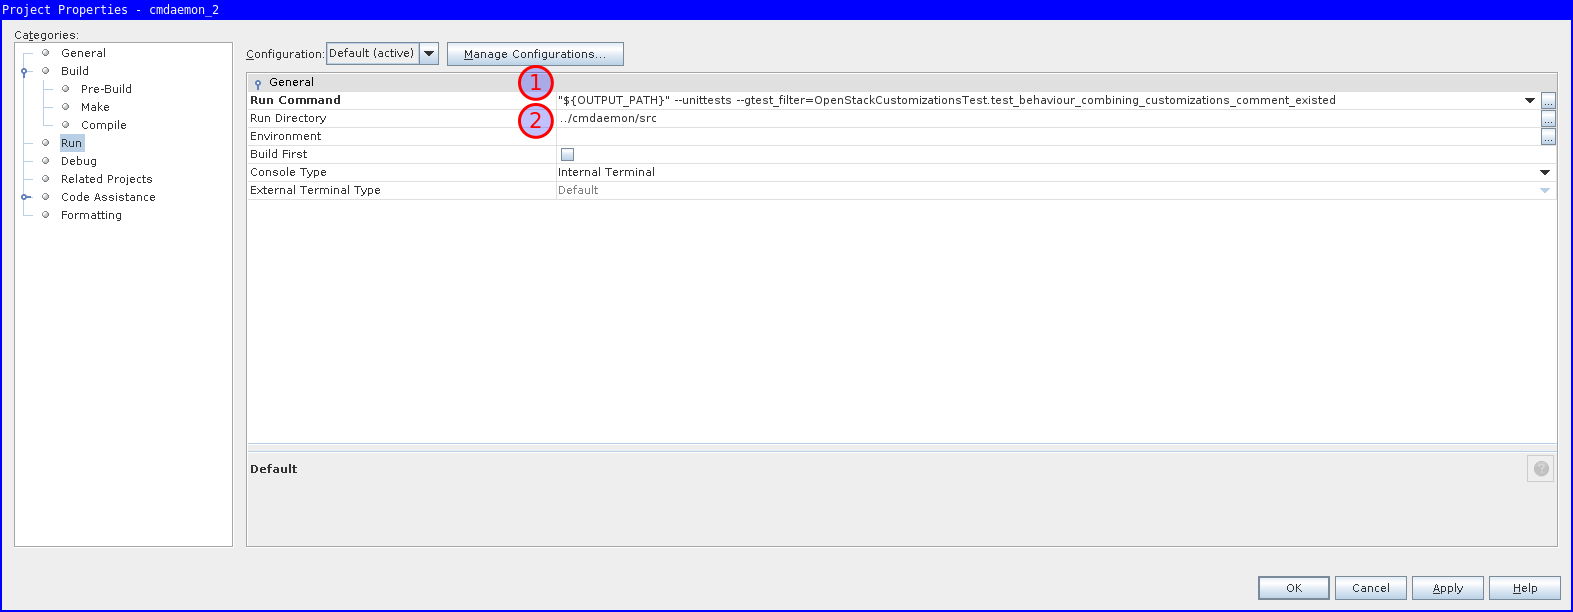
The final thing we want to pass to gdb is the parameters for running our specific unittest.
In my example "${OUTPUT_PATH}" --unittests --gtest_filter=LineParserTest.empty.


You can use these settings to double check if everything is correct
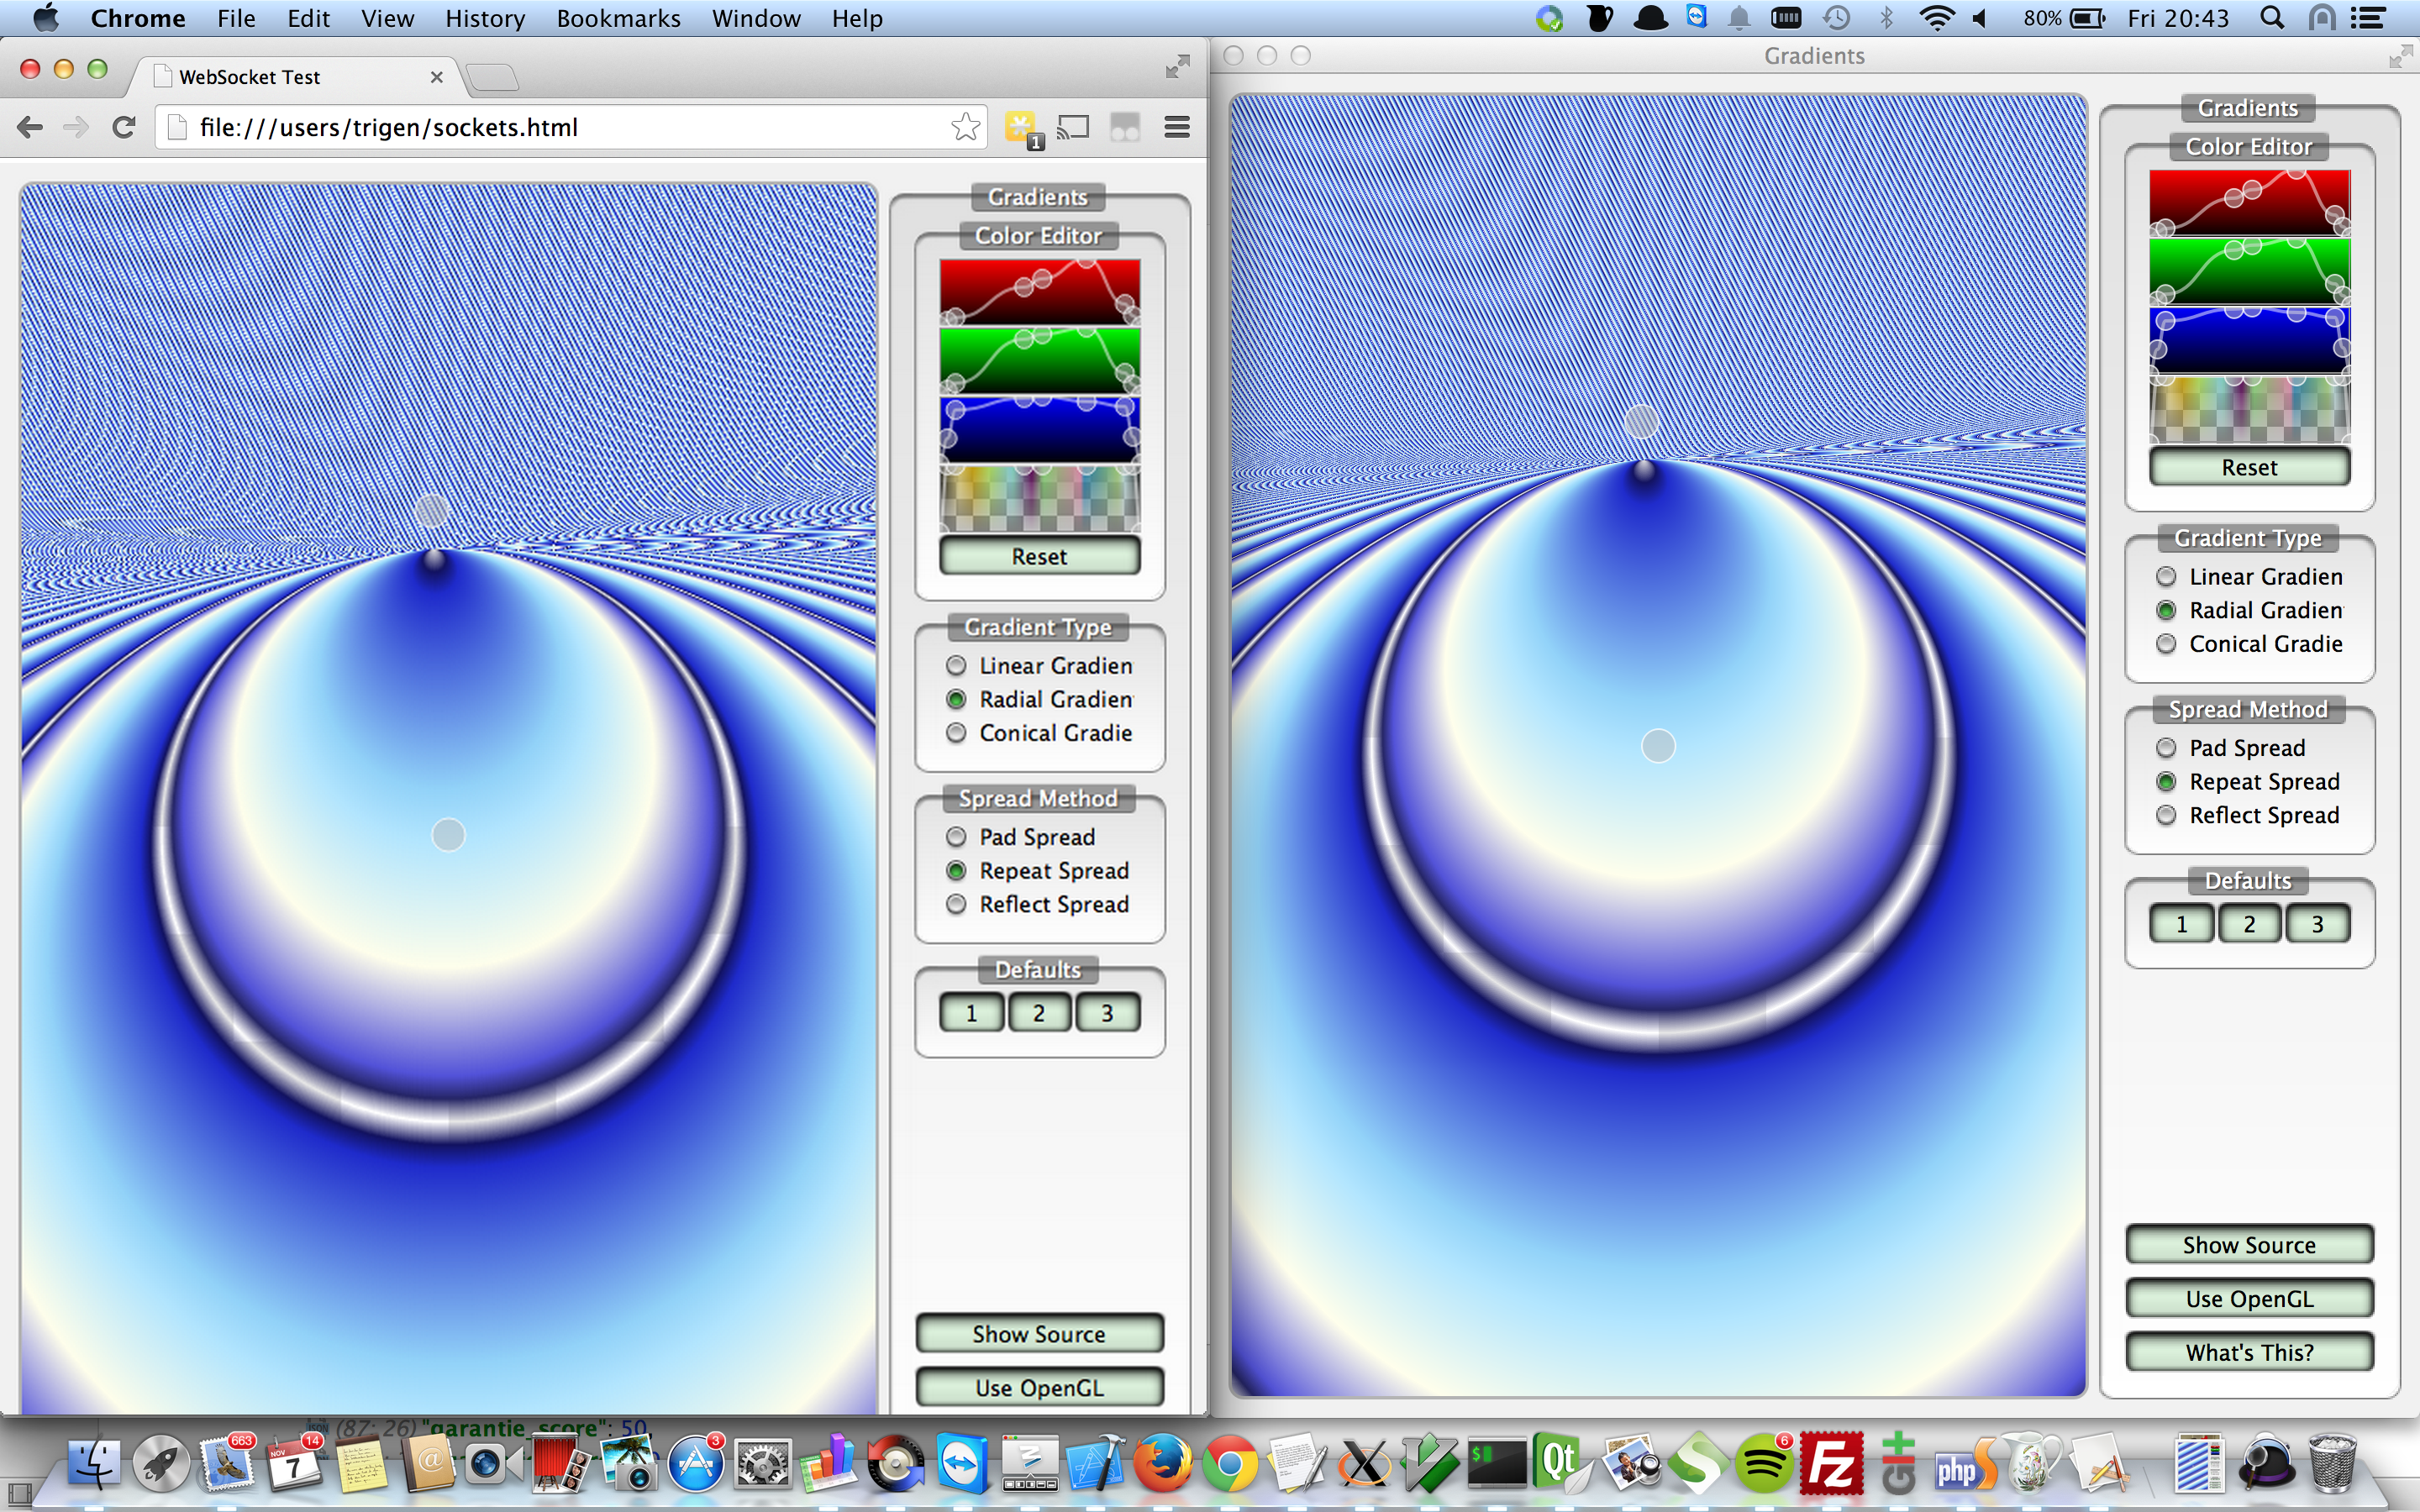
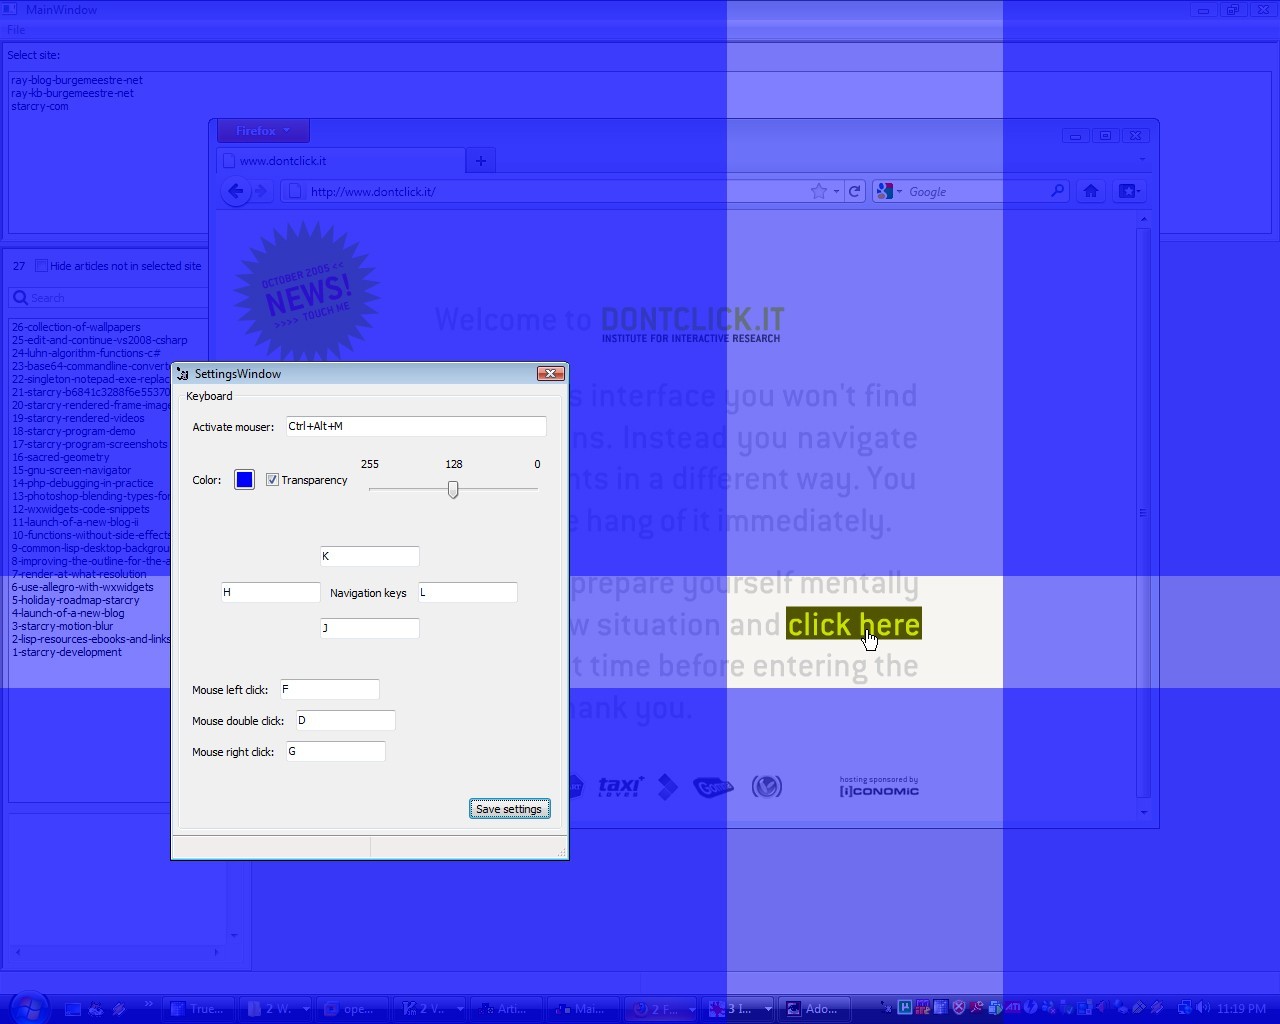
While thinking about a Qt application that I also wanted to create a Web-version for, I experimented a bit with the “lazy man's approach”. I was wondering if I could simply “bridge” from Qt app to Browser in an easy way.
So I created the following proof of concept (Note that this is not just an image, use your mouse to interact):
You can control above window from your browser, it doesn’t always feel like a real-time experience yet though (mind that it's hosted on a very weak server). I took one of the Qt Examples (gradients), stripped it down a bit and wrote a simple plugin. This plugin once loaded, exposes the graphics through a Websocket to the browser and provides an API for handling mouse behaviours. For the graphics currently PNG images are transferred over the Websocket.
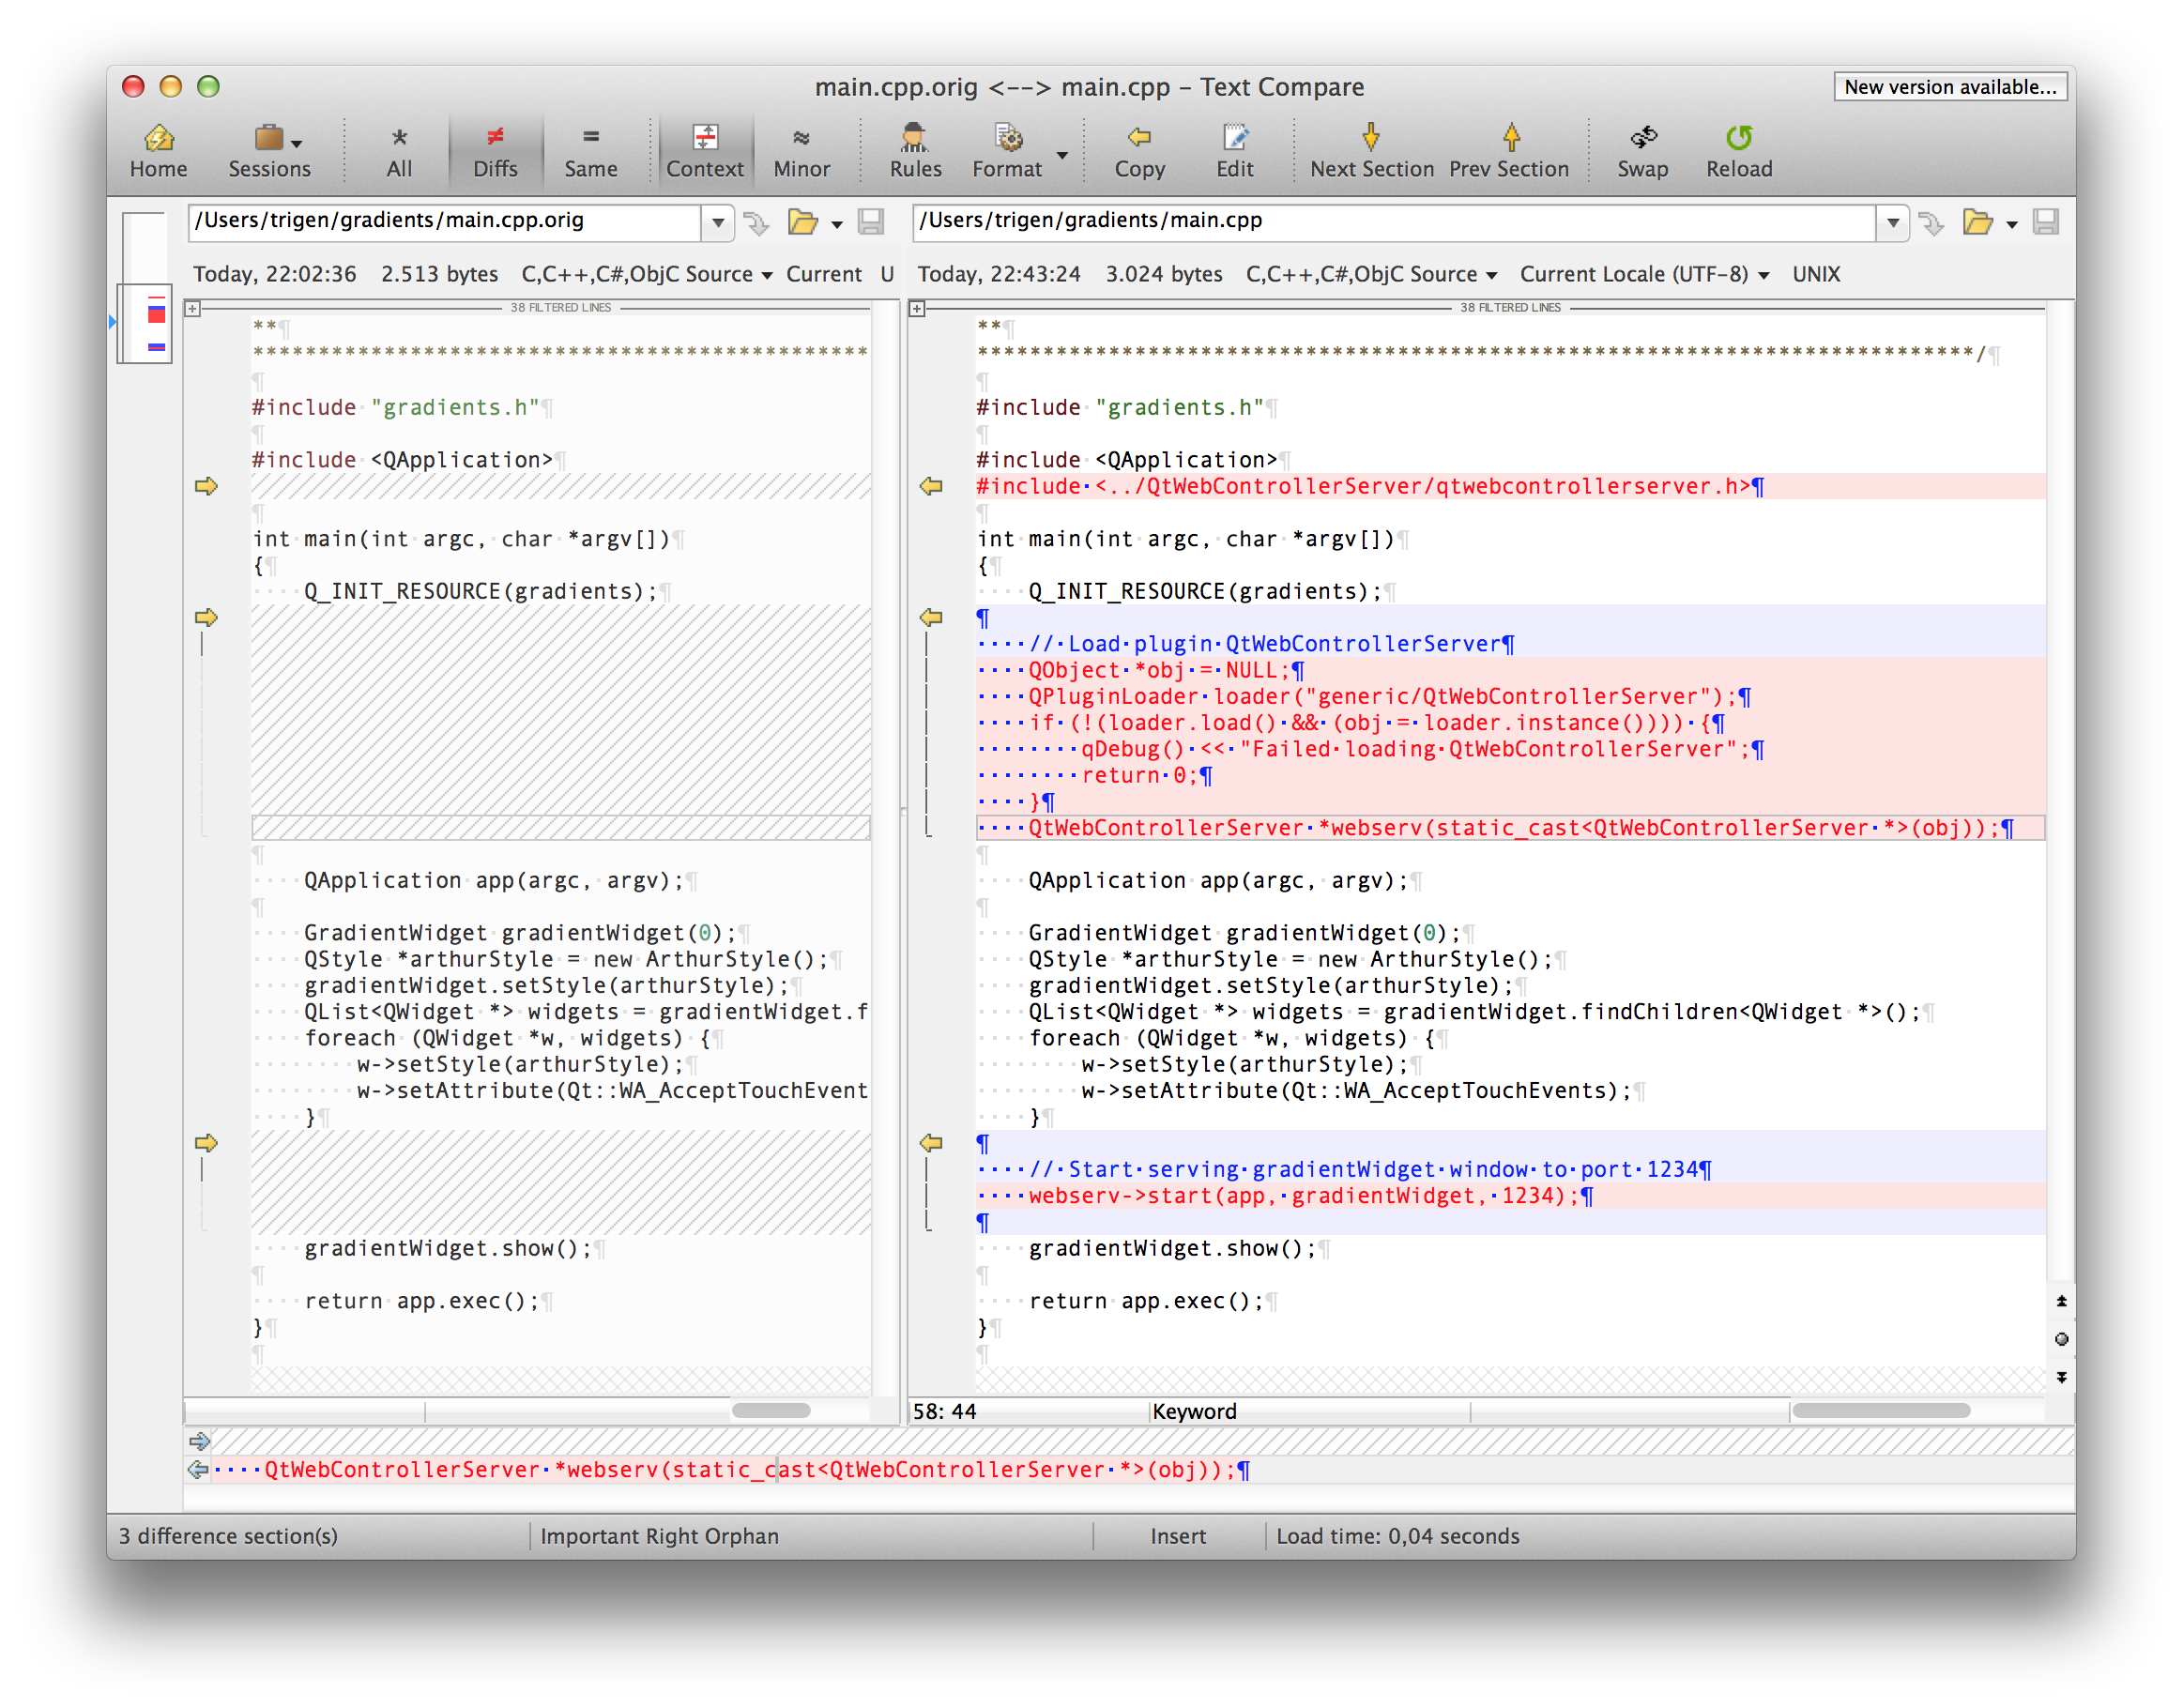
The required patch in main.cpp (for gradients) and an example running locally.
Streaming
Then thinking about steps on how to improve this, I encountered some really cool Javascript stuff! My next idea was to find a way to stream the window instead of working with PNG images. I didn’t pursue this through.
One of my frustrations with the web is that there is still not a real standard for streaming with HTML5. Then I found someone who implemented an MPEG1 decoder in javascript and uses that for streaming: http://phoboslab.org/log/2013/09/html5-live-video-streaming-via-websockets
I experimented a bit with hooking up my Raspberry Pi Camera on it and I got it working with < 100ms delay, so it’s a nice solution. Only perk is that it doesn’t support sound.
Compiled to Javascript (emscripten-qt)
jsmpeg is a MPEG1 Decoder, written in JavaScript. It's "hand ported", i.e. not compiled with emscripten or similar. This will probably make it obsolete with the advent of asmjs.
Reading that I further investigated emscripten, demos here. And also encountered emscripten-qt(!), view some demos here.
I didn't get it to work on my own system(s) unfortunately (OSX 10.9.4 and an Ubuntu server). I might attempt on it again later, see if I can include the gradients example compiled to the browser ![]() .
.
How emscripten-qt basically works is: it uses a slightly older version of Qt and patches it (I think heavily), it also requires a patched main() in the Qt app. It uses LLVM to compile your application from C++ not to a binary like you'd normally do, but to an assembly for use with asm.js. The end result is quite awesome, with some Javascript your Qt program running in the browser, completely client-side. (Some stuff won't be supported like Network).
asm.js was originally a Research project at Mozilla and modern browsers will support it. There is a chance that asm.js will be supported natively in the future, but it's already very fast.
Download + sourcecode
See https://bitbucket.org/rayburgemeestre/qwebcontrollerserverplugin.
git clone git@bitbucket.org:rayburgemeestre/qwebcontrollerserverplugin.git

cd qwebcontrollerserverplugin
cmake .
make
make install

cd example/gradients
cmake .
make

./gradients
Or use an IDE, QCreator should work out of the box, and one that supports CMake will probably too (I tested with CLion).
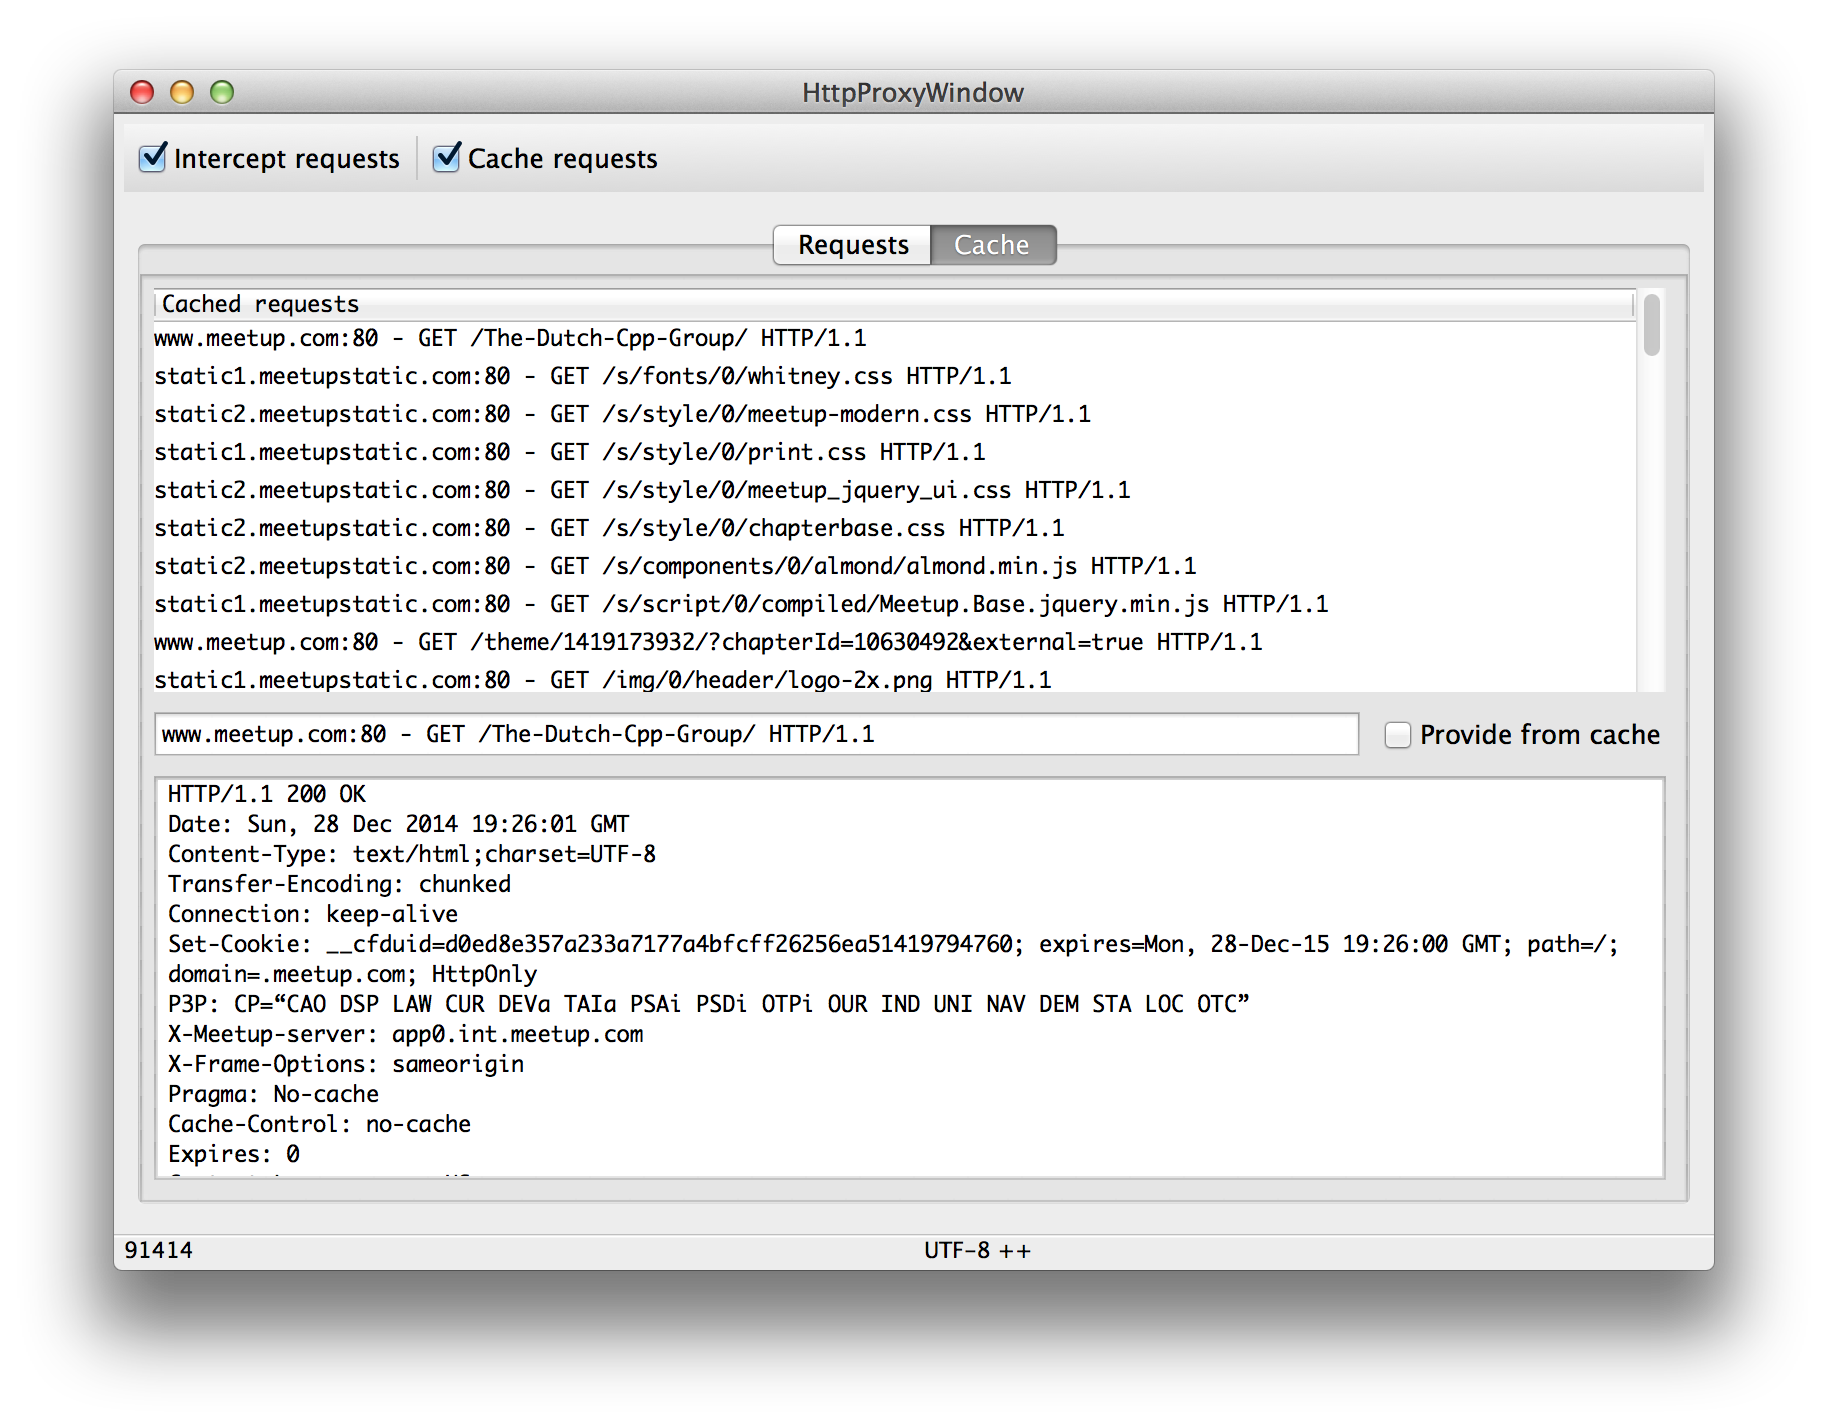
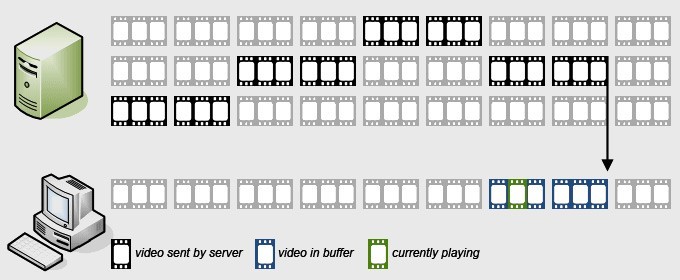
Just to announce I created a new version that supports a non-GUI interface. This makes installing and running it commandline on a linux server easy.
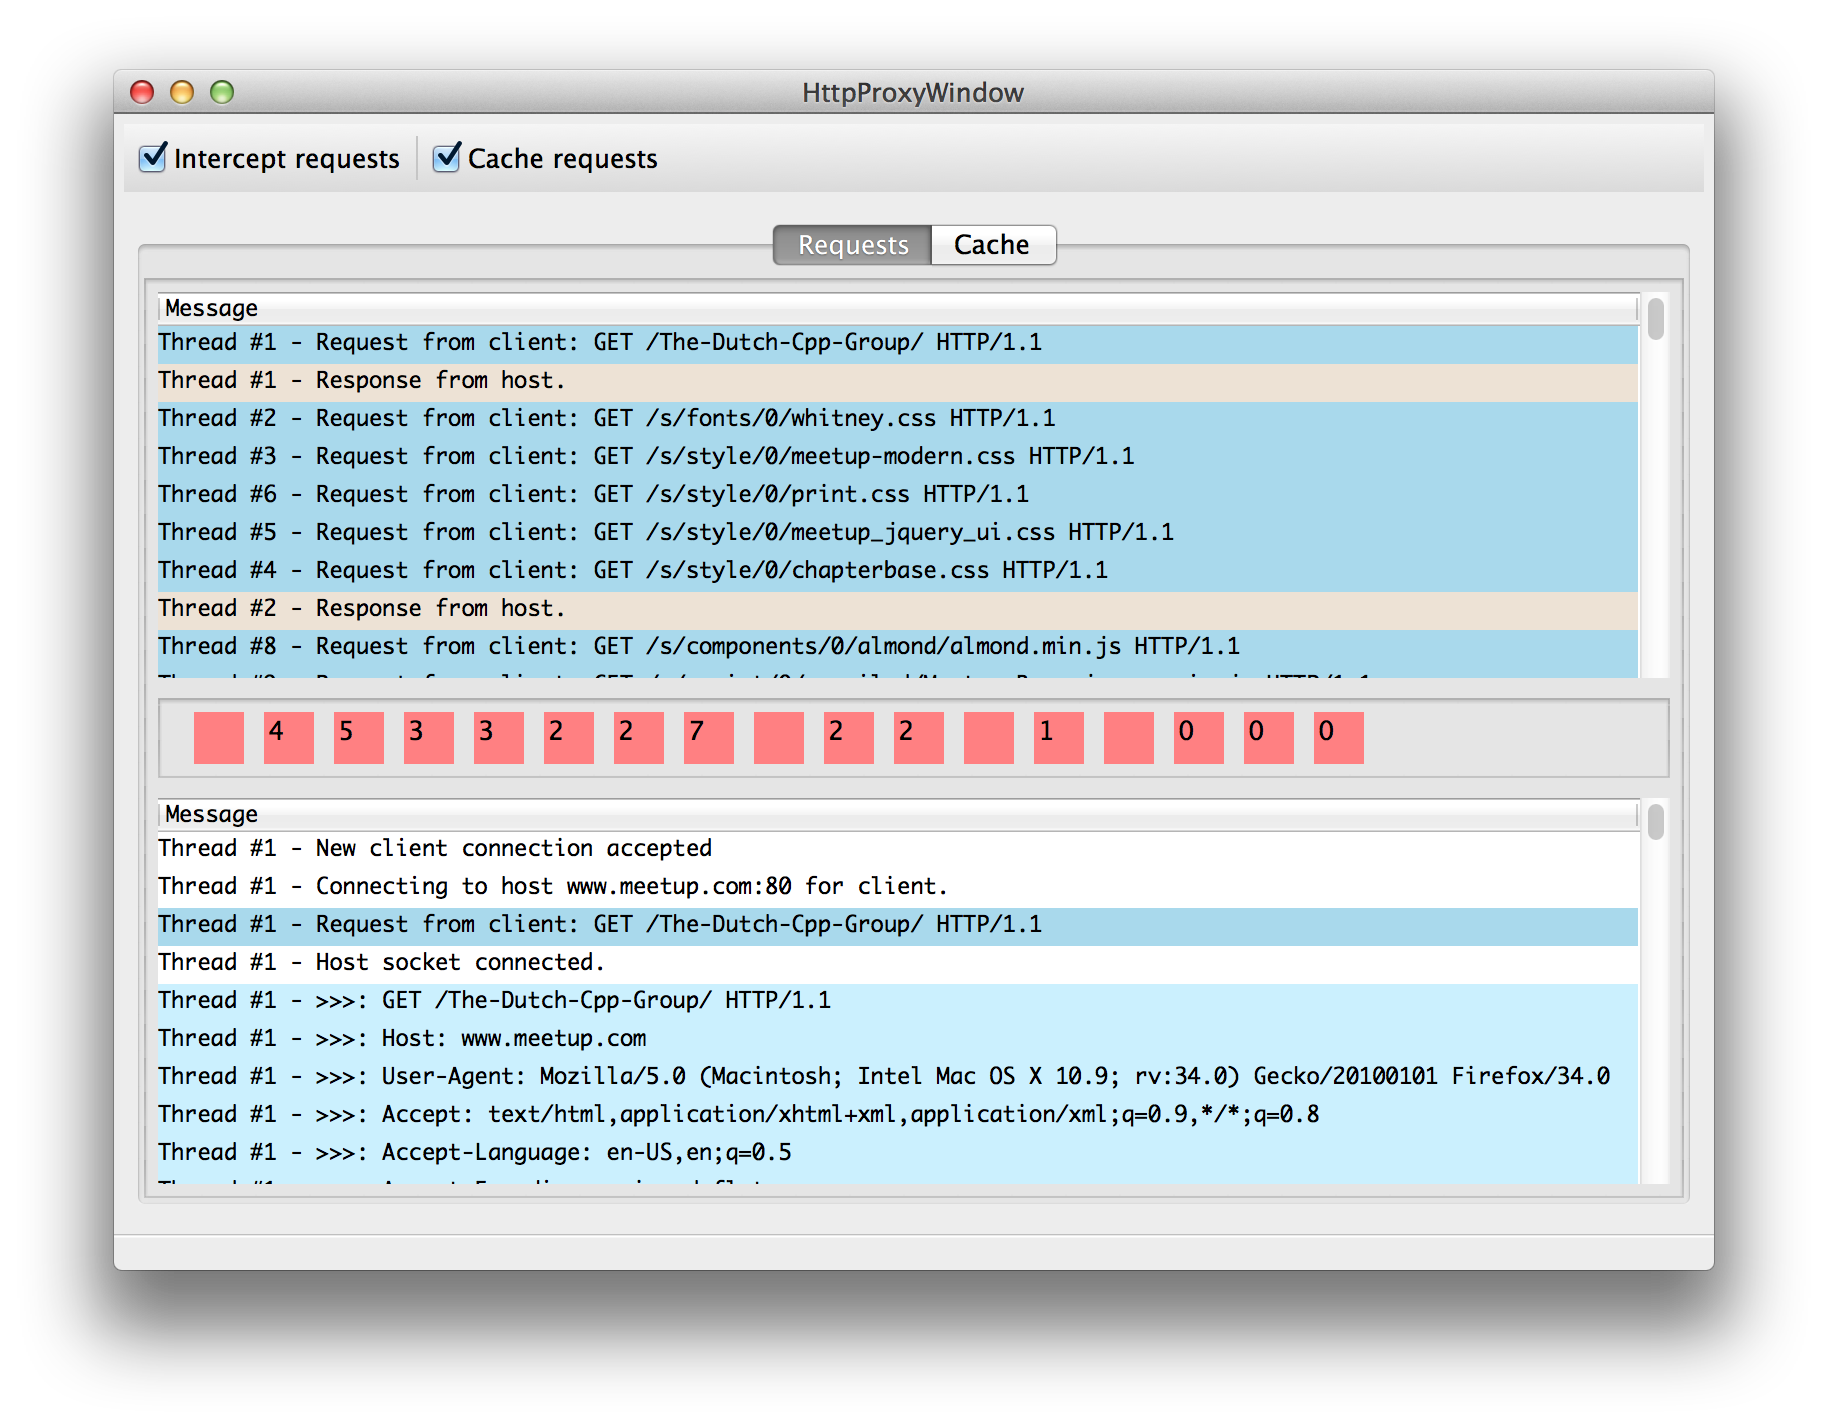
CLI interface
ksh$ wxhttpproxy --help
Usage: wxhttpproxy [-h] [-f <str>] [-n <num>] [-p <num>] [-q]
  -h, --help            displays help on the command line parameters.
  -f, --file=<str>      output everything to <file>.
  -n, --number=<num>    truncate file each <num> lines (default 500000).
  -p, --port=<num>      bind to port <port> (default 8888).
  -q, --quiet           silent output (nothing to stdout).
Building
trigen@Rays-MacBook-Pro.local:/tmp> git clone git@bitbucket.org:rayburgemeestre/wxhttpproxy.git
Cloning into 'wxhttpproxy'...
remote: Counting objects: 394, done.
remote: Compressing objects: 100% (391/391), done.
remote: Total 394 (delta 269), reused 0 (delta 0)
Receiving objects: 100% (394/394), 1.04 MiB | 225.00 KiB/s, done.
Resolving deltas: 100% (269/269), done.
Checking connectivity... done.
trigen@Rays-MacBook-Pro.local:/tmp> cd wxhttpproxy/
/tmp/wxhttpproxy
trigen@Rays-MacBook-Pro.local:/tmp/wxhttpproxy[master]> cmake .
-- The C compiler identification is AppleClang 6.0.0.6000056
-- The CXX compiler identification is AppleClang 6.0.0.6000056
-- Check for working C compiler: /usr/bin/cc
-- Check for working C compiler: /usr/bin/cc -- works
-- Detecting C compiler ABI info
-- Detecting C compiler ABI info - done
-- Check for working CXX compiler: /usr/bin/c++
-- Check for working CXX compiler: /usr/bin/c++ -- works
-- Detecting CXX compiler ABI info
-- Detecting CXX compiler ABI info - done
-- Found wxWidgets: TRUE
/usr/local/Cellar/cmake/3.0.2/share/cmake/Modules/UsewxWidgets.cmake
-- Configuring done
-- Generating done
-- Build files have been written to: /tmp/wxhttpproxy
trigen@Rays-MacBook-Pro.local:/tmp/wxhttpproxy[master]> make
Scanning dependencies of target wxhttpproxy
[ 10%] Building CXX object CMakeFiles/wxhttpproxy.dir/src/application.cpp.o
[ 20%] Building CXX object CMakeFiles/wxhttpproxy.dir/src/cache.cpp.o
[ 30%] Building CXX object CMakeFiles/wxhttpproxy.dir/src/clientdata.cpp.o
[ 40%] Building CXX object CMakeFiles/wxhttpproxy.dir/src/consoleoutputhandler.cpp.o
[ 50%] Building CXX object CMakeFiles/wxhttpproxy.dir/src/guioutputhandler.cpp.o
[ 60%] Building CXX object CMakeFiles/wxhttpproxy.dir/src/httpbuffer.cpp.o
[ 70%] Building CXX object CMakeFiles/wxhttpproxy.dir/src/httpproxywindow.cpp.o
[ 80%] Building CXX object CMakeFiles/wxhttpproxy.dir/src/logger.cpp.o
[ 90%] Building CXX object CMakeFiles/wxhttpproxy.dir/src/socketbuffer.cpp.o
[100%] Building CXX object CMakeFiles/wxhttpproxy.dir/src/socketserver.cpp.o
Linking CXX executable wxhttpproxy
[100%] Built target wxhttpproxy
trigen@Rays-MacBook-Pro.local:/tmp/wxhttpproxy[master]>
Changelog
Version 1.2: ![]()
- Proper Connection: keep-alive support (with reconnects when necessary)
- Support switching to different hosts/backends within a connection.
- Commandline (Non-GUI) version, with logging+truncate feature.
- An actual 1337 icon for the program!
Version 1.1:
- HTTPS support
- OSX support
- Stability fixes
- Support for caching content and serving from cache.
Version 1.0:
- HTTP proxy that supports CONNECT and GET syntax.
CLI example usage (http_proxy=http://localhost:8888 curl http://cppse.nl/test.txt)
ksh$ wxhttpproxy
Info - Server listening on port 8888.
Thread #1 - New client connection accepted
Thread #1 - Connecting to host cppse.nl:80 for client.
Thread #1 - Request from client: GET /test.txt HTTP/1.1
Thread #1 - Host socket connected.
Thread #1 - >>>: GET /test.txt HTTP/1.1
Thread #1 - >>>: User-Agent: curl/7.30.0
Thread #1 - >>>: Host: cppse.nl
Thread #1 - >>>: Accept: */*
Thread #1 - >>>: Proxy-Connection: Keep-Alive
Thread #1 - >>>:
Thread #1 - Response from host.
Thread #1 - <<<: HTTP/1.1 200 OK
Thread #1 - <<<: Date: Sun, 28 Dec 2014 21:05:09 GMT
Thread #1 - <<<: Server: Apache/2.4.6 (Ubuntu)
Thread #1 - <<<: Last-Modified: Sun, 09 Feb 2014 00:48:33 GMT
Thread #1 - <<<: ETag: "c-4f1ee951f920c"
Thread #1 - <<<: Accept-Ranges: bytes
Thread #1 - <<<: Content-Length: 12
Thread #1 - <<<: Connection: close
Thread #1 - <<<: Content-Type: text/plain
Thread #1 - <<<:
Thread #1 - <<<: Hello world
Thread #1 - Host socket disconnected.Deflate and Gzip compress and decompress functions
When implementing a gzip compression & decompression for my blog. I stumbled upon two C++ functions by Timo Bingmann:
- string : compress_string(string)
- string : decompress_string(string)
Renamed these and created two gzip versions from them:
- string : compress_deflate(string)
- string : decompress_deflate(string)
- string : compress_gzip(string)
- string : decompress_gzip(string)
These are the differences:

Complete source
#include <string>
#include <sstream>
#include <stdexcept>
#include <string.h>
#include "zlib.h"
using std::string;
using std::stringstream;
// Found these here http://mail-archives.apache.org/mod_mbox/trafficserver-dev/201110.mbox/%3CCACJPjhYf=+br1W39vyazP=ix
//eQZ-4Gh9-U6TtiEdReG3S4ZZng@mail.gmail.com%3E
#define MOD_GZIP_ZLIB_WINDOWSIZE 15
#define MOD_GZIP_ZLIB_CFACTOR 9
#define MOD_GZIP_ZLIB_BSIZE 8096
// Found this one here: http://panthema.net/2007/0328-ZLibString.html, author is Timo Bingmann
// edited version
/** Compress a STL string using zlib with given compression level and return
* the binary data. */
std::string compress_gzip(const std::string& str,
int compressionlevel = Z_BEST_COMPRESSION)
{
z_stream zs; // z_stream is zlib's control structure
memset(&zs, 0, sizeof(zs));
if (deflateInit2(&zs,
compressionlevel,
Z_DEFLATED,
MOD_GZIP_ZLIB_WINDOWSIZE + 16,
MOD_GZIP_ZLIB_CFACTOR,
Z_DEFAULT_STRATEGY) != Z_OK
) {
throw(std::runtime_error("deflateInit2 failed while compressing."));
}
zs.next_in = (Bytef*)str.data();
zs.avail_in = str.size(); // set the z_stream's input
int ret;
char outbuffer[32768];
std::string outstring;
// retrieve the compressed bytes blockwise
do {
zs.next_out = reinterpret_cast<Bytef*>(outbuffer);
zs.avail_out = sizeof(outbuffer);
ret = deflate(&zs, Z_FINISH);
if (outstring.size() < zs.total_out) {
// append the block to the output string
outstring.append(outbuffer,
zs.total_out - outstring.size());
}
} while (ret == Z_OK);
deflateEnd(&zs);
if (ret != Z_STREAM_END) { // an error occurred that was not EOF
std::ostringstream oss;
oss << "Exception during zlib compression: (" << ret << ") " << zs.msg;
throw(std::runtime_error(oss.str()));
}
return outstring;
}
// Found this one here: http://panthema.net/2007/0328-ZLibString.html, author is Timo Bingmann
/** Compress a STL string using zlib with given compression level and return
* the binary data. */
std::string compress_deflate(const std::string& str,
int compressionlevel = Z_BEST_COMPRESSION)
{
z_stream zs; // z_stream is zlib's control structure
memset(&zs, 0, sizeof(zs));
if (deflateInit(&zs, compressionlevel) != Z_OK)
throw(std::runtime_error("deflateInit failed while compressing."));
zs.next_in = (Bytef*)str.data();
zs.avail_in = str.size(); // set the z_stream's input
int ret;
char outbuffer[32768];
std::string outstring;
// retrieve the compressed bytes blockwise
do {
zs.next_out = reinterpret_cast<Bytef*>(outbuffer);
zs.avail_out = sizeof(outbuffer);
ret = deflate(&zs, Z_FINISH);
if (outstring.size() < zs.total_out) {
// append the block to the output string
outstring.append(outbuffer,
zs.total_out - outstring.size());
}
} while (ret == Z_OK);
deflateEnd(&zs);
if (ret != Z_STREAM_END) { // an error occurred that was not EOF
std::ostringstream oss;
oss << "Exception during zlib compression: (" << ret << ") " << zs.msg;
throw(std::runtime_error(oss.str()));
}
return outstring;
}
/** Decompress an STL string using zlib and return the original data. */
std::string decompress_deflate(const std::string& str)
{
z_stream zs; // z_stream is zlib's control structure
memset(&zs, 0, sizeof(zs));
if (inflateInit(&zs) != Z_OK)
throw(std::runtime_error("inflateInit failed while decompressing."));
zs.next_in = (Bytef*)str.data();
zs.avail_in = str.size();
int ret;
char outbuffer[32768];
std::string outstring;
// get the decompressed bytes blockwise using repeated calls to inflate
do {
zs.next_out = reinterpret_cast<Bytef*>(outbuffer);
zs.avail_out = sizeof(outbuffer);
ret = inflate(&zs, 0);
if (outstring.size() < zs.total_out) {
outstring.append(outbuffer,
zs.total_out - outstring.size());
}
} while (ret == Z_OK);
inflateEnd(&zs);
if (ret != Z_STREAM_END) { // an error occurred that was not EOF
std::ostringstream oss;
oss << "Exception during zlib decompression: (" << ret << ") "
<< zs.msg;
throw(std::runtime_error(oss.str()));
}
return outstring;
}
std::string decompress_gzip(const std::string& str)
{
z_stream zs; // z_stream is zlib's control structure
memset(&zs, 0, sizeof(zs));
if (inflateInit2(&zs, MOD_GZIP_ZLIB_WINDOWSIZE + 16) != Z_OK)
throw(std::runtime_error("inflateInit failed while decompressing."));
zs.next_in = (Bytef*)str.data();
zs.avail_in = str.size();
int ret;
char outbuffer[32768];
std::string outstring;
// get the decompressed bytes blockwise using repeated calls to inflate
do {
zs.next_out = reinterpret_cast<Bytef*>(outbuffer);
zs.avail_out = sizeof(outbuffer);
ret = inflate(&zs, 0);
if (outstring.size() < zs.total_out) {
outstring.append(outbuffer,
zs.total_out - outstring.size());
}
} while (ret == Z_OK);
inflateEnd(&zs);
if (ret != Z_STREAM_END) { // an error occurred that was not EOF
std::ostringstream oss;
oss << "Exception during zlib decompression: (" << ret << ") "
<< zs.msg;
throw(std::runtime_error(oss.str()));
}
return outstring;
}
// Compile: g++ -std=c++11 % -lz
// Run: ./a.out
#include <iostream>
int main()
{
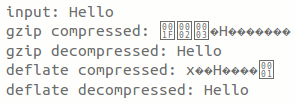
std::string s = "Hello";
std::cout << "input: " << s << std::endl;
std::cout << "gzip compressed: " << compress_gzip(s) << std::endl;;
std::cout << "gzip decompressed: " << decompress_gzip(compress_gzip(s)) << std::endl;;
std::cout << "deflate compressed: " << compress_deflate(s) << std::endl;;
std::cout << "deflate decompressed: " << decompress_deflate(compress_deflate(s)) << std::endl;;
}
Compile
g++ -std=c++11 % -lz
Run
./a.out
Output
As a free alternative for Charles proxy and/or Fiddler I developed wxHttpProxy in one (long) night!
Unfortunately I had to spend the next day making it stable, and support https traffic as well ")
The mentioned alternatives are really great by the way, and have quite a few additional features, I just needed a simple http proxy that I could use in metalogmon, that's why I developed my own. It is opensource, find it on bitbucket.
The idea is to integrate this http proxy into metalogmon, so that you would be able to process your output through javascript. The reason that request/response are both first class citizens is that where I currently develop software I plan to use this proxy between all subsystems communication, and here multiple services communicate with eachother using REST calls.
I want to visualize the call sequences/hierarchy, like [A -> B -> C], [A <- B <- C]. And not group them together like: [A <> B], [B <> C].
Install binary (64 bit and ubuntu/debian based system only)
Install my key
wget -O - http://cppse.nl/apt/keyFile | sudo apt-key add -Add my repo to apt's sources.list.
sudo sh -c "echo deb http://cppse.nl/apt/dists/stable/main/binary / >> /etc/apt/sources.list"Install the package:
sudo aptitude update
sudo aptitude install wxhttpproxy
Usage
wxHttpProxyTip of the day, add a shortcut for starting the proxy (like WINKEY+2 or something)
Available shortcuts
- alt+i - Toggle intercept mode (capture/display request/response, or be silent)
- alt+c - Clear buffer(s)
Catch library
With Catch I developed a few helper classes in a test-driven way, it's a lightweight single-header c++ library for creating unit tests. Really liked working with it and look forward to using it in the future some more.
The apt repository
The shiny new apt repository was also really easy to setup, once you have made your packages, simply follow this wiki.
Other platforms
Should you wish to compile it for windows, it is wxWidgets 3.0.0 based and should already be cross-platform, just didn't test it yet. Use Dialogblocks to compile it (and also have it compile wxWidgets for you (as that's just convenient )).
These are the ones I keep forgetting about:
- Enabling line numbers: Tools, Options, Text Editor, All Languages, Show Line Numbers (source: http://stackoverflow.com/questions/5905687/can-i-see-line-numbers-in-the-vs2010-editor)
- Toggle whitespace/tabs: CTRL+R, CTRL+W. (source: http://stackoverflow.com/questions/4065815/how-to-turn-off-showing-whitespace-characters-in-visual-studio-ide)
- Navigate cursor to previous+next position: CTRL+- and forward CTRL+SHIFT+-.
These are a few you can't do without:
- Step into function: F12 (CTRL+- to return cursor to previous position)
If you can afford it you can't do without Visual Assist X either.
Live video streaming
I was interested in specifically the generation of H264 videos directly from code (without audio). This was something I used to do by generating separate .BMP files that I then convert with mencoder. This costs quite a lot of hdd space and was performance-wise not optimal. Of course I already figured that out, but figuring out how to encode directly to video was something on my To Do list.
Believe it or not, I actually had to search a while for libraries and SDK's, before concluding that ffmpeg was the best option. I've had a bad experience with ffmpeg 5 years ago, so I was probably ignoring ffmpeg in the google search results. You can link to ffmpeg's libraries and use them in your own program, they also provide code samples. This made it all pretty easy to setup. So when I completed generating H264 videos from code I wondered how difficult it would be to directly stream video with ffmpeg.
One cool application would be to use it in games, f.i. make a small livestream for actual games being played on the server.
Ffmpeg supports a few protocols, I chose an RTMP server for my setup, which is Flash only. If that works it'll probably work for other protocols as well. The best alternative for HTML5 is probably Apple's HLS Streaming, which actually is pretty awesome, as a side-note from source:
If multiple qualities of a stream are available, the player will continuously monitor the current bandwidth and pick the next fragment from the highest quality it can load. This is called Adaptive Streaming:
For the videoplayer I chose JWplayer version 6.
Setting up an rtmp server with Jwplayer
The servers I tested: rtmplite on linux, crtmpserver on linux and Red5 Media Server on windows. The linux server I used was a Suse (SLED11) micro EC2 instance on Amazon AWS. But these should all work on linux and windows.
RTMP is flash-only, traffics over port 1935.
Some notes on using rtmplite with JWplayer
Eventually I chose not to use rtmplite, but crtmpserver instead, as you have more output there as to what's going on in the server. rtmplite output is less useful to me, by default it outputs nothing, with verbose you get messages at packet level.
rtmplite used quite a bit more of my CPU compared to crtmpserver (not very accurate due to EC2, but crtmpserver at 0.3% CPU versus > 10% CPU for rtmplite) and it does not understand aspect ratio other than 4:3, so 16:9 will be "squished" into 4:3.
It's not my intent to be negative about rtmplite, if you're a python guy It's probably very easy to tweak and I must say it works out-of-the-box with a simple python rtmp.py, ready for video at rtmp://servername/app/video.
With JWplayer you can view the stream with:
jwplayer("myElement").setup({
    file:       "rtmp://localhost/appflv:video",
    autostart:  true,
    width:      480,
    height:     320
});
If you attempt to use that config, please note that file URL! It took me an hour to get that correct, in all JWPlayer samples you see rtmp://server/app/flv:video.flv or rtmp://server/app/mp4:video.mp4. The prefix flv: or mp4: being just for JWplayer so that it knows what encoding to expect.
As the .mp4 or .flv extension in URL's is not mandatory. Eventually JWplayer will strip away flv:.
An rtmp url like rtmp://server/app/video consists of an application called app and a video called video.
Stripping away the prefix from rtmp://cppse.nl/app/flv:video will provide app/ for the application which looks like app but isn't quite the same.
So... crtmpserver then!
After compiling you fire it up with default settings with: ./crtmpserver/crtmpserver crtmpserver/crtmpserver.lua. You should see something similar to the following output.
ip-10-224-83-43:/usr/local/src/crtmpserver/builders/cmake # ./crtmpserver/crtmpserver ./crtmpserver/crtmpserver.lua
/usr/local/src/crtmpserver/sources/crtmpserver/src/crtmpserver.cpp:203 Initialize I/O handlers manager: epoll
/usr/local/src/crtmpserver/sources/crtmpserver/src/crtmpserver.cpp:206 Configure modules
/usr/local/src/crtmpserver/sources/thelib/src/configuration/module.cpp:84 Module /usr/local/src/crtmpserver/builders/cmake/applications/appselector/libappselector.so loaded
/usr/local/src/crtmpserver/sources/thelib/src/configuration/module.cpp:84 Module /usr/local/src/crtmpserver/builders/cmake/applications/flvplayback/libflvplayback.so loaded
/usr/local/src/crtmpserver/sources/crtmpserver/src/crtmpserver.cpp:212 Plug in the default protocol factory
/usr/local/src/crtmpserver/sources/crtmpserver/src/crtmpserver.cpp:219 Configure factories
/usr/local/src/crtmpserver/sources/crtmpserver/src/crtmpserver.cpp:225 Configure acceptors
/usr/local/src/crtmpserver/sources/thelib/src/netio/epoll/iohandlermanager.cpp:100 Handlers count changed: 0->1 IOHT_ACCEPTOR
/usr/local/src/crtmpserver/sources/crtmpserver/src/crtmpserver.cpp:231 Configure instances
/usr/local/src/crtmpserver/sources/crtmpserver/src/crtmpserver.cpp:237 Start I/O handlers manager: epoll
/usr/local/src/crtmpserver/sources/crtmpserver/src/crtmpserver.cpp:240 Configure applications
/usr/local/src/crtmpserver/sources/thelib/src/configuration/module.cpp:177 Application appselector instantiated
/usr/local/src/crtmpserver/sources/thelib/src/configuration/module.cpp:177 Application flvplayback instantiated
/usr/local/src/crtmpserver/sources/crtmpserver/src/crtmpserver.cpp:246 Install the quit signal
/usr/local/src/crtmpserver/sources/crtmpserver/src/crtmpserver.cpp:257
+-----------------------------------------------------------------------------+
|                                                                     Services|
+---+---------------+-----+-------------------------+-------------------------+
| c |      ip       | port|   protocol stack name   |     application name    |
+---+---------------+-----+-------------------------+-------------------------+
|tcp|        0.0.0.0| 1935|              inboundRtmp|              appselector|
+---+---------------+-----+-------------------------+-------------------------+
/usr/local/src/crtmpserver/sources/crtmpserver/src/crtmpserver.cpp:258 GO! GO! GO! (19664)
With the default configuration anyone can stream a video to the RTMP server, as inbound and outbound are over port 1935. I tried separating that with the configs, but I couldn't find any configuration setting to do this, so I hacked something in the source to only allow inbound RTMP for 127.0.0.1 (see patch.txt). With crtmpserver you don't have the URL problem in JWPlayer.
jwplayer("myElement").setup({
    file:       "rtmp://server/flvplayback/flv:video",
    autostart:  true,
    width:      480,
    height:     320
});
Sending video to the server with "sendstream"
The proof-of-concept tool I set out to make is now a useful test tool you can use to stream a test video with optional audio at a given resolution to a given streaming server. I have compiled it for windows and linux 32 bit (opensuse 12) and also have that in a working chroot for download (~28 mb zipped).
usage: sendstream.exe < RTMP URL > [ < width > < height > < sound > < max_fps >]
 params: width default = 320, height default = 240 pixels, sound default = 1, max_fps default = 25.
 i.e: sendstream.exe "rtmp://localhost/app/video" 800 600
Example output for sendstream.exe rtmp://cppse.nl/flvplayback/video 1920 1080 1:
[libmp3lame @ 058a6320] Channel layout not specified
Output #0, flv, to 'rtmp://cppse.nl/flvplayback/video':
    Stream #0:0: Video: flv1, yuv420p, 1920x1080, q=2-31, 100 kb/s, 90k tbn, 20
tbc
    Stream #0:1: Audio: mp3, 44100 Hz, 2 channels, s16p, 24 kb/s
HandShake: client signature does not match!
writing frame 0 at 0.044793... +V
writing frame 1 at 0.112187... +A+A+A[flv @ 058a2b60] Encoder did not produce pr
oper pts, making some up.
+A+V
writing frame 2 at 0.324518... +A+A+A+V
writing frame 3 at 0.813168... +A+A+A+A+A+A+A+A+A+V
writing frame 4 at 1.03129... +A+A+A+A+A+A+A+A+A+A+A+A+A+A+A+A+A+A+A+V
writing frame 5 at 1.16484... +A+A+A+A+A+A+A+A+A+V
writing frame 6 at 1.23609... +A+A+A+A+A+V
writing frame 7 at 1.28777... +A+A+A+V
writing frame 8 at 1.33955... +A+A+V
writing frame 9 at 1.38883... +A+A+V
writing frame 10 at 1.43901... +A+V
writing frame 11 at 1.48954... +A+A+V
writing frame 12 at 1.53965... +A+A+V
writing frame 13 at 1.58858... +A+A+V
writing frame 14 at 1.6456... +A+A+V
writing frame 15 at 1.69497... +A+A+V
writing frame 16 at 1.74456... +A+A+V
Audio and video are combined with interweaving and if rendering of video frames is relatively slow compared to audio it may require more audio frames in between and vica versa. In the output +A is a written audio and +V a written video frame.
I use SFML for generating the graphics and for audio something similar to the example code by ffmpeg. The interweaving part was the most difficult but important thing to get right. This is the easiest version of the code I could come up with that works properly.
Something I didn't know in the beginning was that you don't need to keep your framerate of sending frames to the server consistent at a given frames per second-rate.
sfml_init(&pixels, &pixelSize);

auto timer = TimerFactory::factory(TimerFactory::Type::WindowsHRTimerImpl);
timer->start();

frame->pts = timer->end();

int64_t currentframe = 0;
while (true) {

    sfml_generate_frame();

    std::cout << "writing frame " << currentframe++ << " at " << (timer->end() / 1000.0) << "... ";

    // Make sure to write enough audio frames until the audio timer lines up
    while (true) {
        double audio_pts = (audio_st) ? (double)audio_st->pts.val * audio_st->time_base.num / audio_st->time_base.den : 0.0;
        double video_pts = (video_st) ? (double)video_st->pts.val * video_st->time_base.num / video_st->time_base.den : 0.0;

        if (audio_pts >= video_pts)
            break;

        std::cout << "+A";
        write_audio_frame(oc, audio_st);
    }

    // Write video frame
    write_video_frame(oc, video_st);
    std::cout << "+V" << std::endl;

    // Set elapsed time as frame time
    frame->pts = timer->end();
}
One final side-note if you are going to use sendstream on linux with Xvfb (X virtual framebuffer).
On SUSE it was a pain to get it working, I ended up installing it on an openSuse VMWare VM where it did work and then made a minimal chroot for it, one that includes Xvfb and sendstream and a run.sh script (you might want to edit that).
Not all screen resolutions you can think off that work fine with RTMP server will work, i.e.: I wanted a 980 x 100 resolution video, that didn't work for Xvfb, it does work if you create a larger screen with a more common resolution like 1280 x 768.
Also 980 x 100 didn't work for SFML, 1000 x 100 did, probably the OpenGL underneath complaining or something. AFAIK these problems do not exist without Xvfb.
The result
Sendstream runs on my webserver capped at 2 FPS and without audio, so that it doesn't hurt the CPU too much.
Download: sendstream-1.0.zip for windows. 11.2MB
Download: sendstream-1.0-chroot.zip for linux (chroot, use: "chroot /path/to/sendstream /run.sh"). 27.2MB
a930805b8867232755da195d34587476 *sendstream-1.0-chroot.zip
6ed8cf5102dbe10c5f4722c80d38cbbd *sendstream-1.0.zip
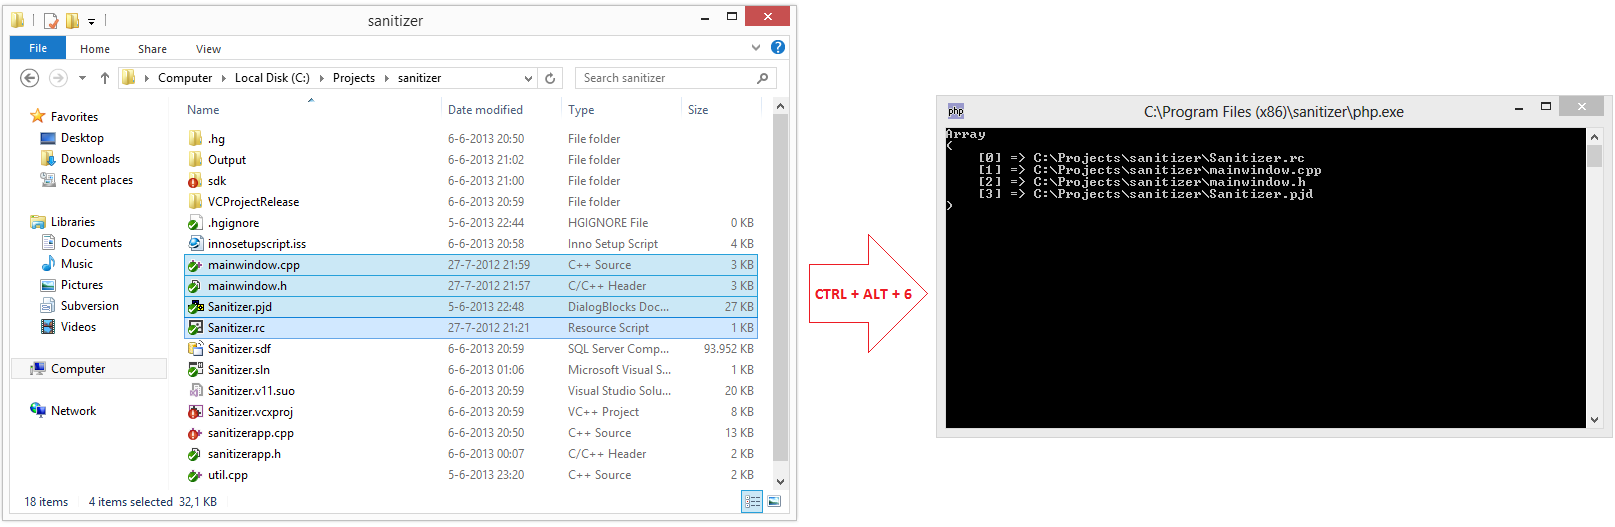
Hook shortcut keys Ctrl+Alt+{0,1,2,3,4,5,6,7,8,9}
sanitizer.exe is a program that reads a config, and then registers the hotkeys Ctrl+Alt+{number}, where {number} is {0, 1, ..., 9}.
Example contents for config.ini:
[1]
type=command
value=putty -load SomeSession

[4]
type=clipbard
value=MyMysqlPasswd

[6]
type=explorer

...
(Only [0] through [9] are valid entries in the config.)
As shown in the example, available action types are:
| action types | description | example |
|---|---|---|
| command | execute system call | putty.exe -load amazon |
| clipboard | replace clipboard with text | some database password perhaps |
| explorer | dispatch selected files in windows explorer to script | see explorer_call.php source |
The explorer action
This action type is special in the config: the value key in the config.ini for it is not used, so you don't need to define it.
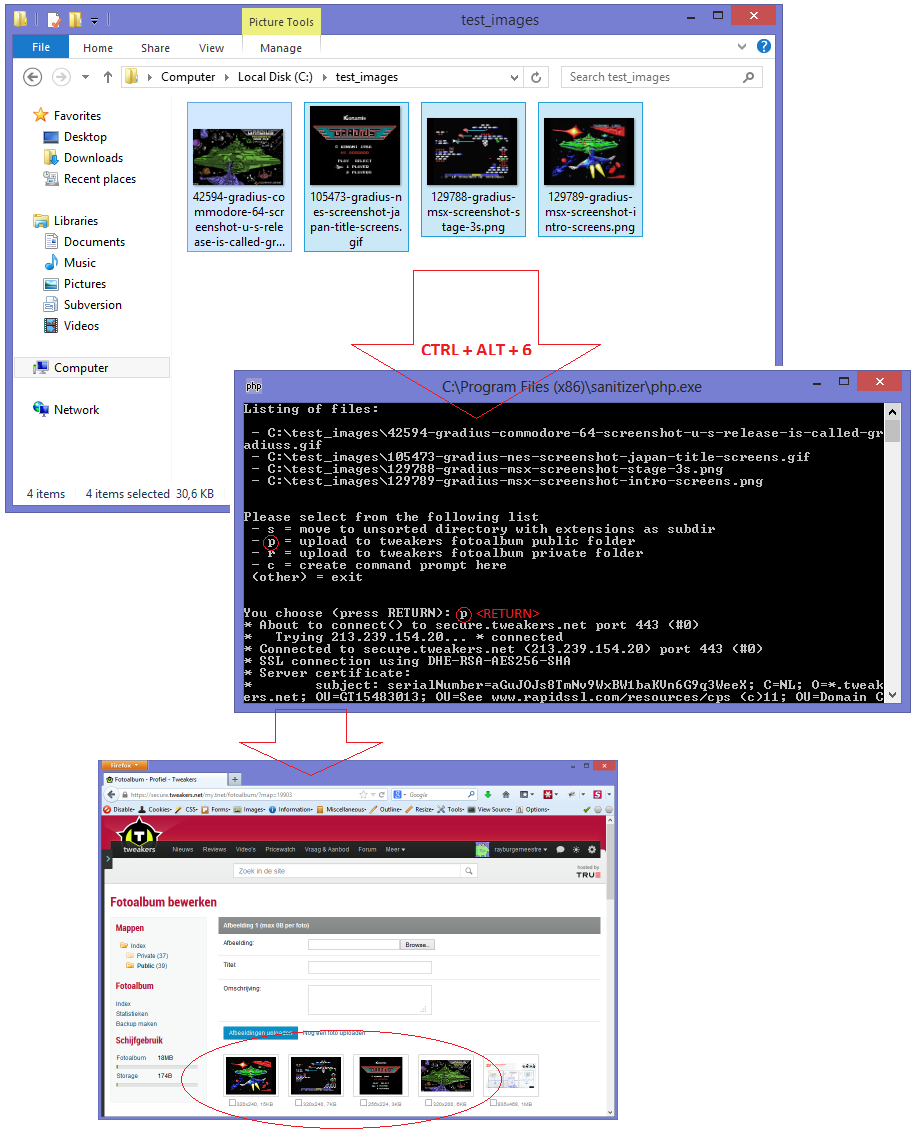
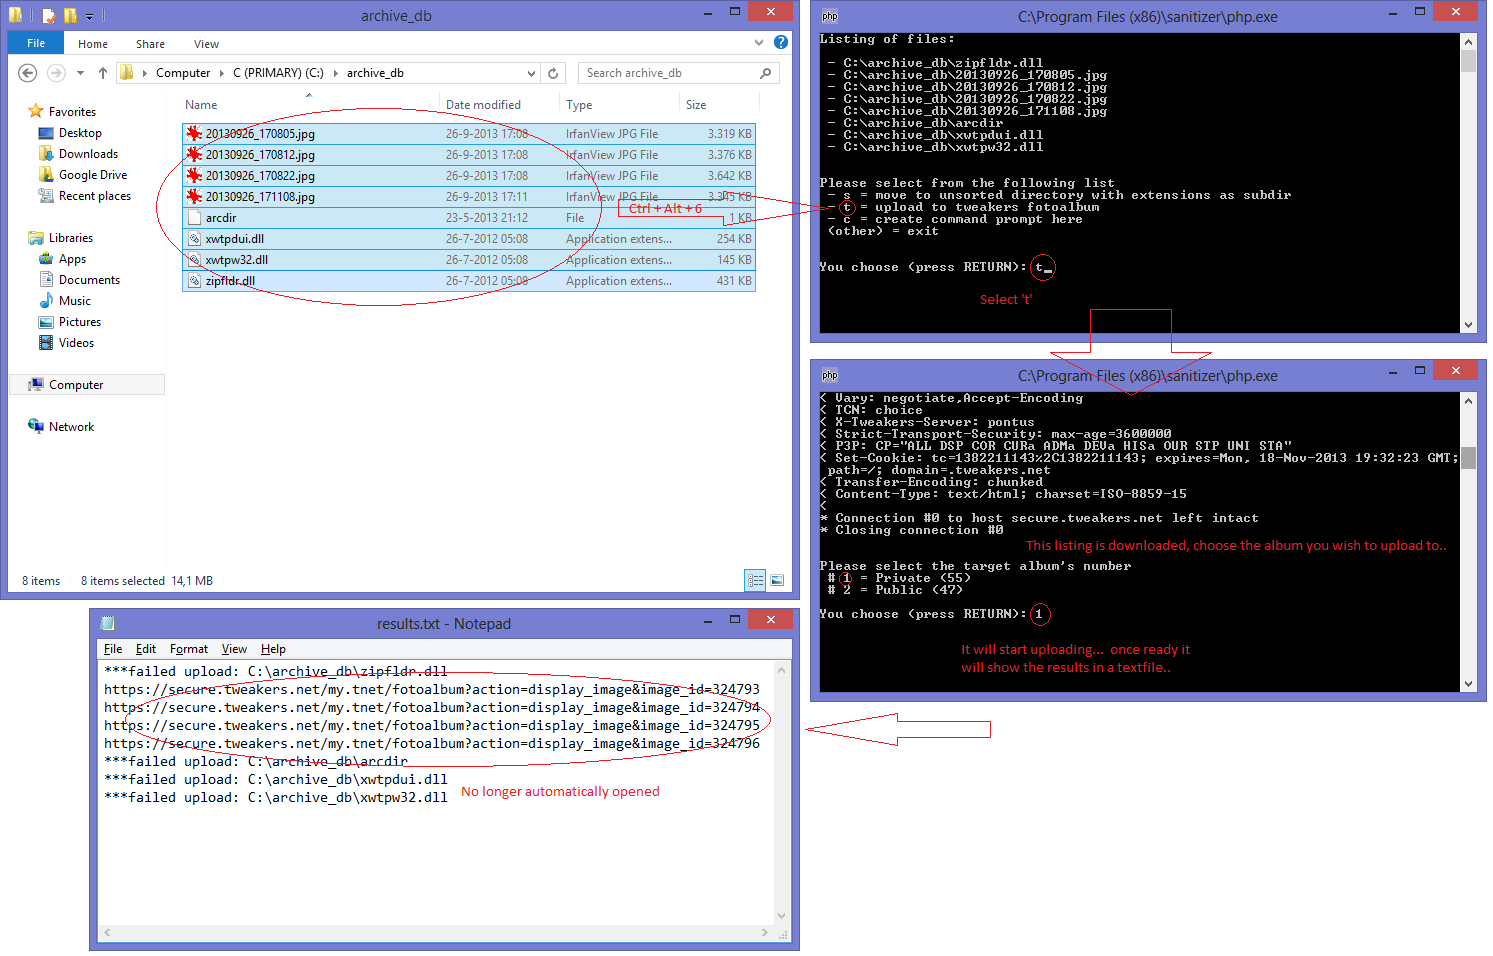
Example use: If you assign it under hotkey Ctrl+Alt+6 as I did in the example, you can use this hotkey whenever a (Windows file) explorer is active/has focus (explorer.exe).
If you trigger the hotkey it fetches the selected files and writes them to selected_files.txt in the program installation directory. As long as this file exists, the hotkey won't trigger again!
It will then immediately call the explorer_call.php PHP-script, also in the installation directory, that can be defined to do whatever you want on this list of files.
As long as it removes the selected_files.txt afterwards.
Contents of the default explorer_call.php script:
<?php
$files = explode("\n", trim(file_get_contents('selected_files.txt')));
unlink('selected_files.txt');

print_r($files);

system("pause");
?>
If you crash the script, and selected_files.txt is not deleted, your shortcut key won't appear to work anymore, as the existance of this file also serves as a lock.
Only when the file was processed and deleted can the explorer hotkey fire and launch the PHP script again.
So when your hotkey appears non-responsive, chances are you need to delete selected_files.txt, or make the script more advanced .
Download
Download setup file: sanitizer-1.0-setup.exe.
The executable is compiled with VS2012 with platform target "Visual Studio 2012 - Windows XP (v110_xp)".
VS2012 x86 redistributable is included in the setup.
After install make sure to edit config.ini first, and realize that there is no GUI, the executable will run in the background. If you want to restart it use the restart_sanitizer.bat.
If you want to kill it, use taskmgr or taskkill /IM sanitizer.exe.
Verify
If you start it with the sample config: Ctrl+Alt+4 should yield SomeOtherPassword in your clipboard; Ctrl+Alt+6 should print selected files in Windows explorer (do this from within explorer); Ctrl+Alt+1 should start putty.exe if you have that installed (and available in your PATH).
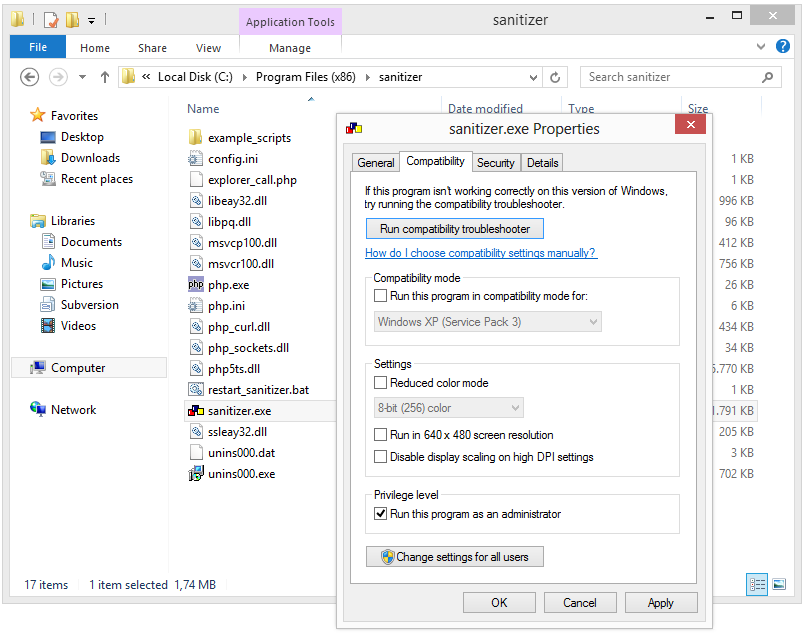
Windows 8 (Vista?) Disable UAC
If your system complains about not being able to write to selected_files.txt, just make it run as Administrator:
Explorer call use case: Tweakers.net foto uploader script
Update 10 jun 2013:
It's included in the installer in the example directory after install, an explorer_call.php script that makes it possible to upload images to your Tnet foto-album.
Wrote a blog-post about it in Dutch here: http://cppse.tweakblogs.net/blog/9047/tweakers-fotoalbum-images-uploader.html.
Update 20 oct 2013:
Made a few changes to the tweakers script again, another Tweakers user wrote a blog about this: http://perkouw.tweakblogs.net/blog/9474/t-punt-net-fotoalbum-script!.html.
- Now the only thing you need to edit is the TnetID (session id).
- It will fetch the available foto albums itself.
- I've also improved the check whether a file upload succeeded, it fetches the last known image from the fotoalbum, before and after the upload, if they match, the upload failed.
- A summary of the uploads is now opened after the last image upload, instead of opening an url every upload ;)
(I'll update the installer later to include this new explorer_call.php)
Background
Yet another C++ benchmark library I guess, but I couldn't find any that fulfilled my needs properly
The requirements: output to text into a format easily parsable (for generating grahps afterwards). Low coupling, non intrusive, performant, provide basic statistics, ... .
So this one is easy to use, at first I implemented the timer using boost::posix_time::microsec_clock, only to discover that the resolution was not as good on windows.
[Edit 15-02-2015: I now think the individual measures may be off a bit, but overall it does seem to average out to correct timings. I now added a boost::chrono based timer, which seems to offer good results on all platforms.]
I don't understand why exactly, so I searched for a better timer (for windows) and found an example for an HRTimer [Edit 15-02-2015, forgot the link, but I found this].
So now you can choose Timer implementations ^_^
Available Timer implementations are:
- BoostTimerImpl - microseconds resolution on *nix systems, at most milliseconds on windows.
- BoostChronoTimerImpl - microseconds resolution on *nix systems and windows.
- WindowsHRTimerImpl - microseconds resolution on windows, windows specific.
Available Measure classes are:
- MeasureCounts - group individual measures per time interval.
- MeasureInterval - individual measures.
With both classes you can set the number of measures you require before the report file should be generated.
Download
Currently compiled as a static library for platform toolset Visual Studio 2012 - Windows XP (v110_xp). It is 32 bit, with flags /MD (Multi-threaded DLL).
Download link: benchmarklib-1.0.zip (md5 37ce3698a5af8b25555913f5151c85c9).
Using the Benchmark and Timer classes
Using the library
- #include "benchmark.h"
- Link against benchmarklib.lib
Using the MeasureCounts class
MeasureCounts counter(TimerFactory::Type::WindowsHRTimerImpl);

// Measure FPS
counter.setDescription("number of frames");
counter.setBatchSize(1000);

// Measure 30 times at 500 milliseconds interval (duration of 15 seconds)
counter.require(30);
counter.setBatchGroupSize(500);

// Results will be written to RESULT_EXAMPLE.TXT
counter.setOutput("EXAMPLE");

while ( ! counter.complete()) {

    /* do something */

    counter.measure();
}
Using the MeasureInterval class
MeasureInterval counter2(TimerFactory::Type::WindowsHRTimerImpl);

counter2.setDescription("milliseconds per frame");

// Measure 500 frames
counter2.require(500);

// Results will be written to RESULT_EXAMPLE2.TXT
counter2.setOutput("EXAMPLE2");

while ( ! counter2.complete()) {

    /* do something */

    counter2.measure();
}
Using the timer class
auto timer = TimerFactory::factory(TimerFactory::Type::WindowsHRTimerImpl);
timer->start();

/* do something */

std::cout << "Run time CPU : " << timer->end() << " milliseconds." << std::endl;
Example output (RESULT_EXAMPLE.TXT)
@@@ BENCHMARK @@@

profile "EXAMPLE"

measure "number of frames" / 1000 ms.

measure interval = 500 ms.


@@@ STATISTICS @@@

N          30
Mean       122.5427
S.E. Mean  0.2686
Std. Dev   1.4714
Variance   62.7829
Minimum    118.8119
Maximum    124.5059
Median     122.7723


@@@ HISTOGRAM @@@

                      #
                      #
                      #
                      #
                      #
                      #
                      #
                #  #  #
          #     #  #  #
 #        #  #  #  #  #  #
 #  #  #  #  #  #  #  #  #  #
------------------------------
 0. 1. 2. 3. 4. 5. 6. 7. 8. 9.

0.  118.8119 <> 119.4446  =  2
1.  119.4446 <> 120.0772  =  1
2.  120.0772 <> 120.7099  =  0
3.  120.7099 <> 121.3426  =  3
4.  121.3426 <> 121.9752  =  2
5.  121.9752 <> 122.6079  =  4
6.  122.6079 <> 123.2406  =  4
7.  123.2406 <> 123.8733  =  11
8.  123.8733 <> 124.5059  =  2
9.  124.5059 <> 125.1386  =  1
Troubleshoot
Use this if your compiler does not support typed enums:
auto timer = TimerFactory::factory("WindowsHRTimer");And for the benchmark classes as well.. (Edit: not yet supported for the Measure classes)
MeasureCounts counter("WindowsHRTimer");
 watermarker tool
Installer
Hier te downloaden: watermarker-1.0-setup.exe
Hoe te gebruiken
Na installatie gewoon "watermarker" starten.
De plaatjes die je wilt watermerken kun je op het grijze vlak slepen. (Zoveel je wilt tegelijk) Je kunt zien hoe ze eruit komen te zien, en dan op "Write to images!" klikken om ze daadwerkelijk te watermerken.
Let wel op: de plaatjes worden overschreven.
Dus je zult wel de plaatjes eerst moeten kopieeren en dan de kopieen watermerken.
Want het watermerk krijgt je er niet meer uit, en de originele foto's wil je wel behouden lijkt me
Voorbeeld:

Update 29 mei 2014: Install it on Ubuntu using wine!
Nu ik geen linux meer gebruik, heb ik gekeken of watermarker goed installeerd d.m.v. wine.
De installatie duurt erg lang, en de shortcut die gemaakt werd werkte niet...
Het probleem was blijkbaar dat de installer niet de C++ runtime dlls heeft geinstalleerd:
trigen@Firefly21:/home/trigen/.wine/drive_c/Program Files (x86)/watermarker> wine watermarker.exe
err:module:import_dll Library MSVCR110.dll (which is needed by L"C:\\Program Files (x86)\\watermarker\\watermarker.exe") not found
err:module:import_dll Library MSVCP110.dll (which is needed by L"C:\\Program Files (x86)\\watermarker\\watermarker.exe") not found
err:module:LdrInitializeThunk Main exe initialization for L"C:\\Program Files (x86)\\watermarker\\watermarker.exe" failed, status c0000135
Deze heb ik handmatig in de watermarker map moeten plaatsen. Download ze hier: msvcp110.dll en msvcr110.dll.
De shortcut doet het daarna wel. Het programma doet het alleen nog niet omdat convert.exe ook problemen geeft.
trigen@Firefly21:/home/trigen/.wine/drive_c/Program Files (x86)/watermarker> wine convert.exe
err:module:import_dll Library VCOMP100.DLL (which is needed by L"C:\\Program Files (x86)\\watermarker\\convert.exe") not found
err:module:LdrInitializeThunk Main exe initialization for L"C:\\Program Files (x86)\\watermarker\\convert.exe" failed, status c0000135
Deze dll ook hier handmatig neerzetten fixed het probleem, download: vcomp100.dll
Op die manier werkt het (inclusief de drag & drop functionaliteit) prima onder Ubuntu (versie 13.10).
I posted this in a comment here, a long while ago. I forgot about it but yesterday someone posted in the same topic, and therefore I received an e-mail.
As my comment somehow isn't visible on the blog (maybe it was never moderated?) i'll post it here. I was using it in a non-unicode project myself, so I encountered the same problem. According to the mail I recvd this is what I wrote:
Nice fixes.

How I get the sourcecode to work in my unicode program however, without modifying the source is as follows.

Simply don't compile the file all_in_one.cpp (or all ibpp/core/*.cpp files individually) with the defines/"preprocessor definitions" _UNICODE and UNICODE enabled.

I didn't look at the Flamerobin source, but my guess is that they do the same.
Posted by rayburgemeestre to Untouched at 6:05 PM
IBPP in a Qt Creator project
Add the following in your .pro file:
DEFINES += IBPP_WINDOWS=value
LIBS += Advapi32.lib
the lib is for fixing
all_in_one.obj : error LNK2019: unresolved external symbol __imp__RegCloseKey@4 referenced in function "public: struct ibpp_internals::GDS * __thiscall ibpp_internals::GDS::Call(void)" (?Call@GDS@ibpp_internals@@QAEPAU12@XZ)
all_in_one.obj : error LNK2019: unresolved external symbol __imp__RegOpenKeyExA@20 referenced in function "public: struct ibpp_internals::GDS * __thiscall ibpp_internals::GDS::Call(void)" (?Call@GDS@ibpp_internals@@QAEPAU12@XZ)
all_in_one.obj : error LNK2019: unresolved external symbol __imp__RegQueryValueExA@24 referenced in function "public: struct ibpp_internals::GDS * __thiscall ibpp_internals::GDS::Call(void)" (?Call@GDS@ibpp_internals@@QAEPAU12@XZ)
Also added the following two #undefs to all_in_one.cpp.
#undef _UNICODE
#undef UNICODEThe following image was rendered by another process
Motivation for using separate processes for rendering is if you wish to have multiple threads rendering. I do a lot of set blending type, put pixels, set blender type again, more pixels, etc. If I use async() to render multiple images at once these function calls might interfere as race conditions.

Probably a noobish moment, but I never realized the "stack" was this limited. I tried declaring something like
struct structw800h600
{
    ...
    Pixels pixels[800 * 600].
};

message_queue mq (create_only, "pixels",
    1, //max message number
    sizeof(structw800h600)); //max message size

structw800h600 img;
memset(&img, 0x00, sizeof(structw800h600));
This code caused an exception while constructing the object that declared an instance of the struct on the stack:
Unhandled exception at 0x003E5017 in Starcry.exe: 0xC00000FD: Stack overflow (parameters: 0x00000000, 0x00702000).Shows break here in chkstk.asm (because I am in debug mode):
[...]
; Find next lower page and probe
cs20:
        sub     eax, _PAGESIZE_         ; decrease by PAGESIZE
        test    dword ptr [eax],eax     ; probe page. <<<<<<<<<<<<<<<<<<<< here
        jmp     short cs10

_chkstk endp

        end
I did not find out the exact threshold but the the crash occured when the size of the struct was above ~1024972 bytes or ~1000 kB. (Size of each pixel object is 16 byte). If I understand it correctly the stack is only several MB so I was simply storing too much data on it.
Still posting this because I almost jumped to the false conclusion that it was a windows platform shared memory limitation.
Simply allocate the Pixel objects from the free-store and send that through the message queue. Something like:
Pixel *pixels = new Pixel[800 * 600];
I have posted on using allegro 4 with wxWidgets before. Allegro 5 is more easy.
Just the stuff I encountered and how to fix
Fix main conflict
#define ALLEGRO_USE_CONSOLE 1

Avoids the following error.

1>MSVCRTD.lib(crtexe.obj) : error LNK2019: unresolved external symbol _main referenced in function ___tmainCRTStartup

#define ALLEGRO_USE_CONSOLE 1

#include <allegro5/allegro.h>
#include <allegro5/allegro_image.h>
#include <allegro5/allegro_primitives.h>
#include <allegro5/allegro_font.h>
#include <allegro5/allegro_ttf.h>
Draw ALLEGRO_BITMAP on static canvas
Note that there is no equivalent of Allegro 4's draw_to_hdc() function. With a little grepping in the source code I found out that (for windows anyway) you have functions that do the same in C:\allegro5\src\win\wmcursor.c
Just borrow local_draw_to_hdc from there and use it in the paint event.
staticbitmap->Connect(wxID_STATIC, wxEVT_PAINT, wxPaintEventHandler(SharedMemoryTest::OnPaint), NULL, this);

void SharedMemoryTest::OnPaint( wxPaintEvent& event )
{
    wxPaintDC dc(wxDynamicCast(event.GetEventObject(), wxWindow));
    WXHDC wxHDC = wxPaintDC::FindDCInCache((wxWindow*) event.GetEventObject());
    HDC hDC = (HDC) wxHDC;

    local_draw_to_hdc(hDC, bmp, 0, 0);
}
Work in progress...
It will be a lot easier to compile. No longer dependant on the json lib. A single .cpp file (as the code is quite small).
No makefile, just a g++ goto.cpp -o goto -lncurses
Get the source code here
P.S. I added colours:

Updates
24-feb-2013: Now listens for ncurses KEY_RESIZE event so changing window size will redraw.
Bash wrapper script
With Apache (2.2) you could get an generic "Internal Server Error" error message in case the cgi sends the wrong headers. There is probably a setting for this in Apache as well, but I always create a bash wrapper script. For example someapp.cgi:
#!/bin/bash
printf "Content-type: text/html\n\n"
/path/to/actual_appl
This immediately makes the output visible and you can comment the printf statement once fixed. This trick only makes sense if you don't have quick access to a debugger or a core dump.
Running application in chroot
There are plugins for apache AFAIK for running cgi applications in a chroot. I didn't experiment with these, as I simply use my (probably lame) bash wrapper here as well:
#!/bin/bash
sudo -E /usr/bin/chroot /usr/local/src/some_jail /usr/bin/some_appl 2>&1
The -E flag means "preserve environment". To allow this you have to configure sudoers properly (visudo). Something like this:
wwwrun ALL=(ALL) SETENV: ALL, NOPASSWD : /usr/bin/chrootThis is no rocket science but I thought this was a really cool solution to the problem.
First I created a helper function Xprintf to interface with an existing C API that works with (non const) char arrays. Hence its char * return value.
char *Xprintf(const char *format, ...);

// This function works in the following situations

foo1(Xprintf("Hello world: %d", 1001)); // void foo1(char *);
foo2(Xprintf("Hello world: %d", 1001)); // void foo2(const char *);
foo3(Xprintf("Hello world: %d", 1001)); // void foo3(const string);
foo4(Xprintf("Hello world: %d", 1001)); // void foo4(const string &);
foo5(Xprintf("Hello world: %d", 1001),
     Xprintf("...", ...));              // void foo5(char *, char *);
Xprintf cannot use just one buffer because the case of 'foo5' would fail (it would get the same pointer twice).
I needed a different return value, like std::string, so that copies could be returned which would clean themselves up as soon as they went out of scope.
But std::string does not provide implicit casting to const char *, only explicit casting through .c_str().
The call to foo1 would become: foo1(const_cast
The following fixes it, creating a tmp_str class that extends std::string and simply provides the implicit cast:
class tmp_str : public std::string
{
public:
    tmp_str(const char *str)
        : std::string(str) {}

    // g++ is fine with adding this one, xlC isn't
    //operator const char *() const { return c_str(); }

    operator char *() const { return const_cast<char *>(c_str()); }
};

tmp_str cHelperCharArray::Xprintf(const char *format, ...)
{
    char buffer[512] = {0x00};

    va_list args;
    va_start(args, format);
    vsprintf(buffer, format, args);
    va_end(args);

    return tmp_str(buffer);
}
A note why tmp_str is-a std::string and not an is-implemented-in-terms-of: the call to foo4 would fail as it would not accept tmp_str as a reference to string (A parameter of type "const std::basic_string,std::allocator > &" cannot be initialized with an rvalue of type "tmp_str".). )
g++ accepts all these foo* functions, but IIRC xlC doesn't like foo2. In that case I had to cast to const. Adding the const char * operator overload would make some casts for that compiler ambiguous.
mplayer can easily be instructed to render on a custom window with the -wid (window handle) parameter.
// On windows
long targetWindowId = reinterpret_cast<long>(canvas->GetHWND());

// On Linux
long targetWindowId = GDK_WINDOW_XWINDOW(canvas->GetHandle()->window);
Now that I got it to render on my canvas, I cannot render on top of it without flickering, because I cannot do double buffering. (I cannot control when mplayer renders frames on the window). That's why I add a second window that reads the first window to a bitmap, I can do whatever I want to that bitmap, and display it . This meant that I could no longer use my preferred video renderer on windows -vo direct3d because somehow that setting doesn't actually draw on the window, just in the same region. When reading the first window I'd get an empty bitmap and not the video. I ended up using -vo directx:noaccel in order to properly read it.
Fix overlap problem
This posed another problem, when hovering the second window on top of the first, it interferes with the video as it renders itself in window1 first. I only encountered this on my windows pc:
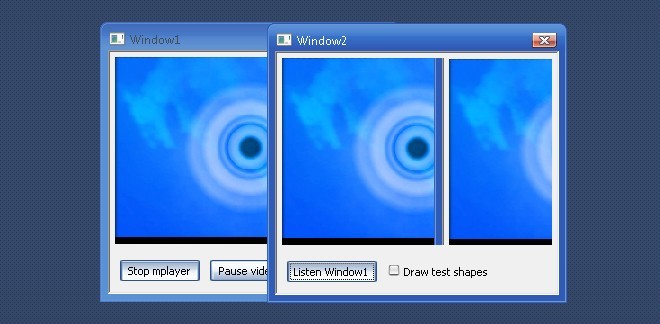
I decided to ignore this problem and try to find a way to hide the first window so that it wouldn't interfere. I tried minimizing it, Hide(), move it outside the screen, etc. But mplayer would not render the video in these cases. I then tried making the window 100% transparent and this worked. It also fixed my overlap-problem as I could now overlap the windows without problems. Somehow making the windows transparent forces the no-hardware-acceleration-directx renderer to behave differently. Making the window 1% transparent also fixes the overlap-problem.
Fix linux support
On Linux I use the -vo X11 video output, and overlap wasn't a problem. The only annoying thing is that in order to get the GTK window handle you have to include a GTK header in C++, which requires adding a lot of include directories to your include path. Because you need to cast the window handle to a GTKWidget instance, and ask it for the xid.
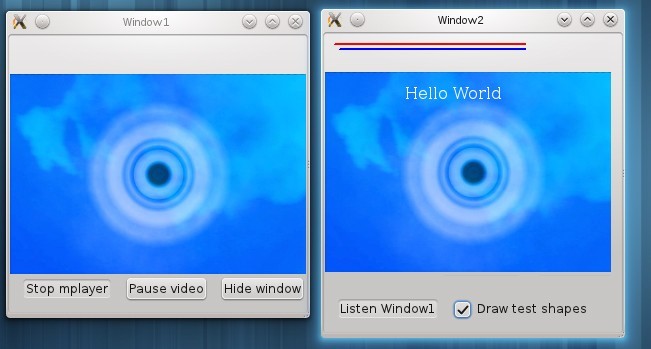
Result
The code is available on bitbucket and works on Windows (tested Windows vista with aero theme) and Linux (openSUSE 11.4). Makefile and Visual studio project files included.
Where I used this for..
All texts and images are rendered on top of the background video.
I'm actually using Adam Pash' mouser for a few years now on vimkeys with a small patch to improve the performance. A few days ago me and Marijn Koesen talked about an OSX / platform independent version. We used to talk about this before, but now being familiar with wxWidgets I realised creating a clone in C++ was probably easy.
My first windows-only version used a simple timer and a few tricks to prevent keypresses from escaping to the active window. The current version is now improved, and no longer uses a timer. I was also able to minimize an artifact the original mouser also had with the flickering of the blue shapes; it is really fast and transparency appears not to slow it down either (it did on my PC with the original mouser).
The only thing missing is multiple-monitor support at this moment, but give us a few days. Having only one monitor isn't helping .
EDIT 11-04-2010: A nice SuperMouser milestone day: Marijn added undo key 'U'. I added multiple monitor support for windows, 'M' key. The latter in need of some testing (I tested it by hardcode-dividing my screen into two halfs).
Marijn Koesen is collaborating and also adding OSX support. The GTK2 version is coming soon. And multiple-monitor support currently has highest priority.
It's all on github for download. The binary for windows is on github as well.
Roadmap:
- 80% Multiple monitor support (working on it)
- 100%
Undo history key (for correcting mistakes) - 0% Remember settings in config.
- 80% OSX compatibility
- 60% GTK2 compatibility
Probably lots of them on the internet, but I made one myself (don't ask me why) Just searched for some encode and decode functions w/google codesearch, then added a simple main().
Usage: base64conv.exe [OPTION] [SOURCE] [DEST]
 where [OPTION] is either --to-base64 or --from-base64,
  [SOURCE] is the file to convert
  [DEST] is the target/output file (will be overwritten)

Examples: base64conv.exe --to-base64 somefile.exe somefile.txt
          base64conv.exe --from-base64 somefile.txt somefile.exe
(something like ./base64conv on linux)
Here you have it:
/*
   base64.cpp and base64.h

   Copyright (C) 2004-2008 Rene Nyffenegger

   This source code is provided 'as-is', without any express or implied
   warranty. In no event will the author be held liable for any damages
   arising from the use of this software.

   Permission is granted to anyone to use this software for any purpose,
   including commercial applications, and to alter it and redistribute it
   freely, subject to the following restrictions:

   1. The origin of this source code must not be misrepresented; you must not
      claim that you wrote the original source code. If you use this source code
      in a product, an acknowledgment in the product documentation would be
      appreciated but is not required.

   2. Altered source versions must be plainly marked as such, and must not be
      misrepresented as being the original source code.

   3. This notice may not be removed or altered from any source distribution.

   Rene Nyffenegger rene.nyffenegger@adp-gmbh.ch

*/

#include <iostream>

static const char base64_chars[] =
    "ABCDEFGHIJKLMNOPQRSTUVWXYZ"
    "abcdefghijklmnopqrstuvwxyz"
    "0123456789+/";

static char *
    base64_encode(const unsigned char *input, int length)
{
    /* http://www.adp-gmbh.ch/cpp/common/base64.html */
    int i=0, j=0, s=0;
    unsigned char char_array_3[3], char_array_4[4];

    int b64len = (length+2 - ((length+2)%3))*4/3;
    char *b64str = new char[b64len + 1];

    while (length--) {
        char_array_3[i++] = *(input++);
        if (i == 3) {
            char_array_4[0] = (char_array_3[0] & 0xfc) >> 2;
            char_array_4[1] = ((char_array_3[0] & 0x03) << 4) + ((char_array_3[1] & 0xf0) >> 4);
            char_array_4[2] = ((char_array_3[1] & 0x0f) << 2) + ((char_array_3[2] & 0xc0) >> 6);
            char_array_4[3] = char_array_3[2] & 0x3f;

            for (i = 0; i < 4; i++)
                b64str[s++] = base64_chars[char_array_4[i]];

            i = 0;
        }
    }
    if (i) {
        for (j = i; j < 3; j++)
            char_array_3[j] = '\0';

        char_array_4[0] = (char_array_3[0] & 0xfc) >> 2;
        char_array_4[1] = ((char_array_3[0] & 0x03) << 4) + ((char_array_3[1] & 0xf0) >> 4);
        char_array_4[2] = ((char_array_3[1] & 0x0f) << 2) + ((char_array_3[2] & 0xc0) >> 6);
        char_array_4[3] = char_array_3[2] & 0x3f;

        for (j = 0; j < i + 1; j++)
            b64str[s++] = base64_chars[char_array_4[j]];

        while (i++ < 3)
            b64str[s++] = '=';
    }
    b64str[b64len] = '\0';

    return b64str;
}

static inline bool is_base64(unsigned char c) {
    return (isalnum(c) || (c == '+') || (c == '/'));
}

static unsigned char *
    base64_decode(const char *input, int length, int *outlen)
{
    int i = 0;
    int j = 0;
    int r = 0;
    int idx = 0;
    unsigned char char_array_4[4], char_array_3[3];
    unsigned char *output = new unsigned char[length*3/4];

    while (length-- && input[idx] != '=') {
        //skip invalid or padding based chars
        if (!is_base64(input[idx])) {
            idx++;
            continue;
        }
        char_array_4[i++] = input[idx++];
        if (i == 4) {
            for (i = 0; i < 4; i++)
                char_array_4[i] = strchr(base64_chars, char_array_4[i]) - base64_chars;

            char_array_3[0] = (char_array_4[0] << 2) + ((char_array_4[1] & 0x30) >> 4);
            char_array_3[1] = ((char_array_4[1] & 0xf) << 4) + ((char_array_4[2] & 0x3c) >> 2);
            char_array_3[2] = ((char_array_4[2] & 0x3) << 6) + char_array_4[3];

            for (i = 0; (i < 3); i++)
                output[r++] = char_array_3[i];
            i = 0;
        }
    }

    if (i) {
        for (j = i; j <4; j++)
            char_array_4[j] = 0;

        for (j = 0; j <4; j++)
            char_array_4[j] = strchr(base64_chars, char_array_4[j]) - base64_chars;

        char_array_3[0] = (char_array_4[0] << 2) + ((char_array_4[1] & 0x30) >> 4);
        char_array_3[1] = ((char_array_4[1] & 0xf) << 4) + ((char_array_4[2] & 0x3c) >> 2);
        char_array_3[2] = ((char_array_4[2] & 0x3) << 6) + char_array_4[3];

        for (j = 0; (j < i - 1); j++)
            output[r++] = char_array_3[j];
    }

    *outlen = r;

    return output;
}


/**
 * This is the interface I added to these two convert functions,
 *  that were originally written by Rene Nyffenegger.
 * Found them via google codesearch, specifically in
 *  http://jacksms.googlecode.com/svn/base64.cpp and
 *  http://jacksms.googlecode.com/svn/base64.hh
 * 2011, Ray Burgemeestre.
 */
#include <string>
#include <fstream>

using namespace std;

void display_usage(const char *programname)
{
    cerr << "Usage: " << programname << " [OPTION] [SOURCE] [DEST]" << endl
         << " where [OPTION] is either --to-base64 or --from-base64," << endl
         << "  [SOURCE] is the file to convert" << endl
         << "  [DEST] is the target/output file (will be overwritten)" << endl
         << "" << endl
         << "Examples: base64conv.exe --to-base64 somefile.exe somefile.txt" << endl
         << "          base64conv.exe --from-base64 somefile.txt somefile.exe" << endl
         << "(something like ./base64conv on linux)" << endl;
}

int main(int argc, char *argv[])
{
    enum Arguments { PROGRAM, OPTION, SOURCE, DEST, ARGS_LEN };
    if (argc != ARGS_LEN) {
        display_usage(argv[PROGRAM]);
        return -1;
    } else {
        char *sourcedata = NULL;
        ifstream::pos_type sourcedataLen = 0;
        ifstream sourcefile (argv[SOURCE], ios::in|ios::binary|ios::ate);
        if (sourcefile.is_open()) {
            sourcedataLen = sourcefile.tellg();
            sourcedata = new char [static_cast<int>(sourcedataLen)];
            sourcefile.seekg(0, ios::beg);
            sourcefile.read(sourcedata, sourcedataLen);
            sourcefile.close();
            cout << "source file " << argv[SOURCE] << " loaded" << endl;
        } else {
            cerr << "unable to open source file, " << argv[SOURCE] << endl;
            return -1;
        }

        if (strcmp(argv[OPTION], "--to-base64") == 0) {
            cout << "converting to base64" << endl;
            char *base64string = base64_encode(reinterpret_cast<unsigned char *>(sourcedata),
                static_cast<int>(sourcedataLen));
            ofstream outputfile(argv[DEST], ios::out|ios::binary|ios::ate);
            if (outputfile.is_open()) {
                outputfile.write (base64string, strlen(base64string));
                outputfile.close();
                cout << "base64 string written to dest file, " << argv[DEST] << endl;
            } else {
                cerr << "unable to open dest file, ", argv[DEST];
                return -1;
            }
        }
        else if (strcmp(argv[OPTION], "--from-base64") == 0) {
            cout << "converting from base64" << endl;
            int outlen = 0;
            unsigned char *decodedbase64string= base64_decode(sourcedata,
                static_cast<int>(sourcedataLen), &outlen);
            ofstream outputfile(argv[DEST], ios::out|ios::binary|ios::ate);
            if (outputfile.is_open()) {
                outputfile.write(reinterpret_cast<const char *>(decodedbase64string), outlen);
                outputfile.close();
                cout << "decoded base64 string written to dest file, " << argv[DEST] << endl;
            } else {
                cerr << "unable to open dest file, ", argv[DEST];
                return -1;
            }
        } else {
            display_usage(argv[PROGRAM]);
            cerr << "@@ invalid [OPTION] specified.";
            return -1;
        }
        delete[] sourcedata;
    }
}
If you need to protect yourself from yourself, like I needed to do. Then this simple notepad replacement executable may be for you .
Click here to download.
What it does is:
- Always instantiates exactly one blank/new/untitled notepad instance at a time.
- The untitled stuff is kept in a user configurable file. So you are not constantly bothered with a Save as dialog..
- Easily 'dispatch' selections within your notepad to separate files.
- When called to open a file, does open a new editor for that file. That editor is configurable.
- Supports better CTRL+Z, CTRL+Y than default notepad.
- Supports CTRL+F and search next with F3.
- (For goto-line with CTRL+G you'll have to dispatch the text to another editor!)
When you own New text document (1).txt until New text document (19).txt, asdf.txt, jlksdjflkajsd.txt, etc., on your desktop. Then you have the same problem I had: using notepads for storing temporary buffers and things like that. With this replacement you are forced to keep just one buffer, which is automatically saved with CTRL+S. And when you do want to keep specific stuff, you select that text and CTRL+D (dispatch to file).
To install it you need to do the following:
- Disable UAC (on Vista for example)
- Reboot the system
- Execute a batch file like the following. Got this copy from here.
Here's the copy (it is included in my .zip). This is not the same script I used, but my guess is it'll probably work:
@echo off

takeown /f c:\windows\syswow64\notepad.exe
cacls c:\windows\syswow64\notepad.exe /G Administrators:F

takeown /f c:\windows\system32\notepad.exe
cacls c:\windows\system32\notepad.exe /G Administrators:F

takeown /f c:\windows\notepad.exe
cacls c:\windows\notepad.exe /G Administrators:F

copy c:\windows\syswow64\notepad.exe c:\windows\syswow64\notepad.exe.backup
copy c:\windows\system32\notepad.exe c:\windows\system32\notepad.exe.backup
copy c:\windows\notepad.exe c:\windows\notepad.exe.backup

rem this has to be executed from within the installation dir.
copy notepad.exe c:\windows\syswow64\notepad.exe
copy notepad.exe c:\windows\system32\notepad.exe
copy notepad.exe c:\windows\notepad.exe
You can read the INSTALL file in the .zip bundle for details.
Example configuration
; configuration for notepad.exe replacement
editor=C:\Program Files\Vim\vim72\gvim.exe
file=C:\temp.txt
title=Untitled
maximized=0When navigating directories, every now and then pushd . and popd just aren't sufficient.
When directory structures tend to become quite deep, I get really annoyed with typing change-directory’s and wish I had some bookmarks.
That's why some time while ago I created a simple tool for usage within (GNU) screen:
CTRL+X pops up a menu for selecting common directories and files ("bookmarks"!).
This makes switching between those long directory structures a lot more pleasant !
Create bookmarks file
// Configuration file ($HOME/.launcher)
[
   {"Websites, configuration" : [
      {"dir" : "/srv/www/vhosts/ray.burgemeestre.net"},
      {"dir" : "/srv/www/vhosts/www.burgemeestre.net"},
      {"dir" : "/usr/local/src/mongoose/am"},
      {"dir" : "/usr/local/src/mongoose/am/output/ray-blog-burgemeestre-net"},
      {"file" : "/etc/apache2/vhosts.d/www-burgemeestre-net.conf"},
      {"file" : "/etc/apache2/vhosts.d/ray-blog-burgemeestre-net.conf"},
      {"file" : "/etc/apache2/vhosts.d/ray-burgemeestre-net.conf"}
   ]},
   {"Common Lisp" : [
      {"dir" : "/var/chroot/lispbot/home/trigen"},
      {"file" : "/var/chroot/lispbot/home/trigen/bot.lisp"}
   ]},
   {"C++ projects" : [
      {"dir" : "/usr/local/src/launcher"},
      {"dir" : "/usr/local/src/launcher/src"},
      {"file" : "/usr/local/src/launcher/src/parser.cpp"}
   ]}
]
Use in screen with C-x
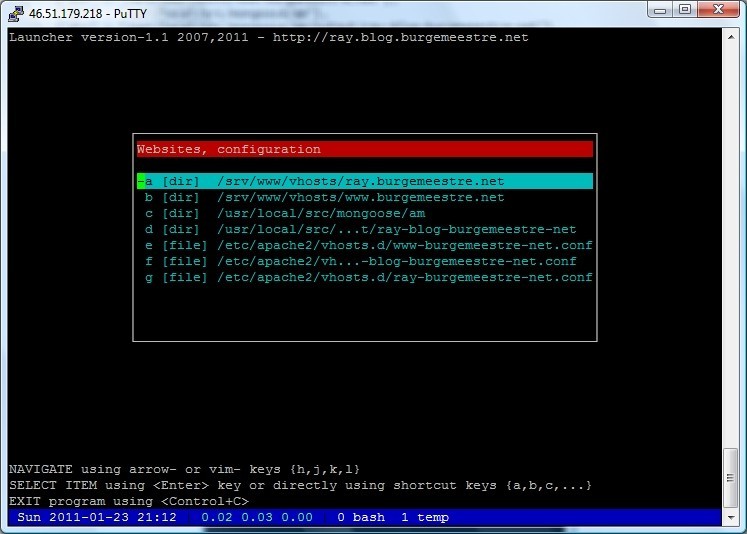
Choosing a directory in the menu opens it in a new screen tab. Choosing a file opens a new menu which allows you to dispatch it to specific editors or e-mail it (options currently all hardcoded in the source).
Installation
Most of the code is still from 2007, but these last two days I refactored the code a bit. And added some build scripts. (Needless to say I didn't get to implementing all features I had in mind.) It's all on github for download.
It installs /usr/local/bin/launcher and two helper bash scripts (/usr/local/bin/launch_scr.sh and /usr/local/bin/launch_scr2.sh).
You bind it to screen in your .screenrc with this line: bindkey ^x exec /usr/local/bin/launch_scr.sh.
(Also for your .screenrc I recommend using a caption if you don't already with:
caption always "%{Yb} %D %Y-%02m-%02d %0c %{k}|%{G} %l %{k}|%{W} %-w%{+b}%n %t%{-b}%+w")
One of the reasons I was using allegro for my project was that they already had (apparantly) a lot of blending modes available. You have set_blender_alpha(), set_blender_hue(), set_blender_color(), but these are not the same as in photoshop. I got some unexpected behaviour from these, and I will edit this post later and elaborate on that some more.
Most of them ignore the r, g, b parameters as well. So it appears they were a big disappointment. By the way, a quick glance at the Allegro 5 source made me think they aren't implemented there either.
That's why I did a quick search and found someone who already collected macro's for all photoshop blending types. By Nathan Moinvaziri. Today, or I should say yesterday (now at 3:17am), I implemented some wrapper functions around it that make it available to allegro, with an API that looks and feels the same as allegro.
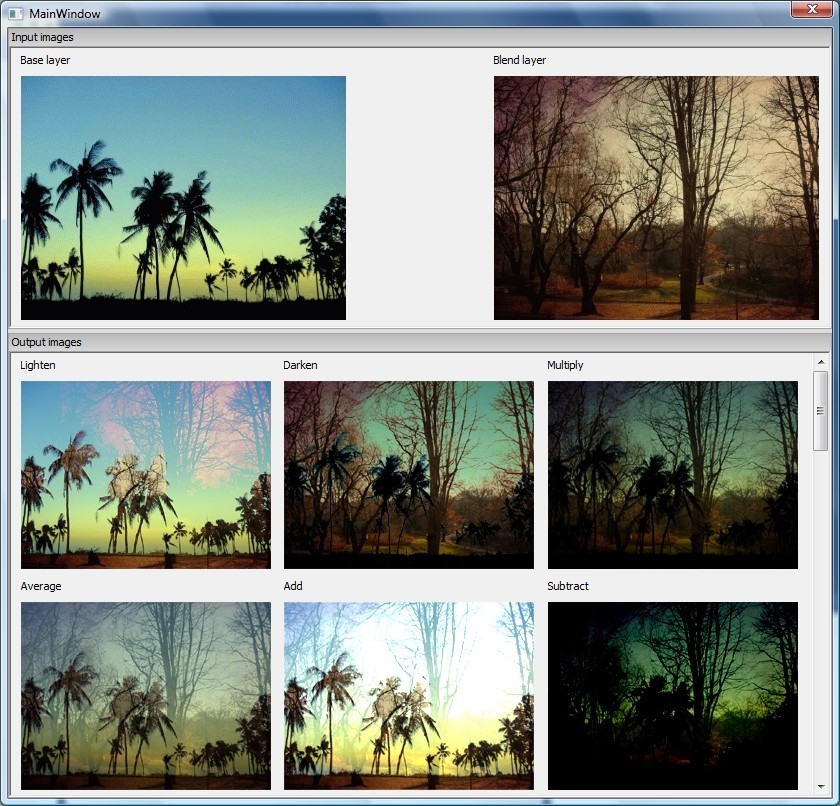
I put it on github with a demo program. From the README:
Put al_blend.h in your project somewhere and include it.  Or put it in the
allegro include directory, i.e. /usr/local/src/allegro/include or
C:\allegro\include.

Now instead of using the allegro blenders with getpixel() and putpixel(), you
can use put_blended_pixel().

    put_blended_pixel():
        Writes a pixel into a bitmap with specific blender.

    Description:
        void put_blended_pixel(BITMAP *bmp, int x, int y, int color,
            (*blender_func)(int &basecolor, int &blendcolor));

    Example:
        put_blended_pixel(screen, x, y, somecolor, blender_lighten);
Available blenders are: blender_darken, blender_multiply, blender_average, blender_add, blender_subtract, blender_difference, blender_negation, blender_screen, blender_exclusion, blender_overlay, blender_softlight, blender_hardlight, blender_colordodge, blender_colorburn, blender_lineardodge, blender_linearburn, blender_linearlight, blender_vividlight, blender_pinlight, blender_hardmix, blender_reflect, blender_glow, blender_phoenix, blender_hue, blender_saturation, blender_color, blender_luminosity,
There are a few things I figured out how to do, and I seem to use them on a regular basis. For these snippets I have to search through my projects every now and then, to find them, and it would be a lot easier if I kept them somewhere listed. Hopefully you will find something useful as well.
Clearing a sizer
I usually make master/detail screens where the detail list is a vertical sizer with stuff on it. Usually a panel with more stuff on it. Every now and then you may want to clear it. I use:
while (theSizer->GetChildren().GetCount() > 0) {
    theSizer->GetItem(static_cast<size_t>(0))->DeleteWindows();
    theSizer->Remove(0);
}

// populate the sizer again maybe

sizerChangelogItems->Layout();
You might want to surround the code with Freeze() and Thaw() for performance.
Hiding and showing a panel on an AUI frame
This is more of a note I keep forgetting about: Instead of calling the Hide() and Show() on the window (panel) itself (which compiles). Use the following:
someWindow->GetAuiManager().GetPane(someWindow->splitterwindow1).Show(false);
someWindow->GetAuiManager().GetPane(someWindow->panel1).Show(true);

someWindow->GetAuiManager().Update();
Using dropdowns with object data.
I use wxChoice a lot, I especially like that the items themselves can refer to anything. Typically how I initialize a choicebox:
wxChoice *choice = ...;
Object *someObject = ...;
for (...) {
    choice->Append("object 1", (void *)someObject);
}
choice->SetStringSelection("object 1");
Then usually I have an event that triggers on the selection of an item in the choicebox. In the event I first get the wxChoice, then cast the client data for the selected item to the object pointed to:
void SomeWindow::OnChoiceSelected( wxCommandEvent& event )
{
    wxChoice *choice = static_cast<wxChoice *>(event.GetEventObject());
    Object *someObject = static_cast<Object *>(choice->GetClientData(choice->GetSelection()));
    if (someObject != NULL) {
        //...
    }
}
Directory functions
wxString resdir(RESOURCE_DIR);
if (!::wxDirExists(resdir)) {
    throw std::runtime_error("resources dir not found");
}
wxDir dir(resdir);
if ( !dir.IsOpened() ) {
    throw std::runtime_error("resources directory could not be opened");
}
wxString filename;
bool cont = dir.GetFirst(&filename);
while ( cont ) {
    int lastdot = filename.Find('.', true);
    if (lastdot != wxNOT_FOUND) {
        wxString name(filename.SubString(0, lastdot - 1));
        wxString ext(filename.SubString(lastdot + 1, filename.Length()));
        if (!ext.compare(_T("cpp"))) {
            ...
        } else {
            ...
        }
    }
    cont = dir.GetNext(&filename);
}
Write to file function
wxFile article(markdownfilename, wxFile::write);
if (!article.IsOpened()) {
    throw std::runtime_error("main.md could not be opened for writing");
}
article.Write(textctrlArticleBody->GetValue());
article.Close();My two favourite libraries ever
Allegro is a game programming library for C/C++ developers distributed freely, supporting the following platforms: Unix (Linux, FreeBSD, etc.), Windows, MacOS X and Haiku/BeOS. (...) source
wxWidgets is a C++ library that lets developers create applications for Windows, OS X, Linux and UNIX on 32-bit and 64-bit architectures as well as several mobile platforms including Windows Mobile, iPhone SDK and embedded GTK+. (...) source
The required code summarized
I include allegro before wxWidgets, not sure if that matters, but what does matter is: the workaround regarding the RGB define, the use of winalleg.h instead of windows.h (needed to avoid conflict between allegro and windows.h); and disabling the 'magic' main() in allegro (wxWidgets' main is used):
#define ALLEGRO_NO_MAGIC_MAIN
#define RGB AL_RGB
#include <allegro.h>
#include <winalleg.h>
#undef RGB
Then I initialize allegro like this in OnCreate() of your wxWidgets application:
install_allegro(SYSTEM_NONE, &errno, NULL);
set_palette(desktop_palette); // example
set_color_depth(32); // example
You could draw allegro BITMAP's to wxStaticBitmap's in the OnPaint() event of the wxWidgets window. But you'll have to decide for yourself what method is most appropriate for your project.
wxPaintDC dc(wxDynamicCast(event.GetEventObject(), wxWindow));
    // you probably already have the wxPaintDC

// Found the following code by searching for a very long time in the
//  wxWidgets source code ;)
WXHDC wxHDC = wxPaintDC::FindDCInCache((wxWindow*) event.GetEventObject());
HDC hDC = (HDC) wxHDC;

... // do your thing here

draw_to_hdc(hDC, allegroBitmap, 0, 0);
    // where allegroBitmap is a valid "BITMAP *"
It took me a while to figure out how I could use draw_to_hdc like this. It's not that obvious (see allegro forums). Others have been struggling with drawing allego bitmaps on wxStaticBitmaps. This method will still yield you quite a high fps count.
Known issues
wxWidgets eventloop--or apparently random--crashes I have experienced some weird behaviour with using allegro with wxWidgets. There have been cases, that although allegro was initialized, in a separate window allegro seems to fail after calls to save_bmp(). Not in the function itself, but even weirder, after having called save_bmp() more than once, eventually the wxWidgets event handling system crashed, complaining about unhandled events. I guess something really wasn't properly initialized (although everything seemed to work, drawing, saving, etc.)
If you experience this, just initialize allegro in that window's OnCreate(), it should fix the problem. Maybe it has to do something with threading, that would explain why allegro has to be initialized (in that thread).
Assembly optimized {get|put}pixel crashes With _getpixel32() and _putpixel32() assembly, the optimized versions of getpixel() and putpixel(). For me these didn't work properly on 64-bit windows environments. After turning off some compiler optimizations the problem seemed to go away.
Non-assembly optimized {get|put}pixel crashes Continuing on the previous, if you replace _getpixel32 with getpixel, you may need to explicitely set a blending mode for 64-bit environments. Somehow I didn't do that, and as the non-assembly optimized getpixel function does bounds checking and blending modes, this became important.
[Edit 22-nov-2010: Just remembered this, but didn't verify it. It may have
something to do with calling drawing_mode(..), and not setting a specific
blending mode like set_trans_blender(..). Setting one of those, or instead
of drawing_mode and set_trans_blender a call to solid_mode(), would fix it.]
[Edit 29-01-2012: By the way. Allegro 5 integrates a little easier with wxWidgets, although come to think of it, I had to grep the source, or more specifically the examples directory in order to get the functions needed to render on a wxStaticBitmap though. I'll create a post for it: TODO]

Topics:
Other interests:
EBPF Flamegraphs C++ Ubuntu 20.04
Site generated using ![]() ArticleManager © 2010-2013
ArticleManager © 2010-2013