Neither one nor Many
Software engineering blog about my projects, geometry, visualization and music.
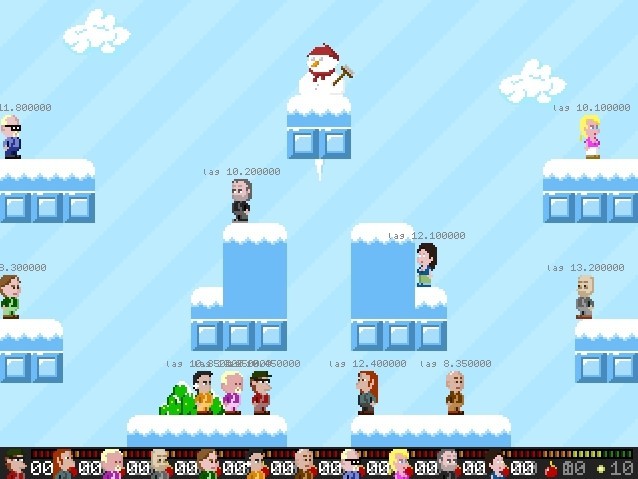
Smash Battle is a really cool game made by Bert Hekman and Jeroen Groeneweg. Of which Jeroen is now a collegue of mine at Tweakers.net. It supports up to four players, you can use gamepads and the multiplayer is best out of five. You can get powerups in the game like extra damage, health pack, armor etc. :) (I see that in the codebase also a single player is under development!)

Network version
I decided to add a network multiplayer gametype to it, and I develop that in a separate branch. It supports more than four players.
Currently the network multiplayer supports only bullets and mines (your default equipment). Powerups do not yet appear. All damage to players or tiles is determined on the server. The clients are trusted though, to send their correct player positions, shots fired etc. You could theoretically cheat (up to a certain level) by modifying and compiling your own client, but it is far easier to implement a network multiplayer if I can trust clients somewhat. This can easily be rewritten though, and if you play with low lags you will probably not notice any difference. But I think you will notice if someone is cheating.
Pre-alpha test release
My fork is https://bitbucket.org/rayburgemeestre/smashbattle
It's a pre-alpha because the gametype is not completely finished yet, if there are more than two players a normal best out of five multiplayer starts. Once the game has started, you cannot join the server anymore. You can already test it out simply install the current release of Smashbattle.
On Windows:
- It will default install to C:\Program Files\Smash Battle\
- Extract the contents of smashbattle-pre-alpha.zip into your installation dir. (Use BattleXP.exe if you're running Windows XP)
- If you changed the install location of it, modify the path in register_server.reg.
- Double click the .reg file, now smashbattle:// protocol should be available.
On Ubuntu:
Put this line in your /etc/apt/sources.list: deb http://repository.condor.tv lucid main
apt-get update
- apt-get install battle
- cd /usr/share/games/smashbattle/ <<<<< important! the game expects level data in ".".
- ./battle
Note that the update command might give you this if you are running 64 bit:
Ign http://us.archive.ubuntu.com quantal-backports/universe Translation-en_US
Fetched 1,032 kB in 30s (33.7 kB/s)
W: Failed to fetch http://repository.condor.tv/dists/lucid/main/binary-amd64/Packages  404  Not Found

E: Some index files failed to download. They have been ignored, or old ones used instead.
You can ignore this error and continue installing the 32 bit version.
The game should now run, but to use the pre-alpha, you have to replace the 'battle' binary with mine:
- rm -f battle && wget http://blog.cppse.nl/battle && chmod +x battle
- Edit: you may need to: apt-get install libsdl-net1.2
Server usage
You can start your server with these parameters:
Battle.exe -s
Example: Battle.exe -s

Battle.exe -s <listen port>
Example: Battle.exe -s 1100

Battle.exe -s <levelname> <listen port>
Example: Battle.exe -s "TRAINING DOJO" 1100
In case no level is given as a parameter, the server will start with level selector. In case no port is given, default will be used (1100).
Client usage
To connect to a client, you need to have registered the .reg file. You can click links like:
smashbattle://<domain.tld>:<port>
Example: smashbattle://cppse.nl:1100
You could type such an url in your WINDOWS+R (Run command) or in command prompt start <url>.
If you do not like to register the .reg file, you can also give it to Battle.exe as a parameter:
Battle.exe <url>
Example: Battle.exe smashbattle://cppse.nl:1100
After you have set a server on your machine, you should be able to connect using ---> smashbattle://localhost:1100
The level names are
"TRAINING DOJO"
"PLATFORM ALLEY"
"PITTFALL"
"DUCK'N'HUNT"
"COMMON GROUNDS"
"POGOSTICK"
"LA MOUSTACHE"
"THE FUNNEL"
"BLAST BOWL"
"PIT OF DEATH"
"RABBIT HOLE"
"STAY HIGH"
"PIE PIT"
"SLIP'N'SLIDE"
"BOULDERDASH"
"SNOW FIGHT"
In game controls
- F1 - toggle console (for debugging)
- F10 - toggle fullscreen
- F11 - toggle FPS
- ESCAPE - pause menu
Default your keyboard controls are
- a, s, d, w - left, duck, right, jump.
- CONTROL - shoot
- ALT - mine
- SHIFT - run
Roadmap
Link gameloop to timeCreate client and server classDesign efficient protocolCreate solution for lag- Introduce nicknames
- Introduce ingame chat
Support powerups- Introduce more gametypes?
- Red team vs Blue team
- King of the Hill
- Capture the flag
- Refactor*
- Merge with master
Refactoring:
While developing I sometimes put #include's above the function where I use stuff from it. This is when I feel like I might refactor the code, I can easily remove the #include again. Works for me, but it results in some stray #include's. Also I'm not sure about my design choice of making server and client singleton's (basically global classes). It was easy so I could weave the client/server code into the game rapidly, but I think it may need to integrate with the existing classes better, and use polymorphism a bit more here and there. Example: I have a few places in the code where I do different stuff based on Main::runmode static global, for server do this, for client do this..

Select behaviour in address bar in Linux
I use control + arrow keys and control + shift + arrow keys for selecting a lot.
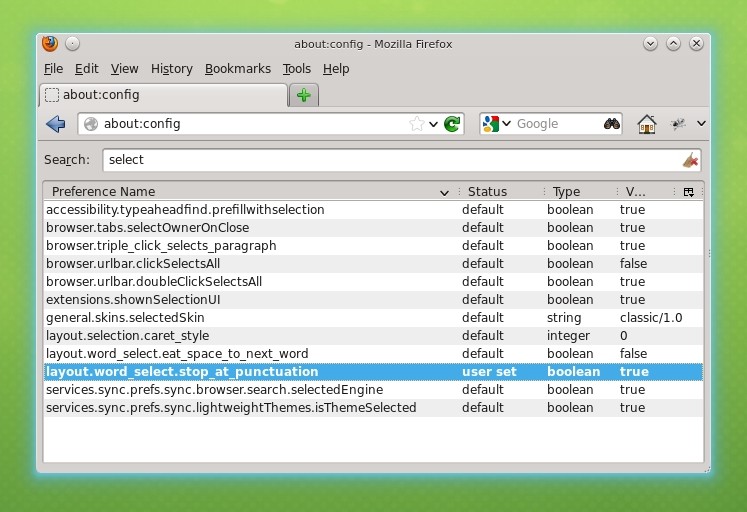
And as a webdeveloper especially in the address bar. I think it is somehow the default under linux distributions, under OpenSuse anyways, that always all text is selected. I find that very VERY annoying. Because you cannot quickly select (a) piece(es) from the URL. But luckily I found the config setting where you can change this! ")
Enable H264 support in Windows
In about:config, enable the value media.windows-media-foundation.enabled. Especially useful if you disable Flash. A lot of video players use a HTML5 player as fallback support only the H264 codec.
I have an unfinished project with--in general--some really horrible sourcecode, but with some cool functions and solutions I came up with as well. One thing I needed for example was to calculate latitude and longitude coordinates from X and Y positions on a google maps canvas, taking zoom level into account. I could not find these conversion functions (around august 2011 anyway).
[Edit, now since May 21, 2015 Google Maps Api V3 was released, which makes it possible with the Google API. I also found an example gist here]
Aligning markers to a grid
The reason I needed these convertion functions in the first place was for creating an align feature for (custom) markers on a google maps canvas. This is how it works before/after aligning:
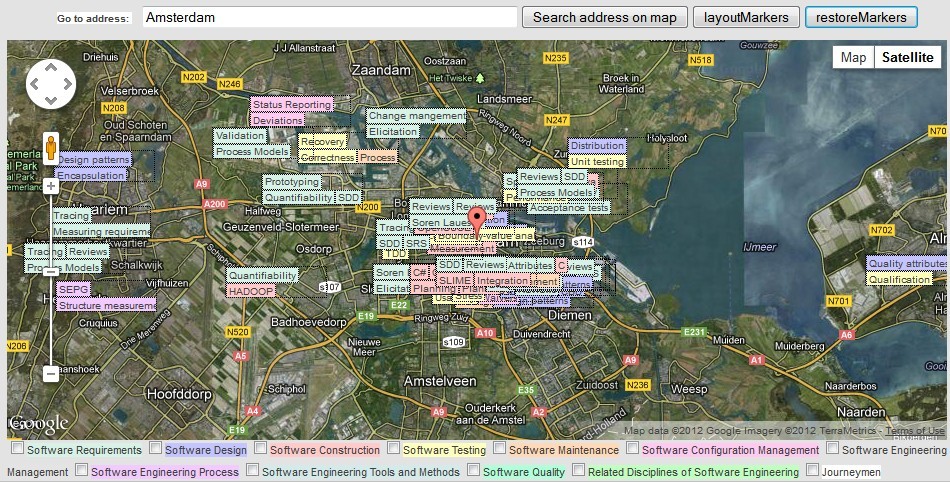

The (very simple) algorithm I came up with divides the map in slots. A grid with a width of 100 for example, only positions markers on 100, 200, 300, 400 pixels. In this example, the 'nearest' slot's width of a marker at position 220,50 pixels wouuld be 200.
The algorithm in pseudocode:
INITIALIZE GRID HEIGHT AND WIDTH ACCORDING TO MAP'S ZOOMLEVEL
    /* gridwidth = 100 << (21 - map.getZoom()) */
    /* gridheight = 30 << (21 - map.getZoom()) */

FOREACH MARKER

    CONVERT MARKER LAT,LON TO X,Y COORDINATES
        /* y = latToY(marker.getPosition().lat()); */
        /* x = lonToX(marker.getPosition().lng()); */

    CONVERT X,Y TO NEAREST SLOT X,Y
        /* slot_y = Math.round(y - (y % gridheight)) */
        /* slot_x = Math.round(x - (x % gridwidth)) */

    SET MARKER X,Y TO SLOT X,Y

    WHILE SLOT POSITION IS OCCUPIED BY ANOTHER MARKER

        MOVE TO NEXT SLOT POSITION
            /* Next slot position is according to a simple spiral movement [1] */

        SET MARKER X,Y TO SLOT X,Y

    ENDWHILE

    CONVERT MARKER X,Y TO LAT,LON
        /* marker.setPosition(new google.maps.LatLng(lat, lon)); */
        /* marker.setPosition(new google.maps.LatLng(lat, log)); */

    STORE SOMEWHERE THAT MARKER IS IN THIS SLOT POSITION

ENDFOREACH
[1]: The search for next slot position is according to this pattern:
up, right, down, down, left, left, up, up, up, right, right, right, etc.
- The change of direction is continious (a spiral): {up, right, down, left, ..}
- The number of 'steps' in each direction is {1, 1, 2, 2, .... n, n}
latToX() and lonToY()
I'm not an expert in math but I was able to find some expressions online that resolved lat+lon for x+y (the other way around). I simply replaced all the constants with their values and put them in a solver to solve them for the variables I was interested in (e.g. longitude for XtoLon). I probably have the sites bookmarked somewhere but I can't find them.
var glOffset = 268435456;
var glRadius = 85445659.4471;// offset / pi

function lonToX(lon)
{
    var p = Math.PI / 180;
    var b = glRadius * lon;
    var c = b * p;
    return Math.round(glOffset + c);
}

function XtoLon(x)
{
    return -180 + 0.0000006705522537 * x;
}

function latToY(lat)
{
    return Math.round(glOffset - glRadius *
            Math.log((1 + Math.sin(lat * Math.PI / 180)) /
                (1 - Math.sin(lat * Math.PI / 180))) / 2);
}

function YtoLat(y)
{
    var e = 2.7182818284590452353602875;
    var a = 268435456;
    var b = 85445659.4471;
    var c = 0.017453292519943;

    return Math.asin(Math.pow(e,(2*a/b-2*y/b))/(Math.pow(e,(2*a/b-2*y/b))+1)-1/(Math.pow(e,(2*a/b-2*y/b))+1))/c;
}
They are not pretty but I like them because they work really well
Edit 10-AUG-2015: deltaLonPerDeltaX(), deltaLatPerDeltaY()
I found out somebody on Stackoverflow elaborated my functions with a deltaLonPerDeltaX() and deltaLatPerDeltaY(). The original poster's image is no longer available, so I'm not sure if I understand the question correctly, and therefore these additional functions. But there is a nice extra info cited from Google, which I will copy here:
At zoom level 1, the map consists of 4 256x256 pixels tiles, resulting in a pixel space from 512x512. At zoom level 19, each x and y pixel on the map can be referenced using a value between 0 and 256 * 2^19(See [https://developers.google.com/maps/documentation/javascript/maptypes?hl=en#MapCoordinates][https://developers.google.com/maps/documentation/javascript/maptypes?hl=en#MapCoordinates])
Just one thing that was annoying me for a long while, and how I fixed it. I tend to switch back and forth between insert and command mode in vim. And somehow PhpStorm with IdeaVim plugin enabled felt non-responsive. I press escape, start hitting :wq, and I have :wq in my code.
I got accustomed hitting Escape twice, and later even three times, by default so that I was more certain I was out of insert mode. I also tried Control+C, and Control+[, but they have the same problem.
I know the 'problem' always occured when i.e. PhpStorm started rendering an Intellisense popup: press '.' somewhere, in a large file it may take a few moments before that popup appears (maybe due to parsing etc.), so you don't see it. Assuming you are now in command mode, the escape press was actually consumed by the popup. Then of course you do escape to command, and try to undo, but it undo's a lot more than the chars you now accidentally sprayed in the code (also not exactly the same behaviour as Vim, but alas :D)
Fix
Right mouse click -> Remove Escape:
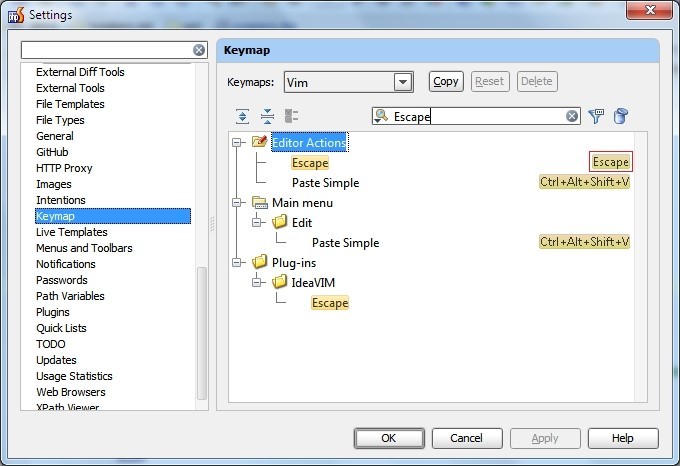
Go to Plug-ins -> IdeaVIM ->
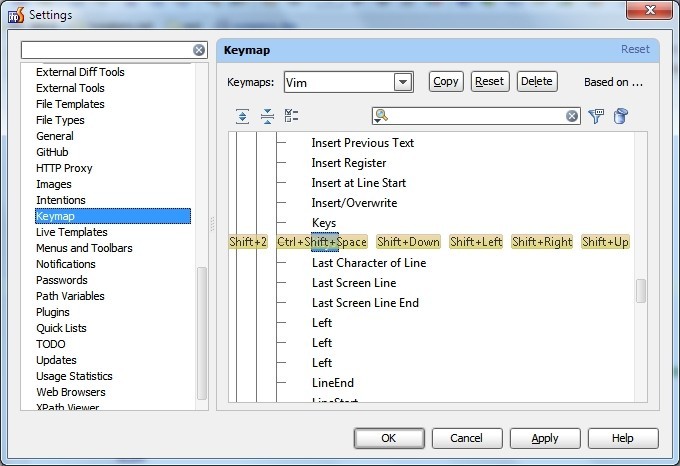
Find the row with all the keybindings on it.. right click on it -> Add Keyboard Shortcut
Hit escape, save that. -> Apply -> Ok.
Annnnnd you're done!
I posted this in a comment here, a long while ago. I forgot about it but yesterday someone posted in the same topic, and therefore I received an e-mail.
As my comment somehow isn't visible on the blog (maybe it was never moderated?) i'll post it here. I was using it in a non-unicode project myself, so I encountered the same problem. According to the mail I recvd this is what I wrote:
Nice fixes.

How I get the sourcecode to work in my unicode program however, without modifying the source is as follows.

Simply don't compile the file all_in_one.cpp (or all ibpp/core/*.cpp files individually) with the defines/"preprocessor definitions" _UNICODE and UNICODE enabled.

I didn't look at the Flamerobin source, but my guess is that they do the same.
Posted by rayburgemeestre to Untouched at 6:05 PM
IBPP in a Qt Creator project
Add the following in your .pro file:
DEFINES += IBPP_WINDOWS=value
LIBS += Advapi32.lib
the lib is for fixing
all_in_one.obj : error LNK2019: unresolved external symbol __imp__RegCloseKey@4 referenced in function "public: struct ibpp_internals::GDS * __thiscall ibpp_internals::GDS::Call(void)" (?Call@GDS@ibpp_internals@@QAEPAU12@XZ)
all_in_one.obj : error LNK2019: unresolved external symbol __imp__RegOpenKeyExA@20 referenced in function "public: struct ibpp_internals::GDS * __thiscall ibpp_internals::GDS::Call(void)" (?Call@GDS@ibpp_internals@@QAEPAU12@XZ)
all_in_one.obj : error LNK2019: unresolved external symbol __imp__RegQueryValueExA@24 referenced in function "public: struct ibpp_internals::GDS * __thiscall ibpp_internals::GDS::Call(void)" (?Call@GDS@ibpp_internals@@QAEPAU12@XZ)
Also added the following two #undefs to all_in_one.cpp.
#undef _UNICODE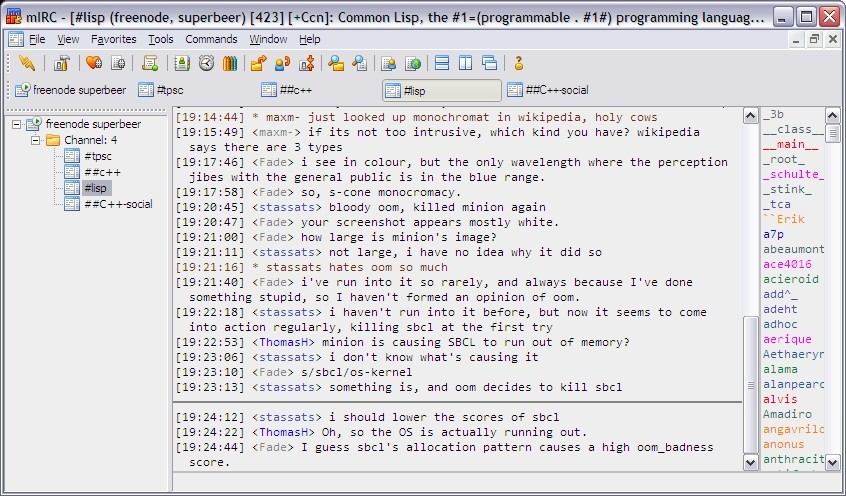
#undef UNICODEI find it pleasant to have nicknames coloured in busy channels, that's why I made this. It simply generates colours by hashing the nicknames. This ensures that a given nickname will always be the same colour.
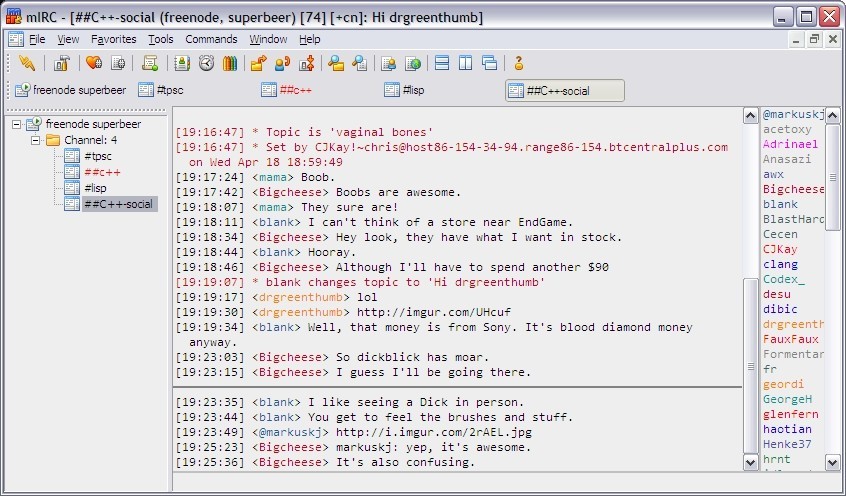
The script
;;;
;;; Lazy nickname coloring script
;;;
;;; Color all nicknames automatically by calculating a numeric hash over the nickname.
;;; The calculated number is used to pick a (space delimited) color from the %colors variable
;;;  (set in "on START" event).
;;; Colors are made configurable because yellow on white is annoying, and you may want to use
;;;  black or white depending on your background color.
;;;

;; Initialize

on 1:START: {
  .initialize_coloring
}

alias initialize_coloring {
  ; use the following colors only
  .set %colors 1 2 3 4 5 6 7 9 10 11 12 13 14 15

  ; reset all entries in the clist
  while ($cnick(1)) {
    .uncolor_nick $cnick(1)
  }
}

;; Events

; Parse the /names <channel> response(s)
raw 353:*: {
  var %names = $4-
  var %i = 1
  var %n = $gettok(%names,0,32)
  while (%i <= %n) {
    var %current_nick = $gettok(%names,%i,32)
    var %firstchar = $mid(%current_nick, 1, 1)
    while (%firstchar isin @+%) {

      %current_nick = $mid(%current_nick, 2)
      %firstchar = $mid(%current_nick, 1, 1)
    }
    .color_nick %current_nick

    inc %i
  }
}

; Handle nick changes/joins/quits
on 1:NICK: {
  .uncolor_nick $nick
  .color_nick $newnick
}

on 1:JOIN:*: {
  .color_nick $nick
}

on 1:QUIT: {
  .uncolor_nick $nick
}

;; Helper functions

; usage: color_nick <nickname>
alias color_nick {
  if (!%colors) {
    .initialize_coloring
  }
  var %colors_idx = $calc($hash($1, 16) % $numtok(%colors, 32)) + 1
  var %nick_color = $gettok(%colors, %colors_idx, 32)
  .cnick $1 %nick_color
}

; usage: uncolor_nick <nickname>
alias uncolor_nick {
  .cnick -r $1
}
Copy & paste it in your remote (open with alt + r).
You may need to enable nicklist colouring in general. Use alt + b, Nick colors, choose "Enable".
Update!!!
Note that I have a new version of this available, see this blogpost.. It also provides a script that makes nicks marked as away light-grey!
The following image was rendered by another process
Motivation for using separate processes for rendering is if you wish to have multiple threads rendering. I do a lot of set blending type, put pixels, set blender type again, more pixels, etc. If I use async() to render multiple images at once these function calls might interfere as race conditions.

Probably a noobish moment, but I never realized the "stack" was this limited. I tried declaring something like
struct structw800h600
{
    ...
    Pixels pixels[800 * 600].
};

message_queue mq (create_only, "pixels",
    1, //max message number
    sizeof(structw800h600)); //max message size

structw800h600 img;
memset(&img, 0x00, sizeof(structw800h600));
This code caused an exception while constructing the object that declared an instance of the struct on the stack:
Unhandled exception at 0x003E5017 in Starcry.exe: 0xC00000FD: Stack overflow (parameters: 0x00000000, 0x00702000).Shows break here in chkstk.asm (because I am in debug mode):
[...]
; Find next lower page and probe
cs20:
        sub     eax, _PAGESIZE_         ; decrease by PAGESIZE
        test    dword ptr [eax],eax     ; probe page. <<<<<<<<<<<<<<<<<<<< here
        jmp     short cs10

_chkstk endp

        end
I did not find out the exact threshold but the the crash occured when the size of the struct was above ~1024972 bytes or ~1000 kB. (Size of each pixel object is 16 byte). If I understand it correctly the stack is only several MB so I was simply storing too much data on it.
Still posting this because I almost jumped to the false conclusion that it was a windows platform shared memory limitation.
Simply allocate the Pixel objects from the free-store and send that through the message queue. Something like:
Pixel *pixels = new Pixel[800 * 600];
I have posted on using allegro 4 with wxWidgets before. Allegro 5 is more easy.
Just the stuff I encountered and how to fix
Fix main conflict
#define ALLEGRO_USE_CONSOLE 1

Avoids the following error.

1>MSVCRTD.lib(crtexe.obj) : error LNK2019: unresolved external symbol _main referenced in function ___tmainCRTStartup

#define ALLEGRO_USE_CONSOLE 1

#include <allegro5/allegro.h>
#include <allegro5/allegro_image.h>
#include <allegro5/allegro_primitives.h>
#include <allegro5/allegro_font.h>
#include <allegro5/allegro_ttf.h>
Draw ALLEGRO_BITMAP on static canvas
Note that there is no equivalent of Allegro 4's draw_to_hdc() function. With a little grepping in the source code I found out that (for windows anyway) you have functions that do the same in C:\allegro5\src\win\wmcursor.c
Just borrow local_draw_to_hdc from there and use it in the paint event.
staticbitmap->Connect(wxID_STATIC, wxEVT_PAINT, wxPaintEventHandler(SharedMemoryTest::OnPaint), NULL, this);

void SharedMemoryTest::OnPaint( wxPaintEvent& event )
{
    wxPaintDC dc(wxDynamicCast(event.GetEventObject(), wxWindow));
    WXHDC wxHDC = wxPaintDC::FindDCInCache((wxWindow*) event.GetEventObject());
    HDC hDC = (HDC) wxHDC;

    local_draw_to_hdc(hDC, bmp, 0, 0);
}
Settings for Tide graph Casio G-Shock GLX 150
Deploying owncloud via Helm on Kubernetes
How to print an endlessly folding card
i3 floating point window resize percentage wise and centered
My visit to Meeting C++ 2016!
Kerberizing Cloudera Manager
How to screen capture in Windows 10 with HiDPI support
Profiling and visualizing with GNU strace
How to "inspect element" XUL applications
How to debug XUL applications
Circlix Clock
Improve performance Jetbrains IDE when working on remote machine
Enable fsnotifier for Jetbrains IDE's like PyCharm over NFS/SSHFS network share
Nagios 4 + Nagvis + Nagiosgraph + Nagios plugins Dockerfile / Docker image
Qt Applications in Browser
Tweak Battle....
Example rendered video
Zend server And the Return of the Oracle Instant Client
Visualize Issue Ranks in Atlassian Jira Agile board
PhpStorm or IntelliJ suddenly hangs / freezes / keyboard not responsive/ unresponsive while editing in Linux / Ubuntu
Deflate and Gzip compress and decompress functions
Optimizing your website for performance
Lame PHP Parser, visualization and how cool hhvm is!
PHP Benelux 2014
Use cache in http proxy for debugging in webdevelopment
Install NVIDIA proprietary drivers in Ubuntu 13.10 or Linux mint 15/16
Free HTTP proxy for debugging purposes with GUI
Away- nicknames coloring in nicklist mIRC
Visual studio shortcut keys / settings
Raspberry pi camera streaming with crtmpserver test
Video streaming from code with SFML and ffmpeg
![nl][] Dutch PHP Conference 2013
![nl][] Tweakers fotoalbum images uploader
sanitizer - a shortcut key app with explorer integration
benchmarklib: a small benchmarking library
![nl][] watermarker tool
Fixing slow phpmyadmin by rewriting queries using mysql-proxy
ksh "pushd .", "popd" and "dirs" commands
Generating gradients
spf13 vim distribution
phpfolding.vim : Automatic folding of PHP functions, classes,.. (also folds related PhpDoc)
Visualizing (inverse) square root optimizations
Configure highlight weechat in screen and putty
Meta log monitor (or scriptable tail with GUI)
Firefox select behaviour and H264 support
Cool way to provide multiple iterators for your class (C++)
X, Y to Latitude + Longitude functions for (google) maps
PhpStorm and Ideavim {Escape,C-c,C-[} responsiveness
Tweakers logo test
Firebird IBPP use in non-unicode project
Automatic nickname in channel and nicklist colouring in mIRC
Allegro 5 separate process for rendering
Allegro 5 and wxWidgets example
Proxy securely through ANY corporate proxy/firewall
GNU Screen Navigator V2
Some CGI "tips"
Inline printf compatible with char *
Render on top of mplayer using custom window
Starcry rendered videos
Behaviours engine
DialogBlocks Howto
Compiling with DialogBlocks
Git, github, Mercurial, bitbucket
SuperMouser - mouseless navigation
Collection of wallpapers
BASE64 COMMANDLINE
Singleton notepad.exe
Starcry rendered frame images
GNU Screen Navigator
PHP debugging in practice!
Photoshop blenders for allegro
Launch of yet another blog ii
Common Lisp wallpaper
Improving the outline for the Adornment of the Middle Way
Using allegro with wxWidgets
Launch of yet another blog
Motion blur
Functional programming
Enable wake-on-lan on Linux Debian (4.0)

Topics:
Other interests:
EBPF Flamegraphs C++ Ubuntu 20.04
Site generated using ![]() ArticleManager © 2010-2013
ArticleManager © 2010-2013